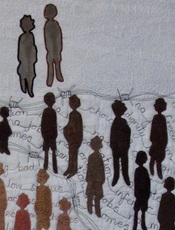
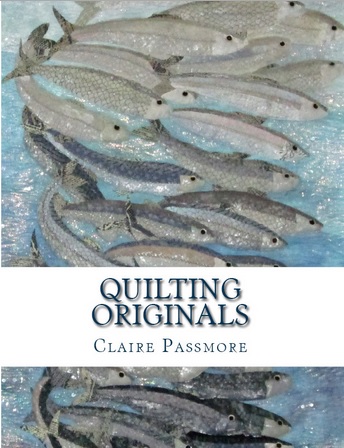
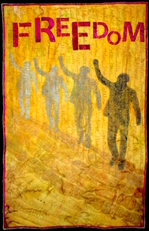
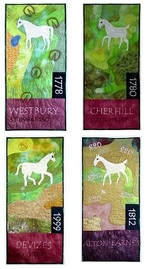
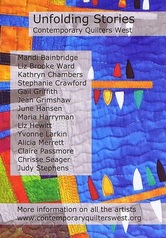
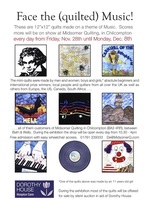
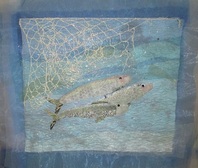
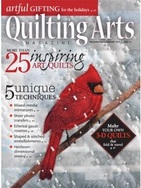
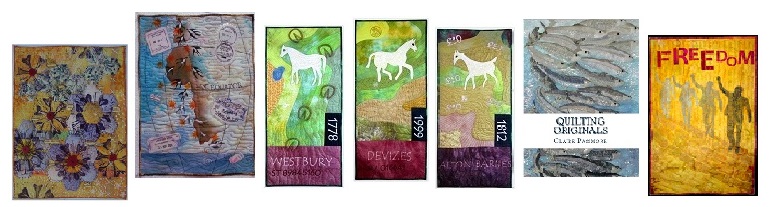
2014...... it seems to have passed by in a flash. Such a lot has happened this year, so perhaps that is why the time has flown. Now I look back I can see why. I started this website and blog, joined the British Quilter's Guild and the Contemporary Quilt West Group, finished writing my book, had my quilt 'Forced Removal' accepted and hung the Festival of Quilts, hung 3 quilts at the 'Unfolding Stories' exhibition, West Barn, Bradford on Avon alongside other members of the CQ West group, had 2 small quilts published in Quilting Arts magazine, started and finished a new series based on the White Horses of Wiltshire, completed my first large-scale private commission, hung several quilts at an exhibition in France and another 2 at Radstock Museum, UK and agreed to my first solo UK exhibition to be held at Midsomer Quilting in May 2015. Now I have written it all down I can see why the book has taken so long to complete! I also wish to take a moment to say 'thank you' to all the people who visit my website and blog, and for all the support and encouragement you give me. I hope you also had a good 2014, and that 2015 brings you happiness and good health. My 2014 in pictures................ click on the picture if you feel like reading a little more.
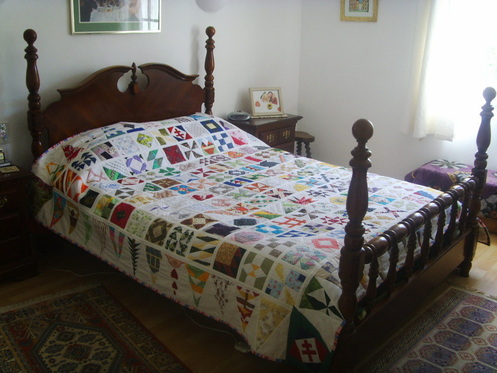
 Thank you for reading. Best wishes for 2015.
In my research for this quilt I have discovered the rich tradition of beautiful hand embroidery created by Russian women over the centuries. I am particularly interested in the long embroidered ritual cloths known as Rushnyky (pronounced roosh-nee-key and written as рушник in Cyrillic charaters), which have an important role in Orthodox Christian practices, particularly the highly decorated type known as nabozhnyk, which are trimmed with lace and are heavily embroidered. Photographs courtesy of Лобачев Владимир; Commons Wikimedia There are many different types of these cloths - ranging from very plain to highly decorated and there is an excellent website, http://www.ukrainianmuseumdetroit.org/textiles/rushnyky.html which gives a lot of detail about the cultural and spiritual importance of these beautiful cloths. I am presently exploring ideas for my quilt using patchwork and hand carved stamps to create a decorated cloth which will be the foundation of my quilt. My first thoughts are to create a piece of cloth that I can stitch into later. Instead of stitching red thread to create the initial pattern (as on the rushnyky), I thought I would try to stamp red squares onto the fabric, in the same way cross stitch can create pattern. I looked at lots of Rushnyk cloths and identified some of the recurring patterns. Each region has its own traditional patterns, but I am not yet familiar enough with the regions or the patterns to know whether I am combining them appropriately. I have sketched some ideas into my sketchbook and carved some very small pieces of lino with a few of the more simple patterns. These lino squares measure 2cm (just over 3/4 of an inch), so a lot of detail was out of the question. I have mounted them onto pieces of dowel to make them easier to manage. I have been busy testing out the blocks on white cotton fabric with screen printing ink. The ink has a soft, buttery consistency, and dries quite quickly, but not so quickly as the ink dries on the block. It also leaves the fabric with a very soft hand. Keeping everything clean and stopping messy fingers is a challenge though! I am feeling very positive about how this has gone so far - I have lots of ideas that are beginning to come together for the quilt, but I still have a lot more exploring to do. I will post more when I have developed my ideas further. In the meantime I would love to hear how you develop your ideas for your quilts. Why not post a message in the comment section for other visitors to read? If you have a website or blog you can direct us there too. Thanks for reading!
Hi there Someone asked me a question yesterday that I find almost impossible to answer. It went a bit like this.... 'So, Claire, what do you love most about what you do? ' 'I love it all' is the truthful answer - but that wasn't enough for the person who asked. They wanted more detail! So I started to think, and that led to this....
My sketchbooks are where most of my development takes place. Here are a few snippets from some of my books.
What do you love about quilting? Please do leave a message if you wish, maybe with a link to your work - it would be great to see what you love too.
Thanks for visiting Claire ![]() Hello again! Here we go with some more tips on how to take the stress out of free motion quilting. This Doodle tree was stitched directly onto white fabric without tracing or drawing beforehand. Just like a real doodle. It started as a warm up piece when I was quilting the Doodle Birds and ended up as a tree full of patterns. I fused on a few pieces of green fabric cut in tiny leaf shapes and used Inktense pencils to draw on some pears and added a little bird. I turned it into a cushion for my friend. Waste not want not! So, now your machine is clean and you have a few squares to practise on, here are a few more things to try out. ![]() get yourself comfortable.... Get yourself comfortable and well positioned. I think this is the most important part of preparing to be successful with free motion quilting. Unless you get this right you will strain your back and neck, end up tense and tired and your quilting will suffer.
TROUBLESHOOTING Stitches too long The speed is too slow, and / or you are moving the fabric too much between stitches. Speed up the machine a little. Stitches too tiny or on top of each other The speed is too fast and you are not moving the fabric quickly enough to keep up. Slow the machine down a little. Thread shredding or breaking Is the machine still threaded properly? Sometimes the thread can jump out of its guides. This can happen in the bobbin too. Is there dust or an odd piece of thread in the works causing problems? Rethread the machine and try again. Not that? Take a look at the spool/reel of thread. Has it wound itself around the supporting pin or has it got in a tangle? If it has, try putting another empty spool underneath it so that the supporting pin is not sticking up above the spool. Nor that. OK, check the bobbin. Has it been wound evenly? Are there any bumps or nicks in the bobbin that are catching the thread? Is there fluff or loose threads in the bobbin area? Try rewinding the bobbin, rethread and try again. Not that either. Hmmm. Then take a look at how the thread has been wound onto the spool in the first place. Is the thread criss crossed or is it smooth and straight? The way the thread unwinds from the spool can cause tangles or tension issues if it does not come off smoothly. As a rule cross wound threads like the green spool below are best placed on a horizontal spool pin on your machine or on a thread stand. Stacked threads like the multi-coloured thread below are best placed on a vertical spool pin. Make sure your thread is happy! Not that either? There are still a few things to check. Is your needle inserted into the machine correctly? Sometimes they come loose or slip down. Undo the screw and take a look at the needle. Is it old, bent, blunt, sticky with glue or does it have a little burr? (To find a burr rub a cotton wool ball down the shaft of the needle to the tip.Clinging fibres may indicate a burr) If the thread cannot pass through the eye of the needle completely smoothly it will cause friction and shred or break the thread. Change the needle if you think this may be the problem. If it seems fine then refit the needle making sure it is snugly in place. Still stuck? Were you stitching really fast? Sometimes the heat generated from stitching very fast can cause the thread to weaken. Rethread and try again, but stitch a little more slowly. OK, I am running out of ideas now....................... try a different thread. Maybe this spool is just old or brittle or just downright rubbish. My last idea..... Switch off the machine. Go and have a coffee. I don't know why, but sometimes it works! Tension issues If you find you have loops or a bird's nest of thread as you stitch you may need to adjust the tension slightly on your machine. BUT - before you go twiddling, check a few things..... When was the last time you cleaned your machine? Take a small soft paintbrush, unplug your machine from the electricity supply and poke about gently in the bobbin area and remove any fluff and threads you find. You might be surprised how much you find! Is the machine correctly threaded? Lift the foot and remove the thread completely. Give it a quick check to make sure it is smooth and has not begun to fray. Carefully rethread the machine with the foot in the UP position (this makes sure the tension discs are open inside the machine). Double check you have the thread coming off the spool in the correct direction - check your handbook. For years I found I was sewing with the thread the wrong way around on one of my machines! Take out the bobbin and check you have that in correctly too. Replace the bobbin, checking it is also travelling in the right direction. Check the needle is not damaged - even a tiny burr can make a huge difference. Once you have eliminated all these issues, try again and see if your stitches are now forming nicely. If not, adjust the tension slightly and see whether that sorts it out, however, in my experience I almost never have to alter the tension - fluff or bad threading is usually the culprit. I hope these tips help you to get started with free motion quilting - it really isn't as difficult as it seems. With a little practise and the right preparation you will be quilting beautiful designs.
![]() This small panel is a 12 inch square that has been created solely with thread and paint. I made it using lots of different free motion quilting patterns and black thread. This is how the square looked before I painted it. The black lines are stitches. I first drew the outline shape of the bird onto paper, then traced this onto a piece of white cotton fabric with a water soluble marking pen. Using this as the quilt top, I made a traditional quilt sandwich by placing a piece of batting behind the top layer and another piece of cotton fabric on the back. I then put black thread onto my machine and in the bobbin, dropped the feed dogs and free motion quilted as many different patterns as I could think of inside the bird shape; and this is how it turned out. Once it was finished I painted it with fabric paints - like a picture from a child's colouring book. Like most things in life, when you begin to learn something it can see difficult, too difficult to master. I remember when I first started learning to drive. There was so much to do all at once and I thought I would never master it. Fortunately, free motion quilting is like a walk in the park when compared to learning to drive! If you take things slowly, plan your work, prepare your machine and practise, you will soon be free motion quilting your own quilts, instead of paying someone else to do it for you. So, here are my top tips to getting started.... first things first... Like most things in life, a little preparation goes a long way. Before you even sit in front of your machine there are a few things you can do to make sure you give yourself the best chance to succeed. 1. To begin with, choose a simple design. Something with gentle curves to help you build a nice rhythm and gain confidence. Here are a few very simple suggestions. ![]() 2. Practise drawing your design on a piece of paper or a wipe off board, lots. You are aiming to get your hand movements smooth, flowing gently as you draw. What you are actually doing is teaching your brain the pattern, so keep on practising until you feel you have really got the pattern into your head. 3. Prepare some small squares of fabric that are ready to be quilted. Choose an inexpensive fabric (old sheets are useful; they don't have to be 100" cotton), and cut up lots of small squares. I use squares roughly 6" in size and find this is enough to practise with. If you want them to be a little larger then that is fine. I keep a small basket of them next to my sewing machine so that I can quickly try out a design or warm up before I quilt the real thing. ![]() This is one of the small squares from my collection - I have hundreds of them! Now the squares sit in a folder and have turned into a great resource for when I want to see how a quilting design might look on part of a quilt. I just get out the squares and place them onto the un-quilted top and I can immediately see if the design might work or not. The nice thing about building up a resource like this is that I have learned and perfected a new skill along the way. When I first started out my quilting lines were not smooth or regular, and I moved the fabric about in a jerky fashion. Little by little, as I practised on these squares I became more confident and less tense until I arrived at the stage where I could quilt pretty much anything I wanted. 4. One further thing to do in preparation - when was the last time you cleaned your machine? If you do this regularly, then I expect you probably don't suffer from many problems with your stitching. It never ceases to amaze me how much fluff and how many stray bits of thread end up down in the bobbin zone. At least a few times a week I unplug my machine and remove the whole bobbin mechanism to give it a good clean out. I use a small soft paintbrush to remove those stubborn bits from deep inside the machine. Look in the handbook that came with your machine if you are uncertain how to get access to this area. Usually, if my machine starts to miss stitches or stop running smoothly this is the main culprit, and a quick swish with the paintbrush usually does the trick! In my next blog post I will outline my tips for getting great results, and things to try should you still find problems. So, if you have some spare cheap fabric, why not make up a few squares to practise on. I promise you, you will begin to love Free motion quilting like my friend!
|
|