Turning an idea into a quiltOne of the things I get asked most frequently is 'Where do you get your ideas?' Fortunately the answer to that is reasonably straight forward. I keep my eyes and ears open and try to notice things that are going on around me. I try to notice things that strike me as interesting, annoying, pretty, ugly, shocking ... and then record them in some way. Mostly I take a quick photo, but sometimes I make a quick scribbled drawing or write something to remind me on whatever piece of paper I have to hand. That is the easy bit! The other question I get asked is 'How do you turn your ideas into quilts?' For me this is a much more interesting question. When I see other people's work I almost always wonder how they took their original idea (often this is explained in their artists statement) and then transformed it into a unique quilt. That is the magic that I want to be able to understand - because if I can get a handle on that, maybe I will be able to make better quilts. So, since I have started to share the progress of this quilt with you I thought I would share my 'how'. This is the process I went through to come up with this quilt design. You might be aware that I published a book about this very topic back last year (you can find details of it here) and in it I explained the use of a toolkit I created to help with the process. The original idea: The idea for this quilt came from a conversation I overheard on a train between two girls as they were browsing through their magazines. I think they were sisters as they seemed to have that love/hate thing going on. The older of the two girls was clearly in the mood to put the other in her place and came out with this charming piece of advice. At first I thought she was being particularly venomous, but upon reflection I think it was a sound piece of advice. This is what she said;
"Go easy on the makeup; you aren't as ugly as you think."
Starting the design: I didn't really need a reminder of this quote, as I spent the rest of the train trip pondering what she had said. When I got off the train I started to notice how much makeup some girls/ women do actually wear - and some of it really was quite shocking! Extra long lashes are definitely 'in' as is something I have discovered Kim Kardashian has made famous, called 'contour makeup'. Click here if you have 7 minutes to waste. Done well it can make a positive difference. Done badly it just looks like - well you decide! Clickhere to see!!! However, when I got home, just to, make sure I didn't forget, I jotted it down in my sketchbook and left it at that for a while. Every now and again I added a few thoughts to the page, scribbled a few images that came to mind and wrote a few words related to the whole makeup thing. The main idea I decided to focus on is that although we think of makeup as somehow making us more beautiful, what it actually does is create a veil to hide behind. And that sparked off a whole new set of ideas about veils and one of my favourite fabrics - organza! So, as usual, my sketchbook was the starting place for turning my thoughts into pictures. I must emphasize that this is what works for me. If you want to give it a try, why not? What have you got to lose? However, if it doesn't work for you, don't lose any sleep over it! (It will give you wrinkles.) Although they are not in my sketchbook, I also looked through a few copies of 'Hello' magazine whilst at the dentist - and got some great ideas for how makeup can go horribly wrong. I also looked up some images of typical '70's makeup in the Mary Quant style on the internet - you can see them here.
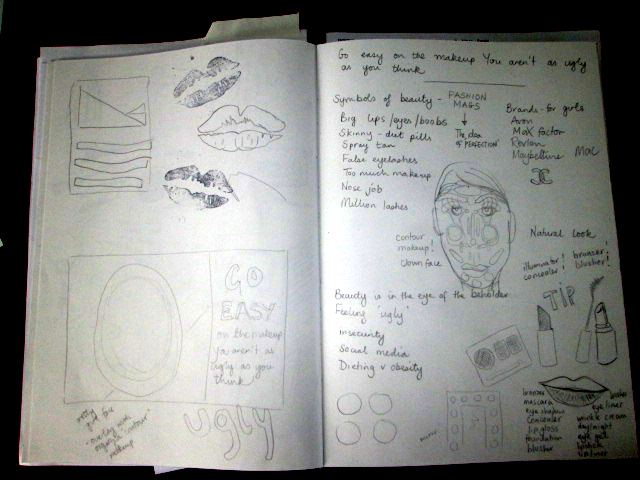
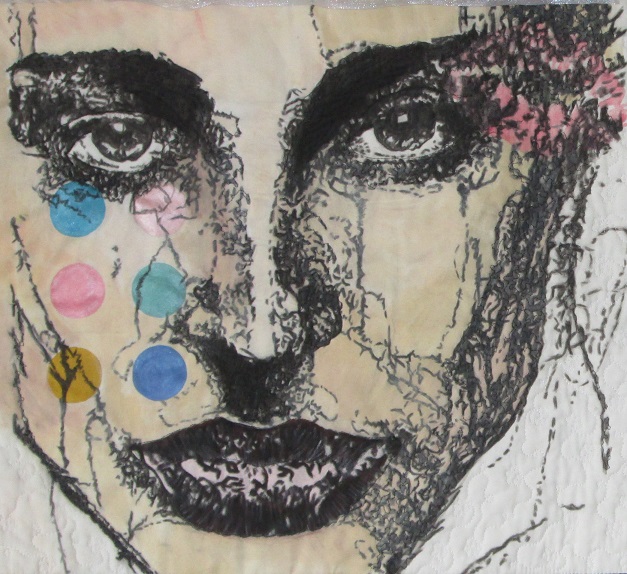
 Refining the ideas with the toolkit: With all these ideas buzzing around in my head the next stage was to start to refine my thoughts to get a better idea of what I wanted to include in the quilt. This is the stage where I like to take a more structured approach and pin myself down a little more. What I need to think of next are the lines, shapes, colours and textures I want to use on the surface of the fabric. That is where my toolkit comes in. Below is an example of how I might go about this next stage.
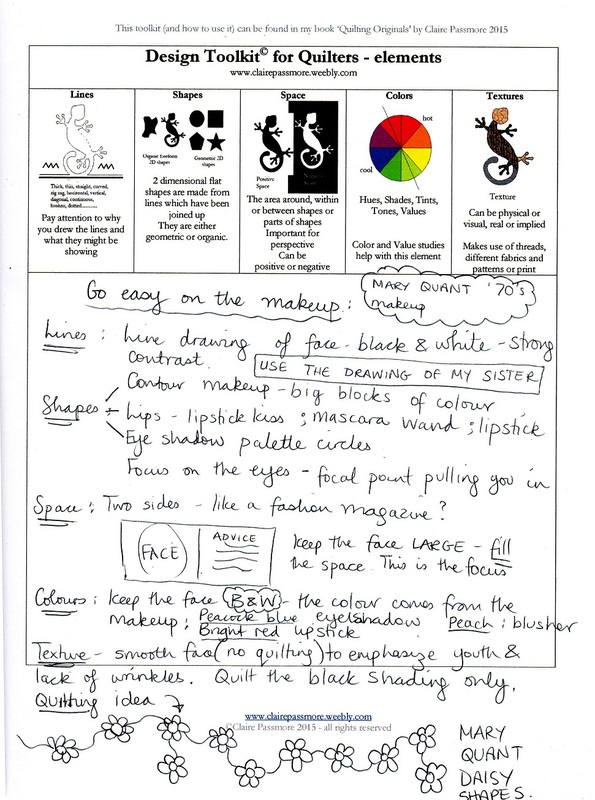
 To keep things short and simple I have only given you a general idea of what I would think about at this stage. The design elements I want to incorporate in the quilt are identified in the 'elements' part of the toolkit above. Now, at least, I have some concrete ideas to start playing with. And playing is what I do next. In my book I explain in detail how I use my design toolkit using four of my quilts from my 'Destination Series' as examples.
I will add more to this post over the next few weeks, explaining further how I developed the quilt and showing you how it finally turns out.
Thanks for reading.
So, you can imagine how pleased I was when I found these little green fruits in the park. Immediately I remembered the 'black hand' incident and decided to make some walnut ink to use in a quilt. (Did you know... technically walnuts aren't nuts at all, and neither are almonds or pistachios for that matter. In fact they are drupes. Who knew!?)
So when I got home I began my research into how to turn my walnut into ink. I found lots of information scattered across the internet and blended them all together to make my own version of walnut ink. This is what I did.
STEP 1
I searched the local charity shops (known locally as Opp shops) and bought an old saucepan, and I am so glad I did! There is nothing toxic in the walnuts, so that is not an issue - but remember I mentioned staining................ well, my the stainless steel pan is now stained inside too! I put the whole collection of green walnut fruits into the pan (around 40 or so) and covered them with water. I don't think the quantity really matters, just enough to cover them and let them float a little. (note: they aren't all in the pan in this photo) I put the lid on and let them simmer really low all day. STEP 2 By the end of the day they looked like this. The green fruits had all turned black and were mostly quite mushy. I wanted to remove the blackened husks at this point, but I had other things to do, so I just turned off the heat and left them covered on the stove top until the next morning. STEP 3 Wearing my lovely pink marigolds, I drained the dark brown liquid into an old milk carton for safe storage and set to work removing the now blackened squishy outer husks. As they had been cooking for hours most of them came off really easily, revealing the more familiar walnut shell inside. NOTE: it is the squishy black outer husk that I am keeping. The walnuts shells from inside I have put to one side. I don't know if they will be edible when they are dried, but I am going to find out! STEP 4 I put the black mushy goo back into the saucepan and returned the black liquid I had stored in the old milk carton. I then covered the pan once again and let it simmer for another whole day. By now the liquid was looking quite dark indeed and had reduced in volume. STEP 5 After letting it cool I made a funnel from an old pop bottle by cutting the top section off and inverting it into the base. I wanted something that I could throw away after use and would be big enough to help me with the next step. STEP 6 I carefully poured the black liquid into my old milk carton again and lined the funnel with a piece of seed cloth - any muslin type cloth or even a pair of old tights would have done. Working in the sink I then put half of the black mushy husks into the funnel and let the liquid drain into the pot below. Next I squeezed the cloth until I got as much of the liquid out of the husks as possible. STEP 7 I returned all the black liquid I had gathered to the pan for the last time and placed it back on a low heat with the lid off, to reduce. STEP 8 After about 15 minutes of simmering the ink had reduced to this. Isn't it a beautiful colour? STEP 9 To help preserve the ink I finally added a small amount (around a teaspoon) of alcohol to the mixture. I used 99.97% rubbing alcohol - but I have read that vodka also works well. Unfortunately the super high strength on my alcohol turned the ink to gel (aagh!!) - so I added a little warm water to the mixture to dilute the alcohol. This did the trick and after swooshing the pan a little the gel dissolved and the ink was liquid once again. Note: I have read that adding a whole clove to the ink at this stage can also act as a preservative - so I may pop one in. It will smell nice too. Now I just need to find a nice project to use my ink with! If you find a walnut tree please do have a go at this - it was great fun to make. There are no toxic fumes or chemicals involved (unless you count alcohol) and in fact, the smell of the quietly cooking walnuts was very pleasant. I am really looking forward to using my ink. Thanks for reading.
Between finishing my last white horse quilt and making a lot of flower bowls I have been thinking about beginning my new series of work. For quite a long time I have wanted to create a series that was based on 'advice'. It seems to me that no mater how old you are or who you speak to,there is always someone who is only too happy to offer up their two penn'orth!
Some people enjoy people watching, but I like people listening (I think you could also technically call it eavesdropping, but I don't listen to personal stuff, and anyway, the stuff I like to listen to is meant to be heard) so over the past 6 months or so I have been recording some of the more pithy and witty things I have overhear in my day-to-day life. Here are a couple so you get the idea.
I was too busy to do much 'making' in the summer, what with moving house, assisting with the organisation of the Contemporary Quilt Group's 'elements' challenge and a busy teaching schedule that somehow I just couldn't get started. Just before Christmas I did manage to make one new quilt - which unfortunately I can't yet show - so I decided I would wait until the New Year before I would begin. I did, however, start a sketchbook to begin to develop some ideas. It isn't a pretty sketchbook this time - it is mostly full of text - the quotes I overhear and my thoughts and ideas that spring from them. The few sketches that I have done are all still pretty rough - sometimes just lines and scribbles in response to words. I need to work on these to refine my thought and ideas and get some concrete images or shapes to work with. The one thing I have decided, however, is that I want to include lots of hand stitching to embellish the surface of the quilts. I want them to be really interesting to look at, so by adding both surface design techniques and stitch I am hoping they will encourage people to come close and take a really good look. I bought a lovely old book on my last day in South Africa, (a kind of souvenir? )in a second hand book shop that promised that it has every embroidery stitch I will ever need. I'll let you know if it is true! I have decided to call the series 'Words of Wisdom', and the first quilt I am tackling concerns some advice I heard one teenage girl offer to her friend. I was quite shocked at the bluntness of it at the time - but upon reflection I think it hit the nail on the head. This is what she said;
"Go easy on the makeup; you aren't as ugly as you think."
Using a photograph of my sister to work from, I made a sketch to base the quilt on....
I decided the best way to recreate the face on fabric was with Derwent Inktennse Pencils. I enlarged the sketch and then placed it behind a piece of white cotton and effectively 'traced' the face onto the fabric.
So far, so good! I am very pleased with the way the pencils were able to make such fine and detailed lines on the fabric. I used aloe vera gel to fix the pencil lines, which worked perfectly. I must admit, when I put it into a sink full of water once it was finished I did hold my breath - but not a single part of the black ink ran. Huge relief! I will post the progress of this quilt in a few weeks time. Thanks for reading.
Happy New Year!
A slightly different way to use the gel plate As I had the gel plates out today I decided to use the large plate to help me create a piece of fabric for a new quilt I have in mind. The quilt needs a long thin piece of fabric with foliage hanging downwards. Whilst I was walking through Sydenham Botanic Park this morning I collected a small bag full of organic bits and bobs from the ground. One of them was a small piece of twig from a beautiful Jacaranda tree which I thought would be perfect for the job. It was the right size and scale and was flexible enough to make the gently curving foliage. I decided to use the Jacaranda twig to print the delicate little leaf shapes onto the fabric. As each twiglet (I don't think that is the real name, I just made that up) has 20 or more tiny leaves it was going to be tricky to ink up the whole thing for printing. Normally I would use a sponge or roller to put the ink on - but I knew this would probably damage the delicate little leaves - so I decided to put the ink onto the gel plate paint and then press the leaves gently onto the plate to apply the ink. When I pulled the ink covered twig away from the plate it was ready to print onto the fabric.
I now need to work on this piece of fabric some more, to add more interest and depth. I'm not exactly sure how it will turn out yet, but that is all part of the excitement and fun!
Thanks for reading.
|
|