CLAIRE PASSMORE blog

A bit of free motion fun for Christmas

30/11/2015

 
Picture
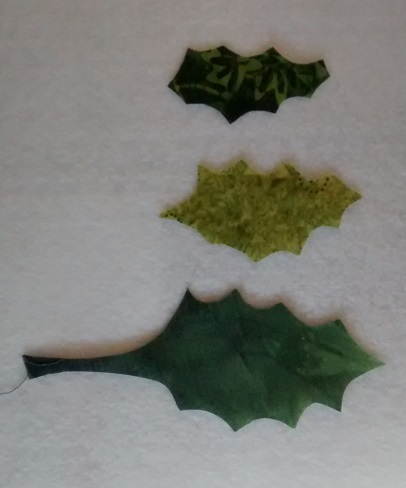
Having messed about with raw edged leaves last week I had some ideas to make a few pretty things for Christmas. The holly leaves looked particularly nice, so I soaked a few more oddments of fabric in the Terial Magic stiffener and cut out a few more leaves; small, medium and large.
​
Picture
Stiffened fabric scraps (starch or Terial Magic) cut into holly leaf shapes.
Picture
Put the leaves into a little stack
Picture
Add another piece of fabric cut into the shape of mistletoe....

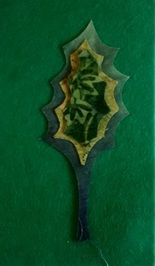
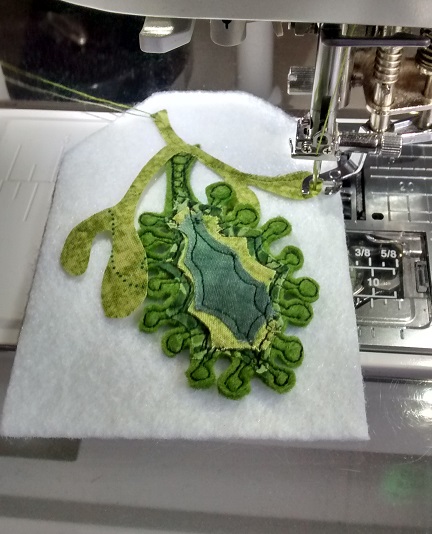
​I placed the holly leaf shapes on top of each other and finally put the little pile onto a piece of green felt. I then free motion stitched the leaves down and did a bit more stitching around the edge to look like berries. Then I cut it out. Looks ok, don't you think?
​

Picture
All looking good.... a little bit of fraying on the light green fabric - that was the piece I stiffened with starch. Maybe the Terial Magic would have been better for this particular fabric.
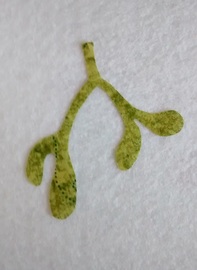
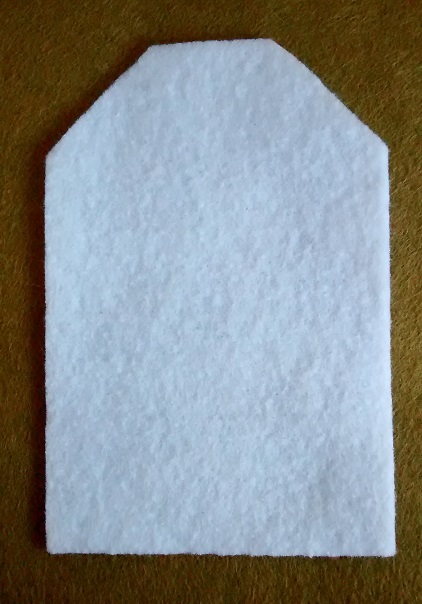
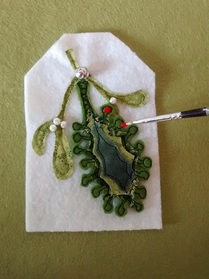
Next I cut a piece of white felt into a rectangular 'tag' shape and laid the mistletoe and felt leaf onto it and then stitched that down too.
Picture
White felt rectangle (with the corners cut off)
Picture
Free motion stitch the pieces onto the felt. No need to be precise!
Picture
Add a few beads and a little acrylic paint.
Ta da!!!
Picture
I added a dark green layer of felt for a backing and then free motion quilted a simple squiggle with silver thread all over the white felt.

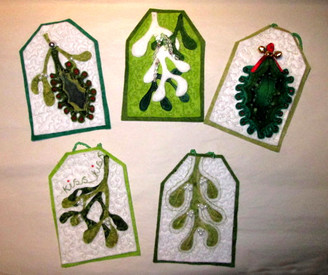
And then I got carried away..........................

​​

Why not try out something similar? It was lots of fun and all I used was a few cotton fabric scraps and some oddments of felt.

​Thanks for looking.
​
​Please feel free to share my website or blog with your friends by using the buttons to the right. If you would like to receive an e mail each time I post a new blog, please click here. I promise to never send you junk or give your address to anybody else.

Trying out a new stabilising product: Terial Magic

23/11/2015

 
I was at Midsomer Quilting last week, teaching my 'Doodle Birds' workshop (more on that later) and was given a present by De - a new product to try out. It is called 'Terial Magic', and I must admit, I had never heard of it until now.

Terial Magic is a slightly sticky liquid that comes in an easy to use spray bottle. According to the instructions it needs to be sprayed onto fabric and allowed to dry naturally for 15 or so minutes, and then ironed.

Once dry it is supposed to make the fabric stiff (like when you use starch) and non fraying. Stiff enough, it is claimed, that no further stabiliser is required for things like machine embroidery or 3D work.

Picture
Trying out Terial Magic

To see how it worked I took a few pieces of cotton quilting fabric from my scraps bag and sprayed them until they were moist. Following the demonstration on the Terial Magic website (click here) I put my fabric into a small tub and sprayed it. Once it was quite moist I squished it about a bit to make sure the liquid had penetrated throughout the whole piece, and then squeezed out the excess liquid (I put this back into my bottle).

Picture
Spray the dry fabric with Terial Magic in a small bowl until saturated
Picture
Squeeze out the excess slightly sticky liquid. I put this back into my bottle

After smoothing it out I left it to air dry on a flat surface for the 15 minutes stated. After this time it was still very wet - it was a winter's day in the UK, so not very warm - so I left it for around another 20 minutes of so, by which time it was only just damp. Obviously the temperature plays an important part in this, so use your judgment.
NOTE:At this stage the fabric was slightly stiff, but not noticeably different to when I had started.

I then took the fabric pieces and ironed them, as per the instructions. I used a hot  iron directly on the fabric (no ironing sheet) and the heat obviously had an effect, as the fabrics became smooth, very crisp and stiff. There was no residue on the iron and no flakes or 'gunge' on the fabric. 
Picture
Pressing the damp fabric with a hot iron. It became very crisp - like a piece of thin card

Comparison with starch

Up to this point I was starting to wonder why I would use this product instead of starch. I do not often use starch on my fabric, but when I do I usually mix my own and apply it in the same way.

I applied the homemade spray starch to the fabric in the same way as I did the Terial Magic and left it to dry until just damp and  then ironed the fabric. It was slightly stiff, but nowhere near as stiff as with the Terial Magic.
To try and get a stiffer result I sprayed the fabric once again with the starch mixture, but this time I ironed it dry straight away. This made a big difference and the fabric now had very similar crispness and stiffness to the Terial Magic soaked fabric. 

There were, however, two things I noticed which were slightly different when using the starch.
1. Small flakey particles of starch came to the surface of the fabric, which easily scorched
2. The sole plate on my iron got covered in a thin film of starch, which also scorched. Not the end of the world, but it meant I had to clean the sole plate of my iron which is always a pain.


My spray starch recipe:

50ml tap water
200ml  hot water

1 to 3 teaspoons of cornflour

Mix the cornflour and the
cold water to a smooth paste.
Add the hot water and whisk / shake until well mixed.
Pour into a spray bottle.

​According to the blurb that comes with Terial Magic these are two of the drawbacks of using starch. Another thing they mention is that insects like to eat the starch and therefore your fabric. I must say that I have never noticed this, but I am not a regular 'starch user'(!) so I am not able to say whether this is an issue or not. They also say the stiffener in Terial Magic is not edible by insects - so if this is important to you it may influence your choice.

What to do with this stiffened fabric

​The stiffened fabric was interesting.
It folds crisply - just like thin card, so if you have a project that needs firm creases or needs to stand without support this may be a good product to use. 

I tried a few origami ideas...​
Picture
This is a single layer of fabric folded to make a star
Picture
A single layer of fabric folded to make a dress. Next to it is a banknote I was once given, also folded into a dress shape
Picture
Folded hexie yoyo - easy once you have got the hang of it! (trouble is it took me an hour to get the hang if it)
The crispness of the fabric made it perfect for folding techniques. I can imagine it would also be particularly good when piecing small, fiddly shapes or pieces cut on a bias.

Origami links for the above 
For the folded dress, click here
For the yo-yo hexie, click here


​Next I tried some needle turn applique
Picture
1. The stiff fabric was easy to cut. I chose this fabric as it was particularly bad at fraying prior to treatment
Picture
4. The needle and thread slipped through the fabric easily - it was a pleasure to stitch
Picture
6. Fabric soaked in starch - cut well and no noticeable fraying
Picture
2. After cutting I finger pressed the seam allowance over. The crease stayed perfectly


The green fabric stiffened with the Terrial Magic did not fray at all and was very easy to stitch. I was pleased to note that there was no resistance to the needle from the product in the fabric


To make a fair comparison I repeated the process with a piece of yellow fabric soaked in starch. It cut well and creased well, just the same as the Terial Magic soaked fabric. The only difference I noticed was that when I came to stitch the needle and thread were not at all easy to pass through the fabric. It was much more difficult and made hard work of a simple job.
Picture
3. I pinned the leaf shape in place ready to stitch down
Picture
5. The finished leaf shape stitched down
Picture
7. The two leaf shapes; the green fabric was easy to stitch, the yellow much more difficult.

And then I tried stitching some raw edged leave to a piece of fabric
​​
Picture
Holly leaf shapes cut from Terial Magic soaked fabric
Picture
Place 12 in a circle, and stitch down the centre of each leaf. It looks better in real life than this photo!
The stiffness of the leaves made it easy to position them on the fabric and the raw edges, once again, did not fray.

The blurb also says you can use the stiffened fabric for machine embroidery without and further stabiliser. As I don't have an embroidery unit I can't let you know about that - but if anyone does and has experience of this product it would be good to find out if the claims are true. 

So - do I like Terial Magic? Yes, I think I do. It is similar to starch, but has a nicer feel, doesn't gunk up my iron and the treated fabric is nicer to stitch. I don't often need fabric that is stiff or crisp, but when I do I think this product would be a useful addition to the tools I already use. Thanks De - when I run out I will be buying another bottle from you!


Now for those Doodle birds!
These are a few pictures I took during the workshop at Midsomer quilting last weekend. Brilliant aren't they?

And how about these two amazing Doodle Poodles?  My thanks to Chris D who was so inspired when she got home that she made these two fantastic pieces. I just love them! Thanks for sharing them, Chris, I think you have cracked free motion quilting!
Picture
Picture
I hope you have enjoyed seeing all this brilliant free motion work. Thanks for looking.
​
Please feel free to share my website or blog with your friends by using the buttons to the right. If you would like to receive an e mail each time I post a new blog, please click here. I promise to never send you junk or give your address to anybody else.

Make an easy slip over cover for your sketchbook

16/11/2015

 
Last week I posted some pictures of several of the art journal slip on covers that use the fabrics I made whilst exploring and experimenting with different surface design techniques. 

Quite a few people got in touch with me to ask how I made the slip on covers, so I thought it would be a good idea to try and write a post to show you how I go about it. They are quite straightforward to make- so I hope my explanation doesn't make it seem too complicated.

Picture
1. Measure the book you wish to cover
In this example I measured a spiral bound sketchbook. It is important to make sure that you measure the thickness of the spine as well as the front and back cover - especially with a book like this that has a particularly fat spine.

Make sure you note down the measurements - as you need to add a bit to them in the next step.
Picture
2. Add a seam allowance
Take each measurement and add a generous quarter of an inch all around.

In this example the width of the front and back covers will become 9 inches,
the height of the front and back covers will become 12 and a quarter inches and the spine will become 1 and a half inches wide.

In my example I have pieced some fabrics pink and green fabrics to create the front and back covers. It would look equally good if you used a whole piece of fabric for each section - or even a whole piece of fabric for the whole cover. 
Picture


​3. Join the sections together

​Join the sections to create a whole piece which will wrap around  the whole book cover, with a little extra fabric (a quarter of an inch) on each edge.
Note:If you were using a whole piece of fabric you would already be at this step.
Picture

4. Make two tie closures
Either make two very thin strips from a co-ordinating fabric, or cut two pieces of tape or ribbon. These will be the ties that you use to keep the book closed. You can make them as long or short as you like -  long ones will wrap around the book before you tie them, short ones you can just knot or tie in a bow.
These two are about 8 inches and 10 inches long.
Picture
5. Cut 2 further pieces for the inner cover
​Next you need to  cut two pieces of co-ordinating fabric that are the same height as the front and back cover sections and  little narrower. Don't worry about the exact width. 

On each piece neaten one of the long sides by folding the fabric over and pressing and then folding it over again. Stitch down the neatened edge using a straight or decorative stitch. You should now have two rectangles, each with one neat long side and one raw edge. The short sides will both be raw. 
Picture
6. Add a pocket if you wish
​As an optional extra, you can stitch a pocket onto one or both of these rectangles. For your first attempt it might be worth skipping this stage until
you have seen how the finished cover turns out.

These pieces will eventually be on the inside of the book covers. If you want you could make a long, thin pocket to perhaps hold a pen or pencil.
Picture


7. Add a bit of quilting
​Go back to your front/back and spine piece. Quilt it all over as much or as little as you like. Just a few lines of stitching will be enough. I just like to go a bit mad.
Make sure you lay the finished piece with the right side up.
Picture

8. Attach the ties
​When you are happy with that, take the two thin strips and pin them, horizontally, onto the right side of the cover. Pin one one each of the short sides, roughly half way down.Make sure to let them overhang the short edge a little - about a quarter of an inch or so. 
Picture

9. Pin the inner cover pieces in place
​Next, still with the right side of the cover uppermost take the two smaller rectangles and pin the to either side of the cover. Match the raw edges to the edges of the cover and have the neatened edges facing inwards.

Pin them in place.
Picture


10. Add a final piece to cover the gap
​Look at that gap that is left in between the two pieces you have pinned in place - where you can still see the quilted cover fabric. You need to cut a piece of fabric that is about 3 inches wider than this gap. Leave all the edges raw - they wont be on show. 
Picture


11. Pin, pin, pin

Place this piece over the gap - roughly centrally so that it overlaps the other two pieces of fabric you pinned on earlier. Pin this in place too
Picture

12.Stitch all the way around
With a straight stitch, sew all the way around the whole piece with a scant quarter inch seam. When you come to the place where the thin strips are located on the short sides go over them a few times - reverse stitching to make sure the ties are firmly attached. 
Carefully clip the corners if you think it is bulky
Picture

​13. Start to turn it right side out
Nearly there!
Now start to turn the cover inside out. Start with the central rectangle. In this picture the rectangle of fabric has been turned to the back, revealing the cover once again.
Picture


14. Keep going
​Now turn one of the long rectangles on the side inside out. Use a pencil to poke out the corners.
Picture


15. Ta da!! Done!
​And finally turn the other rectangle inside out. Give the whole cover a good press and roll the seams so they lie flat. 

You are now looking at the inside of the book cover.
Picture

16. Slip your sketchbook into the cover
Now take the back cover of your sketchbook and slide it into the jacket. It might need a wiggle to get it to right up to the end and into the corners.

​Then do the same with the front cover.
Picture


17. Admire your work
​And then close up the journal and tie it closed. 

Done!
Picture
Picture
I hope that makes sense. It really isn't difficult. The thing tat sometimes goes wrong for me is that I make it too small - so be generous when you add your seam allowances - you can always re-stitch around the edges if it is too big. 

​If you make one I'd love to see it!

Thanks for reading.
​Please feel free to share my website or blog with your friends by using the buttons to the right. If you would like to receive an e mail each time I post a new blog, please click here. I promise to never send you junk or give your address to anybody else.

A is for Apple - part 2

8/11/2015

 
Do you remember this picture? It was only a month or so ago; look how blue the sky was!

Using the humble apple as my inspiration, I made a few print blocks with lino and card and some stencils. I used them to make rubbings and prints on a selection of different fabrics - and then put them in my 'to do' pile. 
(You can see the original blog post where I made the fabrics I have used below by clicking here).


​Well, last week I took several of the bits and pieces and a pretty piece of hand-dyed fabric  and turned them into a journal cover. I think it is a nice way to use up some of those experimental pieces of fabric.
I stitched them onto the background fabric and added aome free motion quilting, thread sketching and wrote directly onto the fabric with a permanent pen. I then held it all together with some long lines of simple hand stitching, to keep some of the loose bits from flapping about. 


It is pretty random, but I think it turned out quite nicely in the end, and was a good way to use fabrics I created from my explorations. 
Why not have a go at something similar? It was quick, easy and fun!
Picture
Here are a few other sketchbooks which I have made, also using up 'experiments'!
Thanks for looking. 
​
Please feel free to share my website or blog with your friends by using the buttons to the right. If you would like to receive an e mail each time I post a new blog, please click here. I promise to never send you junk or give your address to anybody else.

Beautiful flowers - in fabric

2/11/2015


Nesting flower bowls - they just keep getting more beautiful

Picture
Picture
Flower Power!
Picture
It has been flower power all the way form me this past week.

It started on Wednesday 
with the ladies from the Wiltshire Guild of Spinners, Weavers and Quilters  in Steeple Ashton
Claire Passmore flower bowl workshop
As you can see - everyone was hard at work.
Then on Saturday and Sunday I was at Midsomer Quilting - creating even more fabulous flowers. I think we made enough to fill a whole florists, and not only that - we can all smile and know that the future of quilting is going to continue. The age range of the people at the workshops this week spanned from age 9 to ............... well, more than 21!
Claire Passmore flower bowl workshop
On Saturday poppies were very popular, but a sunflower, a little waterlily and a poinsettia also snuck in.
Claire Passmore flower bowl workshop
Then on Sunday waterlilies stole the show... with another sunflower, and a few poppies in the mix.
I think you will agree - they all look amazing. What I love the most is that no two bowls look the same. There are so many ways they can be varied; just by changing the colour from yellow to white - a sunflower can be transformed into a daisy. By changing the thread colour the visual texture alters the flower; smoothly stitched free motion lines make a gentle, delicate flower, whereas bold embroidery stitches make for a vibrant, flashy bloom. There is lots of room to experiment and try new ideas.

If you would like more information on this and other workshops, please click here


I hope you have enjoyed seeing the fun we all had this week. 
Thanks for reading.
​

Please feel free to share my website or blog with your friends by using the buttons to the right. If you would like to receive an e mail each time I post a new blog, please click here. I promise to never send you junk or give your address to anybody else.
    Picture
    Picture
    Picture
    Picture


    Click here if you would like to receive an e mail when I add a new blog post.
                       OR

    Follow my blog with Bloglovin
    Picture

    Categories

    All
    Challenges
    Classes
    Colour
    Cool-ideas
    Courses
    Designing
    Doodling
    Dye
    Exhibitions
    Experimenting
    Festival-of-quilts
    Flower-bowls
    Gelli-plates
    Hanging-sleeves
    How-to
    Inspiration
    Line
    Lino Blocks
    Making
    Marbling
    Mending
    Mono Printing
    Mosaic
    New-products
    Purchasing
    Quilt Gallery
    SAQA
    Sew On The Go
    Sketchbooks
    Software
    Stencils
    Stitch
    Surface Design
    Talks
    Thread
    White Horses
    Workshops
    Yarn Bobming

    Archives

    December 2020
    September 2020
    August 2020
    July 2020
    May 2020
    February 2020
    December 2019
    October 2019
    September 2019
    July 2019
    May 2019
    March 2019
    February 2019
    January 2019
    December 2018
    November 2018
    September 2018
    August 2018
    July 2018
    June 2018
    May 2018
    April 2018
    March 2018
    February 2018
    January 2018
    December 2017
    November 2017
    October 2017
    September 2017
    July 2017
    June 2017
    May 2017
    April 2017
    March 2017
    February 2017
    January 2017
    December 2016
    November 2016
    October 2016
    September 2016
    August 2016
    July 2016
    May 2016
    April 2016
    March 2016
    February 2016
    January 2016
    December 2015
    November 2015
    October 2015
    September 2015
    August 2015
    July 2015
    June 2015
    May 2015
    April 2015
    March 2015
    February 2015
    January 2015
    December 2014
    November 2014
    October 2014
    September 2014
    August 2014
    July 2014
    June 2014
    May 2014
    April 2014
    March 2014

    RSS Feed

    Picture
    Picture
Powered by Create your own unique website with customizable templates.