CLAIRE PASSMORE textile artist

Surface design; making stencils

21/8/2014

 
Another easy and quick way to add some interest to fabric is to use stencils. You can buy stencil plastic if you want to make very durable stencils to use over and over again, but I don't often reuse my stencils that much so I prefer to use freezer paper or recycled materials.

All you need is a sharp knife, freezer paper, a cutting mat and an image to cut out.
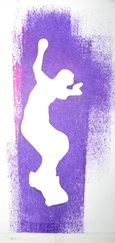
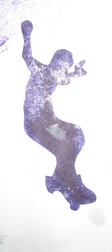
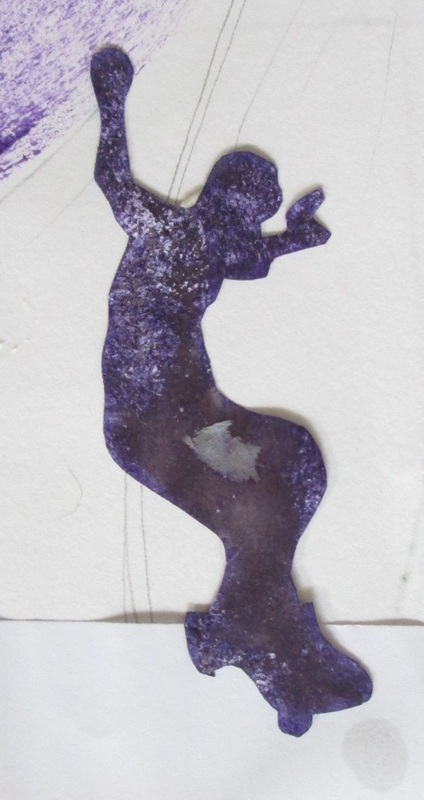
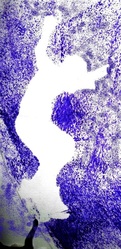
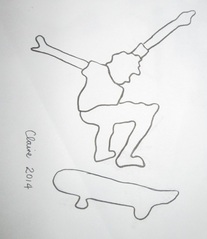
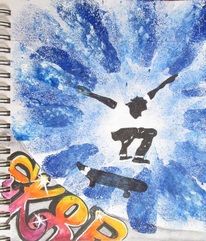
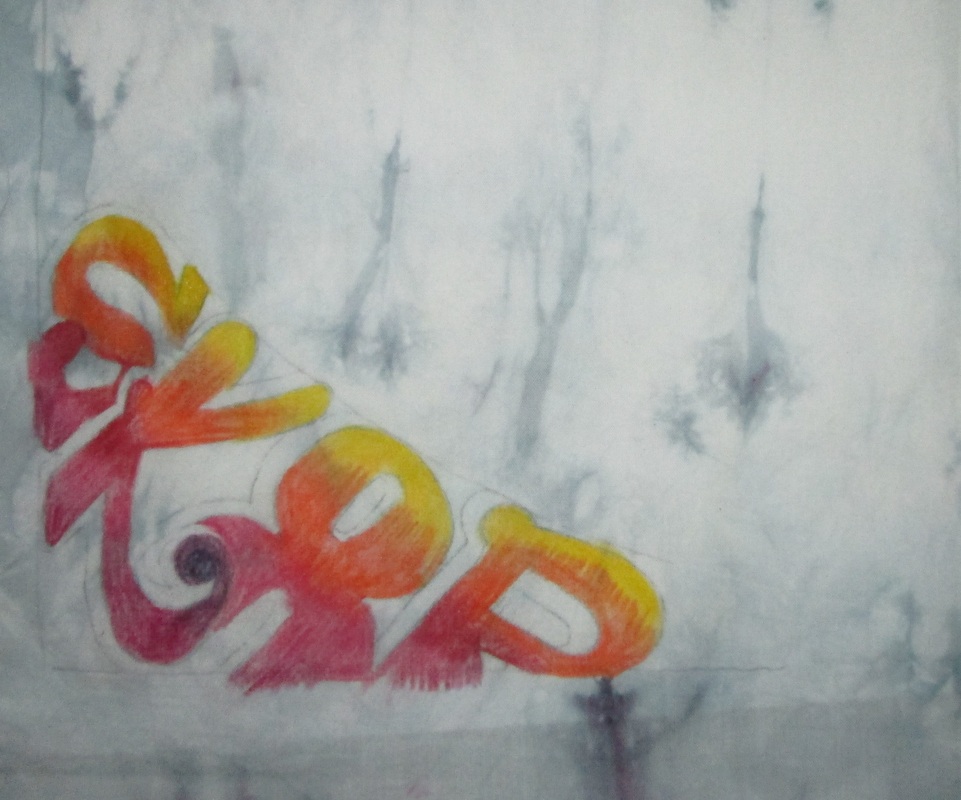
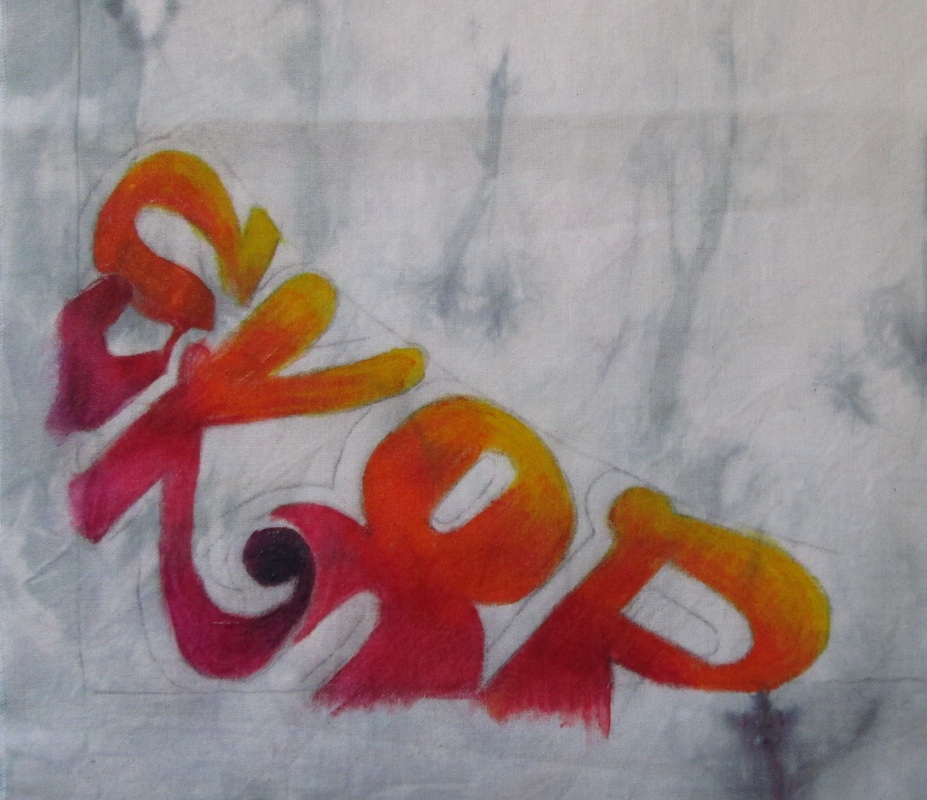
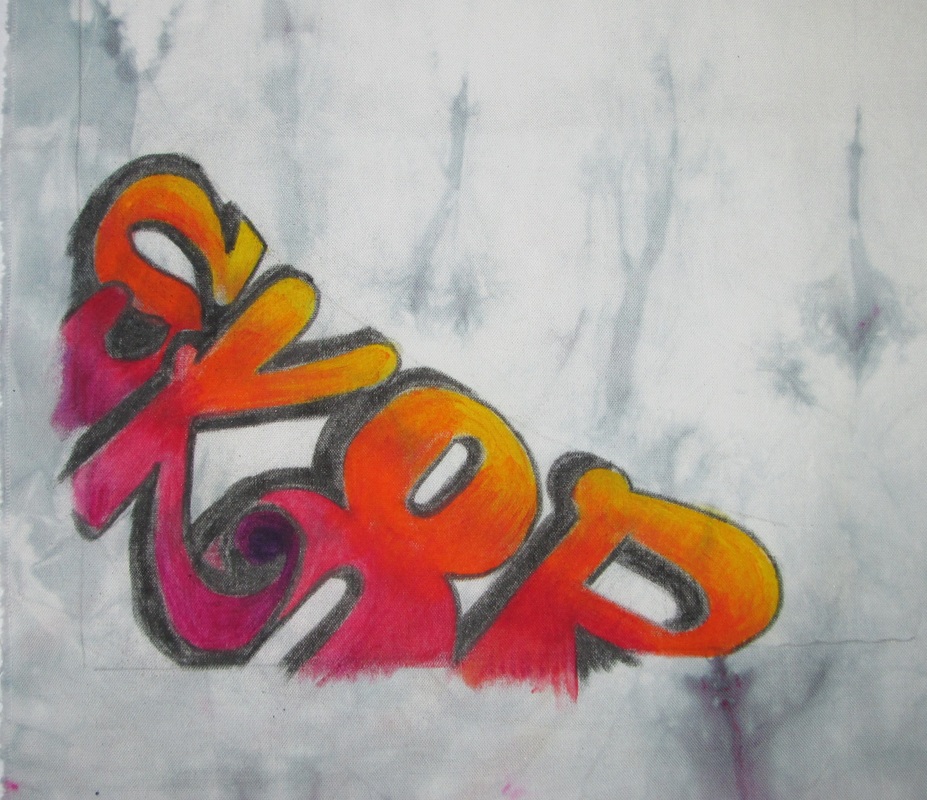
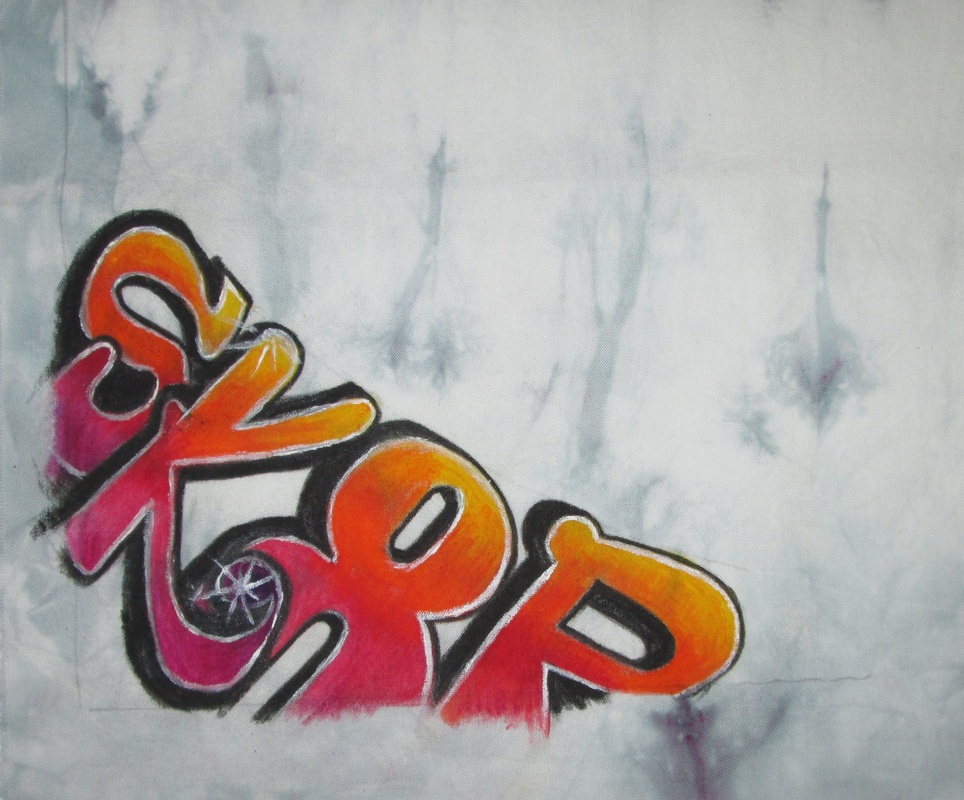
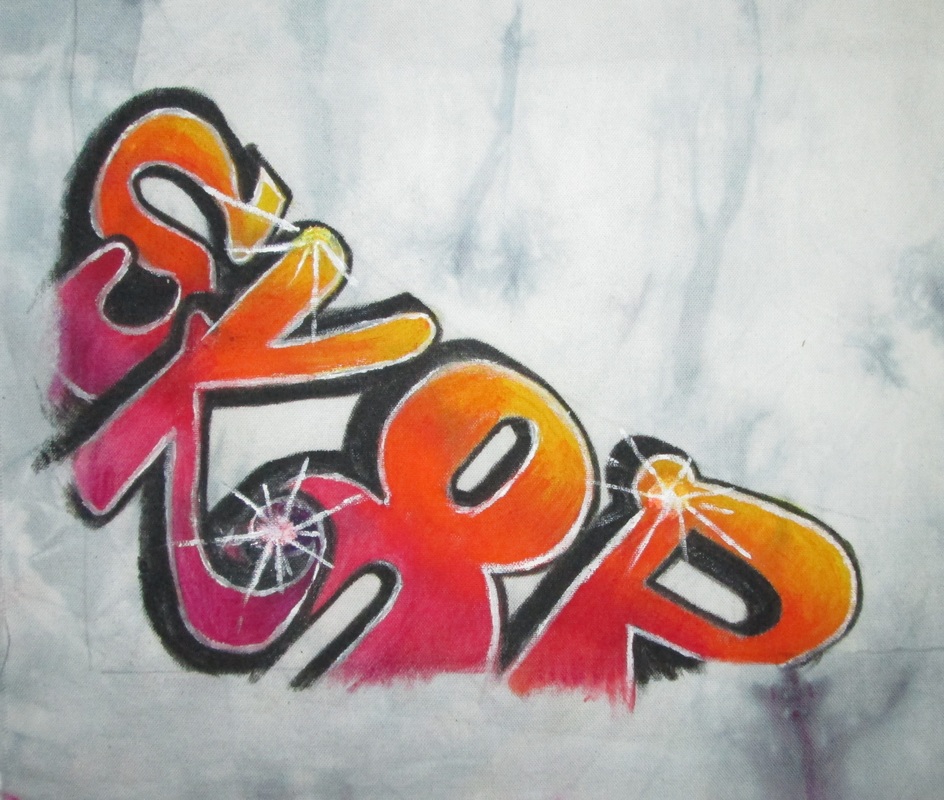
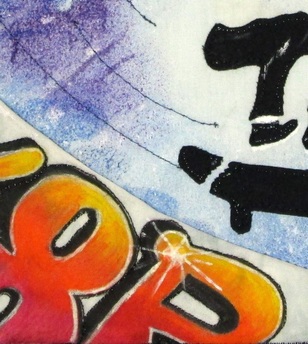
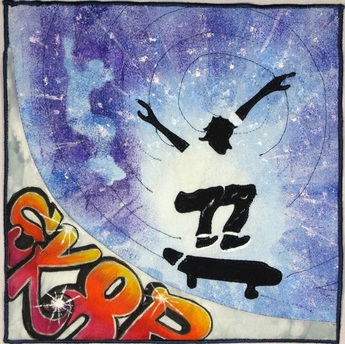


Picture
Picture
Picture
Draw onto the paper. Cut out the shape with a craft knife
Picture
Put the stencil onto the fabric. Use a roller or sponge to cover the freezer paper with paint. I used acrylic paint here.
Picture
Keep the piece(s) you cut out to use as a mask.
Picture
Put the mask onto the fabric and using a roller or sponge cover with paint.

Using a stencil to make a SK8R Boy

Using this very simple idea I made a small 8" x 8" quilt of a boy I saw in our local skate park.

The boy I saw flying through the air was wearing dark trousers and a white T shirt. As he flew through the air I noticed his T shirt blended into the sky, which gave me the idea of leaving out his T shirt all together. This was easy to do with the stencil - I just ignored the T shirt when it came to cutting out the stencil pieces.

For the background I used the paint and roller from the earlier messing about I had done with stencils. This was a bit of a 'use up' quilt. I used Derwent Inktense pencils for the graffiti in the corner as I love the intense colour you can achieve with them.

Picture
Start with a drawing
Picture
Add a background
Picture
Add some colour

To make the quilt I started with a small mottled piece of grey hand dyed fabric. In the corner I attempted my version of some of the graffiti I saw at the skate park. It was so vibrant and colourful I thought it would look great in the corner of the quilt and would balance the image of the boy flying through the air. 

Picture
Outline the letters and colour them using Derwent Inktense pencils
Picture
Paint over the coloured area with fabric extender gel
Picture
Add some more detail with the pencils and then paint over again
Picture
Add the sparkly highlights with white fabric paint
Picture
Not too bad! But I have discovered that graffiti style text is really difficult!

Picture
I cut the grey fabric on a curve, joined it to a piece of pale blue fabric and pressed the seam towards the grey fabric. Next I put a piece of batting under the grey area to raise and give it the appearance of being the concrete ramp.
Picture
I stenciled on the boy and then put the mask pieces over the area whilst I spray painted the background with watered down acrylic paint and a toothbrush.

Surface design; Lino printing

14/8/2014

 
Picture
I really enjoy carving lino blocks and I am now  usually able to make one without bleeding too much. I bought some small squares of lino a year or so ago, and then forgot all about them. I then bought some easy-carve type squares and made several nice blocks with them. They cut like butter. If you have the choice - go for these. Softer still are cheap erasers - they are just a bit small - but wow - you could cut these with a spoon (not really, but you get what I mean).

Fast forward to a few days ago. Whilst cleaning out my supplies boxes I found those old lino squares. They are a little dry and crumbly when compared with the smooth as silk easy-carve, but never one to waste things, I decided to carve a block right there and then.

I made a small and simple drawing of 3 cherries, traced it and transferred the outline to my lino square. After carefully cutting it out, this is how it looks.

Picture
Draw some cherries
Picture
Trace the drawing
Picture
Transfer to the lino square carve out the design
When it was finished I made a few test prints, tidied up the last few bumps and then printed several pages in my sketchbook. I made a rubbing too.


Picture
Simple repeated stamp onto old book pages. Coloured with Derwent Inktense pencils.
Picture
Repeating stamps onto gesso covered pages. Painted with Koh-i-noor watercolors.Rubbing over lino block on pink paper
Picture
Koh-i-noor watercolor blob background. Stamped over and colored with Derwent Inktense pencils

Next I found two old erasers. One was a little crusty at the end, so I chopped it off. I drew a single cherry and carved it in less than a minute. Wow - these things are easy to cut! Next I drew a little leaf, and quick as a flash, cut away the exterior. Now I had a cherry and a leaf to play with.
Picture
Cherry and leaf stamp cut from old erasers


Stamping onto a piece of recycled linen. 
Picture

Top tips for cutting lino blocks

  1. Make a lino sampler. Try out your different cutter blades on a scrap piece of lino. Vary the angle of the blade as you cut; cut in little chunks; cut long lines; cut straight; cut wavy; get used to what you can do with the blades before you start. I write on my lino square so I remember which blade did what.
  2. Transfer the image you want to cut onto the lino/ easy-carve/ eraser IN REVERSE with a soft pencil. I do this by tracing.
  3. Colour the parts you want to keep with a dark pen so you know exactly what to cut away and what to keep.
  4. Put the lino onto a protected non-slip surface. I use a cutting mat or board and on top of that one of those spongy draw liner mat type things from the pound shop. You can get fancy bench hooks, but I don't use one.
  5. If the lino is really hard and cold warm it up a bit. Try sitting on it for a while, leave it in the sunshine, give it a blast with a hairdryer, pop it on a radiator.... Otherwise, just start.
  6. CUT AWAY FROM YOURSELF. ALWAYS. Keep your other hand behind the direction of the blade. Otherwise there will be blood, and sometimes lots of blood. Turn the lino block when you need to change direction - don't be tempted to cut towards you or turn your body.
  7. Cut slowly. Start with a small v shaped blade to outline the shapes, then move onto the blades that are wider and remove more lino. Look at your sampler to remind the way the different blades cut.
  8. If a blade becomes dull or wont cut nicely, change it. If you have an expensive cutter, sharpen the blade. If, like me, you have a cheap and cheerful Speedball cutter, just put a new blade in. 
  9. When you think you have finished, ink up the block and try it out. Trim away anything you don't like and neaten up any wonky cuts.


Picture

Picture
Picture
Sample of different cuts made by different blades


Reverse of design traced onto lino


Black parts not to be cut away

White non-slip mat

I hope you give lino cutting a try - it is quick and easy and you can create your own motifs and print with ink, dye, acrylic paint, ink, household bleach, decolourant or anything else you can think of. You can also make rubbings - so you get 2 for one with these! 

I have no idea yet  what I will do with these small stamps - but watch this space!

The Sketchbook Challenge                                      August 2014: TEA AND COFFEE

9/8/2014


Do you work in a sketchbook - or want to start?

I have just discovered a great blog called The sketchbook challenge. There is so much great stuff out 'there' and I wish I had a better way of discovering it. Anyway.......................
I love to use sketchbooks to help develop ideas for my quilts, so this looks like a great way to get more inspiration, share ideas and see other lovely sketchbooks.


There are some great people hosting it; Sue Bleiweiss, Jackie Bowcutt, Traci Bunkers, Dion Dior, Jamie Fingal, Desiree Habicht, Leslie Tucker Jenison, Lyric Kinard, Jane LaFazio, Jacqueline Newbold ,Judy Coates Perez, Joanne Sharpe, Carol Sloan
Picture

How it works
On the first day of each month a theme is announced. This month it is TEA AND COFFEE.You can work in any medium that you like - paint, watercolor, pen & ink, charcoal, collage, marker, crayon or something else and your sketchbook should be a reflection of you and you should feel free to explore and work in any mediums that you want. Here are my first ideas.

Picture
'Teacups' by Claire Passmore Aug 2014
Picture
Continuous line drawing idea for free motion quilting design by Claire Passmore Aug 2014
Picture
'Coffee Beans' by Claire Passmore Aug 2014

The great thing is it is so flexible. There is no minimum or maximum.  You just work in your sketchbook as often as you like and create as many pages as you are inspired to. It doesn't even have to be in a sketchbook - Sketchbook Challenge artist Jane LaFazio will be working in single sheets for this challenge and that might be something you might like to try too.

How to share your images

You can post photos of your pages to your own blog if you have one and if you do then leave a link to the posts in the Sketchbook Challenge website in the comments section of the theme post so others can find it.  You can also post photos to the specialflickr group that we've set up.  You'll find that here .


So - there you have it. I have just created my Flikr account, posted my pictures and am about to put a link to this post on the Sketchbook Challenge website. I am looking forward to seeing what other people do this month! 

Festival of Quilts 7th to 10th August 2014

7/8/2014

 
I recently joined the group Contemporary Quilters  West,  a group of 14 contemporary and art quilters based in the Wiltshire, Bath, Bristol and Somerset areas.  We are all members of the Quilters Guild and most of us are members of the internet based Contemporary Quilt Group.  
I am delighted to say that at least 5 of the group have work on display at the Festival of Quilts this year, starting today.

Unfortunately I am not in the UK at the moment, so am not going to be able to attend - but thanks to the wonders of the internet, Facebook, Twitter etc. I hope to see many of the quilts, at least on my screen.

If you are lucky enough to be going, do look out for the work of Chrisse Seager, Alicia Merrett, Judy Stevens, Kathryn Chambers, all members of Contemporary Quilters West. Clicking on their names will take you to their respective blogs or websites where you can see more of their work. I have also added some images below.


Picture'Bushfire' by Christine Seager 158cm x 116cm

Fine Art Quilt Masters 2014 (sponsored by Freudenberg Vilene)

Chrisse's piece, 'Bushfire' in the Fine Arts Quit Masters display. Congratulations to Chrisse on achieving such recognition.


Picture
Alicia Merrett has her own gallery this year, 'Mapping the Imagination' . She has published a book of the same title to accompany this exhibition, advanced copies are available directly from Alicia at the festival.


Contemporary Quilt Challenge: Dislocation
Contemporary Quilt is a specialist group of The Quilters’ Guild of the British Isles comprising over 700 members. A diverse group of quilters and fabric artists working to create innovative and dynamic art. The group has been set theme for 2014 of ‘Dislocation’ to be interpreted in any way they choose.  Very best quilts will be on display within their gallery at this year’s Festival. 
Judy, Kathryn and myself have quilts in this gallery
Picture
'Incident' by Judy Stephens 2014 Contemporary Quilt Group Challenge Finalist
Picture
'Dislocation' by Kaththryn Chambers 2014 Contemporary Quilt Group Challenge Finalist
Picture
'Forced Removal' by Claire Passmore 2014 Contemporary Quilt Group Challenge Finalist

Feeling Blue

1/8/2014

 
I haven't worked in my sketchbook for quite a while now - I have been busy with another project that is taking up all of my time. But sometimes a change is as good as a rest, as some very clever person once said.

So I got out a new set of water colours and my box of bits and pieces (for things that one day might be useful) and I pulled out 3 blue things ; a cornflower seed head; a postcard of a lighthouse and mussel shell. Random!

This is how the pages turned out. 


Picture
Who doesn't love a new box of paints? These are a small pocket set from Windsor and Newton

Picture
Where two oceans meet; messing about with blue and green.
Picture
One little cornflower in a crack in the pavement
Picture
This might make a very pretty small quilt

Picture
Mussel shell color study

    BACK TO WEBSITE


    Click here if you would like to receive an e mail when I add a new blog post.
                       OR

    Follow my blog with Bloglovin
    Picture
    Picture
    Picture
    QuilterBlogs

    Categories

    All
    Challenges
    Colour
    Cool-ideas
    Courses
    Designing
    Doodling
    Dye
    Exhibitions
    Experimenting
    Festival-of-quilts
    Flower-bowls
    Gelli-plates
    Hanging-sleeves
    How-to
    Inspiration
    Line
    Lino Blocks
    Making
    Marbling
    Mending
    Mono Printing
    Mosaic
    New-products
    Purchasing
    Quilt Gallery
    SAQA
    Sew On The Go
    Sketchbooks
    Software
    Stencils
    Stitch
    Surface Design
    Talks
    Thread
    White Horses
    Workshops
    Yarn Bobming

    Archives

    October 2019
    September 2019
    July 2019
    May 2019
    March 2019
    February 2019
    January 2019
    December 2018
    November 2018
    September 2018
    August 2018
    July 2018
    June 2018
    May 2018
    April 2018
    March 2018
    February 2018
    January 2018
    December 2017
    November 2017
    October 2017
    September 2017
    July 2017
    June 2017
    May 2017
    April 2017
    March 2017
    February 2017
    January 2017
    December 2016
    November 2016
    October 2016
    September 2016
    August 2016
    July 2016
    May 2016
    April 2016
    March 2016
    February 2016
    January 2016
    December 2015
    November 2015
    October 2015
    September 2015
    August 2015
    July 2015
    June 2015
    May 2015
    April 2015
    March 2015
    February 2015
    January 2015
    December 2014
    November 2014
    October 2014
    September 2014
    August 2014
    July 2014
    June 2014
    May 2014
    April 2014
    March 2014

    RSS Feed

    BACK TO WEBSITE
Powered by Create your own unique website with customizable templates.