CLAIRE PASSMORE blog

A house full of flowers

31/8/2015

 
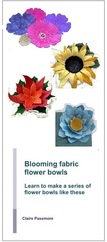
Well now that summer seems to be well and truly over I decided it was time to get on with the flowers. I spent the week transforming my big heap of colourful fabric into a lovely collection of flowers and now have a house full! 


I made
 some old favourites and added a new flower to the collection. I hope you like them!
These flower bowls are such fun to make and I get a huge amount of pleasure from turning a flat piece of fabric into a beautifully shaped flower. For this new 'crop' of flowers I have mixed hand dyed fabrics with commercial prints, giving a slightly different look from the originals, and because each of the flowers is reversible there are lots of combinations when it comes to displaying them -  so many, in fact, I lost track when I was photographing them.
For example, for the waterlily there are 5 bowls which can each be turned inside out - giving 15 combinations. Perfect for those who find it hard to make up their mind (like me!)

Over the next few months I will be teaching one day workshops where you can learn how to make these bowls - or better still, how you can design and create your own bowls - in pretty much any shape you can imagine.


Picture
Flower bowl workshop brochure. Click for more details
Midsomer Quilting Saturday 31st October 2015
Midsomer Quilting Sunday 1st November 2015
Pauline's Patchwork Saturday 9th July 2016
Blackmore Vale Embroiderers Guild 5th November 2016


Thanks for reading!


Please feel free to share my website or blog with your friends by using the buttons to the right. If you would like to receive an e mail each time I post a new blog, please click here. I promise to never send you junk or give your address to anybody else.

Dismaland? Not here!

24/8/2015

 
                            COLOUR FEST
Picture
So this is what has been keeping me busy this week!

 I took advantage of a beautiful sunny day and set up camp in the garden;  and this is what I ended up with..... 10 metres of jewel-coloured  gorgeousness.


Can you guess what it is all for?

sunflower
sunflowers
poinsettia
poinsettias
poppy
poppies
blue waterlily
blue waterlily


yep! .... the nesting flower bowls!

Over the next few months I will be teaching how to make these beautiful flower bowls at several workshops - 2 at Midsomer Quilting and a few for some quilting and embroidery groups. In preparation I have been creating the patterns for each set of bowls. Now I am testing them to make sure everything works out perfectly. Here is a sneak preview of some of the bowls under construction.


Picture
Blue waterlily
Picture
Purple poppy
Picture
Vibrant sunflower

I just love making these bowls - they are so bright and cheerful - you can't help but smile as you stitch!

For more information about the different flower bowls click here.

For the brochure on the flower bowl workshop, click here.

Thanks for reading.

Have you ever wondered about trying the fun of dyeing your own fabric?

It isn't difficult and you don't need a lot of fancy equipment...
Picture
... most of it will be in your recycling box.
Picture
Picture
And it needn't be expensive either. You can buy all the chemicals you need to get started for £14 on Amazon (free delivery too, it is a really good deal).
http://goo.gl/py2vhK
Picture


Got the dye and not sure what to do with it? No worries. You can find a really straightforward explanation of the 'how to' of dyeing in my book, Quilting Originals'.

Picture
I  have used lots of photographs to show you exactly what to do and clearly explain several different methods so that you can explore a variety of different results using the same dyes.  

My book is available directly from me  £18.95 or from Amazon uk for £24.95. You can see a preview of it here.
Picture
Please feel free to share my website or blog with your friends by using the buttons to the right. If you would like to receive an e mail each time I post a new blog, please click here. I promise to never send you junk or give your address to anybody else.

What the heck is Dismaland? Click here.

Sun printing with soy milk

17/8/2015


South African soy and sunshine

Picture


It has been a long time since I started messing about with this new idea, but this weekend I decided to finish what I started several months ago. Before I left South Africa I started an experiment with soy milk , paint and sunshine - and what follows is how it turned out.


Picture

Now I know sun printing is not new - I have tried this fun technique before, when I made the small quilt named 'A Faithful Hand' (above right) using Pebeo Setacolor paints
. When I first tried the technique I was amazed at how simple yet effective it was.  Just by covering fabric with the paint then allowing it to dry in the sun with a solid object placed on the fabric (in this case a stencil I cut from cardboard) I created a beautiful piece of fabric to work with.  However, I discovered one major problem with the paints once the piece was finished. Although I had heat set the fabric (well, I thought I had heat set the fabric), when I came to block the quilt the mist of water I sprayed over the surface sent the blue and orange paint running in all directions. As you can imagine - after completing all that stitching I was not happy!!!!

Lesson learned: Follow the manufacturer's instructions to the letter when you heat set your work, and then check and double check to ensure it is heat set properly before you continue. 

Anyway, after that misadventure, my love affair with the process stopped. Until now.

Thinking back to some of the things I have seen on my travels, I have seen soy milk used as a binder when used with mud (yes, mud!) to colour fabric. Not understanding the process, I began researching the use of mud and soy as a traditional method of adding colour to fabric. As it turns out  the soy milk acts as a very effective 'binder' - in a similar way that a mordant works with other natural dyes. Apparently that is why babies that are fed on soy milk have bibs that never come clean!

The thing with soy milk is that it needs time to do its job - and the longer you leave it, the better the results. So, back in March, before I left the South African sunshine, I decided to try out a new idea.....


sun dyeing with paint and soy milk

Picture
Mixing the paints - soy milk and acrylic paint
Picture
Fabric covered in the soy milk & paint mixture then covered with a windmill shaped mask
Picture
work in progress

The process is pretty simple. All you do it mix the acrylic paint with soy milk until you get a milk-like consistency. You then  brush or sponge the mixture onto damp fabric (I used 100% cotton seed cloth) and cover part of the fabric with a mask. I used a mixture of things - metal letters, foam shapes and wooden die cuts, but you could use anything - natural items like leaves and grasses are very popular. You then leave the whole lot to dry in the sun. 

The way it works is this: the heat from the sun dries the uncovered fabric more quickly than that which is covered by the mask. This dry uncovered fabric then pulls the moisture out from under the mask (you may be familiar with the term 'wicking' it away) and at the same time takes the pigment from the paint with it. Thus, the paint and soy mix is physically drawn out from underneath the mask, leaving a whitish area the same shape as the mask. Clever eh?

This is exactly the same process as you would use if you used the Pebeo paints directly from the pot. The next part, however, is where the properties of the soy milk come in.


Note
It is not the UV from the sun that is important - just the heat. So, if you do not live in a very sunny place, just put your fabric under a heat lamp, taking care to ensure it cannot burn.
Once the fabric is completely dry (and now a little crispy) you remove the mask and you will find a blank patch on the fabric where it was placed. So far so good - the sun print has now been created. With the Pebeo paints you now need to iron the fabric to fix the paint  - that is where it went wrong for me. Because I was trying the soy milk binder the proteins in the soy milk needed time to naturally break down and bind with the fabric, so I needed to pack them away and wait. I believe 3 or so weeks is long enough - but I have not experimented with this to discover. In my case I have waited a little over 4 months (time flies!!) and this is what I discovered.

When I plunged the fabrics into hot soapy water nothing happened! No bleeding of colour, no paint washing out into the water,  NOTHING!! The colour was now completely fixed. Whether that is due 100% to the soy milk I do not know for certain, but what I do know is that it worked really well. Here are some of the results. 

Picture
Picture
Picture
So - some interesting discoveries. I am not sure I will follow through with this much further at the moment - but it is always interesting to explore ideas and experiment with different ways to do things. Who knows what might come of it in the future, and what soy milk could also be mixed with to yield interesting fabric to work with.

Thanks for reading.


Please feel free to share my website or blog with your friends by using the buttons to the right. If you would like to receive an e mail each time I post a new blog, please clickhere. I promise to never send you junk or give your address to anybody else.

The making of a gallery at Festival of Quilts 2015

10/8/2015

 
Picture
It is that time of year again - Festival of Quilts is upon us. If you live in, or are travelling around the UK at the moment and have an 'interest' or should I say 'obsession' with all things quilt, then it is likely that you will be either visiting  the NEC in Birmingham yourself over the next few days - or at least know someone who is!

Until this year, I have always entered quilt shows through the front doors, but this visit was a little different to the usual trip most people make; very early in the morning  I went in through the back door - door 9.4 to be exact (this place is a vast maze!) - and entered an almost empty hall. I was greeted by a few guys busy with hammers, nail guns, and paint rollers and the odd electrician, busy installing temporary walls, lighting and carpets . They had been there all night I think!


Wearing my very attractive high viz jacket I managed to find gallery L16 - 3 white walls tucked in the corner of the enormous Hall 9, near the cinema, cafeteria and the all important loos. It doesn't look much does it? Well, not yet......


Picture
Gallery L16: Early Wednesday morning!
The truth is, however, that the organisation for this particular gallery began almost a year ago. Things like this don't happen overnight. I have to admit, I have never really thought about it before. But I thought it might be interesting to let you know the sort of things that do go in in the background to get a gallery such as this up and running.

Picture
Last year Chrisse Seager was responsible for the organisation of the challenge. The theme, you may remember, was 'Dislocation' and the quilts which were hung in the Dislocation Gallery at last year's Festival of Quilts and subsequently went on to tour across Europe and the UK. 
Click  here for more about that challenge
.
Picture
This Saturday (8th August) Chrisse and Hilary Gooding are presenting a lecture where they will talk about the history of the CQ Challenges, the themes, the need to jury the entries in recent years, the organisation of the challenges and the galleries as well as the opportunities available for the quilts to tour. The lecture will be illustrated with quilt images from past exhibitions. If you are there, why not go along to find out more and support the work of Chrisse and Hilary.

This year, Margaret Pratt has been responsible for the exhibition, assisted once again by Hilary Gooding and myself and guided by Chrisse whose experience has proved invaluable in making this year's gallery a success.


Picture
The work for this year's challenge actually began late last year when the theme for the challenge was decided. From there the website to publicise the challenge needed to be created and the application forms needed to be set up and put online. These were available from April 1st, but of course, lots of testing needed to be done to make sure they were ready and working properly for release. As you can imagine, all of this takes time. After several discussions and meetings the plan for this year's challenge was set and when April 1st arrived I waited for the applications to arrive via the website and through the post. The first entry arrived that day! 


The entry form required a lot of detail from the applicant as well as an image of the quilt. All of this had to be carefully collated and stored to ensure no mix-ups! A 20cm square sample created using the same fabrics and methods of construction also needed to be submitted by post, sent to Margaret directly. Keeping track of applications, images and samples was a good test of my organisational skills, especially as many of the parts of the entries arrived weeks or even months apart. Sometimes forms or images did not arrive - lost somewhere in the mysterious goings on of the internet, and sometimes I received a photo of someone's granny or pet dog (which were lovely to see) instead of the quilt! However, it all came together in the end and I enjoyed logging on each morning to see what had arrived in my inbox overnight. The remarkable range of ideas and styles were fabulous to see. 
REMEMBER
As this is the only image of the whole quilt the judges would see it is REALLY important that the photo is the very best you can take. Judges like to see the quilt in all its glory - not hands, heads, feet and miscellaneous background. Having it straight also is a good idea.


The great thing about the way the entry process to the competition has been organised is that I was able to do all of this whilst in New Zealand - something which would have been completely impossible were it not for high speed internet and my laptop! I was also able to answer questions by e mail and hopefully nobody even realised that I was over 11,000 miles away.

As the entries arrived I gave each one its own number and set up spreadsheets to keep track of the process....... more on the importance of that later. I also created a secure gallery in the cloud to allow Margaret and myself to access the images and other information from wherever we were. The power of the internet still amazes me!

As the samples began to arrive by post, Margaret Pratt was also excited. She too enjoyed opening the packages that started arriving on her doorstep at regular intervals. I am sure her postman must have wondered what on earth was going on. Little did he or she know what was to be coming later!! We kept in close contact to ensure we both knew what had arrived and what was still outstanding for each of the entries. 

To ensure the entries were judged anonymously, the back of each sample was covered over with a piece of fabric which Margaret hand stitched in place, so covering the name of the maker. She then needed to add the number I had given to the quilt. That way we were able to keep the maker of the quilts anonymous for the jurors and keep track of which sample was which.
Picture
Annette Morgan

By 23rd June the entries were all in (well............. almost all in) and a whole package collated for Annette Morgan and Marion Barnes, the 2 jurors for this challenge. For them to do their job, Annette and Marion wanted to see the stitched sample, the written statement and the full image of each piece. Being able to zoom in on the photographs enabled them to see any detail. I can't emphasise enough the need to take a decent photograph of your quilt should you ever enter a quilt competition in this way. 
Margaret then made a special trip to Ipswich to take everything to the jurors and waited for their decisions.

 
Picture
Marion Barnes
Annette and Marion selected 43 quilts which they felt best matched the brief for the challenge, and these are the quilts you will see hanging in the gallery in hall 9 (stand L16).

By the 1st of July the selections were complete and it was then my job to write to all those who had entered, giving the good and bad news respectively. Giving good news is always easy, but sending bad news is never a pleasure and a number of people were understandably disappointed.  It is the one part of the organisation of this event that was not enjoyable. 

From that point on it all got a bit crazy!


A few of the samples needed to be returned to their makers, as they did not wish for them to be put on display as their quilt was not selected. 

The selected quilts quickly began to arrive at Margaret's home (the postman didn't know what had hit him!) and needed to be carefully unpacked and stored ready for transport. Margaret's husband John constructed a custom made carrier and also constructed the hanging battens for the quilts. (Just in case you did not know - each quilt needs to be screwed to the wall to ensure they are not stolen. It has happened. Can you believe it??!!)
Picture
John fixing Alicia Merrett's beautiful quilt to the wall with screws through the hanging batten)

Obviously, in many months to come, the quilts will all need to be returned to their makers - so the packing materials which the quilts arrived in need to be kept for their safe return. Margaret tells me she has a large part of her loft space filled with them!

Picture
A few of the hanging plans, one for each wall, showing thumbnails of the quilts (all to scale).

As the quilts arrived Margaret told me that she was delighted to see that they looked even better in reality than the photographs. She was then finally able to complete her hanging plan for the gallery. Many months earlier she had created a general hanging plan - knowing the dimensions of the walls of the gallery - but she needed to have the quilts in front of her to make her final choices as to which quilts to hang together. I am sure you can imagine how long that must have taken and the difficulty of deciding where to place 43 quilts in relation to one another!


Labels also needed to be created. Using the statements provided from each maker I created labels which Margaret was able to print and mount onto foam board. I haven't asked her how long it took - but I am sure it took another day at least to get them all done perfectly.

In addition to all this, Margaret also mounted each of the 20cm square samples she received (with a few exceptions as mentioned earlier) and placed them into files which she also beautifully decorated. These are the files you will see on the tables at the gallery which you are able to handle and give everyone the opportunity to see up-close the construction methods and materials used for each quilt. 

Oh... I almost forgot - the timetable for the stewarding - that also completed by Margaret.


Finally, on Wednesday 5th August, Margaret and her husband John set off early from their home with the car packed with tool kit, quilts, folders, paperwork, more paperwork, tickets, car park permits, ladder................... and lots of other 'stuff' and arrived bright and early at the NEC.

I set off early with my husband too - with parking permit, but without the all important entry tickets! - Margaret put them in the post last week and the envelope still has not arrived!!  Thank goodness that didn't happen with any of the quilts! 
Fortunately replacement tickets were provided once we arrived at the all important door 9.4!

Picture
Margaret holding her stack of labels. Thanks to her great organisation everything was packed in order and ready to put up quickly and easily on the day.
Which brings me to the final stages of setting up the gallery.  John and I hung the quilts and Margaret and Jeremy organised the labels. But the best way to explain is in pictures - I have written far too much!!

Picture
Marking the wall for the temporary top string line to be put up.
Picture
The second quilt to go up
Picture
More screws required
Picture
Quilts unpacked and ready to hang
Picture
The master plan!
Picture
Getting there
Picture
John, with wooden batten in hand
Picture
Jeremy and Margaret motoring along with the labels
Picture
Not many left to hang now
All in all it took just over 6 hours in total to have the quilts and labels hung. (with just one coffee break!) Our tables never did arrive - despite several visits to the 'table lady' - so we kept our 'setting up' table and used that. I think I saw John sit down once - so it was a long day all around. But I hope you will agree - the gallery looks fabulous. The quilts look amazing - and the total amount of hard work put in to the creation of each will surely number in the thousands of hours. Add to that the number of hours that Margaret and John, Hillary and myself have  added and it is a VERY big number indeed. I would not like to hazard a guess.

So - a huge THANK YOU to all involved with the creation of this gallery, and especially to Margaret. If she had not volunteered to take on this role this gallery would not exist. If I have forgotten to mention someone I apologise now. 

I will leave you with some more images of the quilts as they were when I left them on Wednesday evening, before the cleaners arrived to make everything spick and span.  I will not be back until Sunday, when I will see the completed gallery for the first time before I then take it all down again. If you are going to the Festival of Quilts I hope you will stop by to see the gallery - it is WELL worth it and if you are there on Sunday I look forward to saying hello.

If you have any photographs that you would like me to add to this blog them please do send them - I would love to create a beautiful gallery for those who were not able to attend to see.

Once the gallery is taken down on Sunday evening the quilts are off on tour. I do not know where they are going as yet, but CQ's Exhibition Officer, Amanda Wright will take ownership of the collection from Margaret and give her a much deserved break. 

Hilary Gooding will also begin creating the 'book of the show' as in previous years. See here for the fabulous  books she has previously created. Watch this space to find out more about it!


I hope you have enjoyed finding out more about the background to this year's gallery at Festival of Quilts. If you are there tomorrow, why not pop in to Chrisse Seager and Hilary Gooding's lecture which gives more detail about the background to last year's challenge 'Dislocation'. 

Thanks for reading!

Please feel free to share my website or blog with your friends by using the buttons to the right. If you would like to receive an e mail each time I post a new blog, please click here. I promise to never send you junk or give your address to anybody else.

    Picture
    Picture
    Picture
    Picture


    Click here if you would like to receive an e mail when I add a new blog post.
                       OR

    Follow my blog with Bloglovin
    Picture

    Categories

    All
    Challenges
    Classes
    Colour
    Cool-ideas
    Courses
    Designing
    Doodling
    Dye
    Exhibitions
    Experimenting
    Festival-of-quilts
    Flower-bowls
    Gelli-plates
    Hanging-sleeves
    How-to
    Inspiration
    Line
    Lino Blocks
    Making
    Marbling
    Mending
    Mono Printing
    Mosaic
    New-products
    Purchasing
    Quilt Gallery
    SAQA
    Sew On The Go
    Sketchbooks
    Software
    Stencils
    Stitch
    Surface Design
    Talks
    Thread
    White Horses
    Workshops
    Yarn Bobming

    Archives

    December 2020
    September 2020
    August 2020
    July 2020
    May 2020
    February 2020
    December 2019
    October 2019
    September 2019
    July 2019
    May 2019
    March 2019
    February 2019
    January 2019
    December 2018
    November 2018
    September 2018
    August 2018
    July 2018
    June 2018
    May 2018
    April 2018
    March 2018
    February 2018
    January 2018
    December 2017
    November 2017
    October 2017
    September 2017
    July 2017
    June 2017
    May 2017
    April 2017
    March 2017
    February 2017
    January 2017
    December 2016
    November 2016
    October 2016
    September 2016
    August 2016
    July 2016
    May 2016
    April 2016
    March 2016
    February 2016
    January 2016
    December 2015
    November 2015
    October 2015
    September 2015
    August 2015
    July 2015
    June 2015
    May 2015
    April 2015
    March 2015
    February 2015
    January 2015
    December 2014
    November 2014
    October 2014
    September 2014
    August 2014
    July 2014
    June 2014
    May 2014
    April 2014
    March 2014

    RSS Feed

    Picture
    Picture
Powered by Create your own unique website with customizable templates.