CLAIRE PASSMORE blog

'Quilt tin' Quilting

26/1/2015

 
Picture
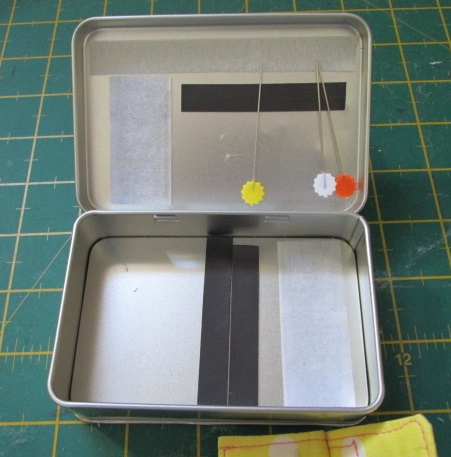
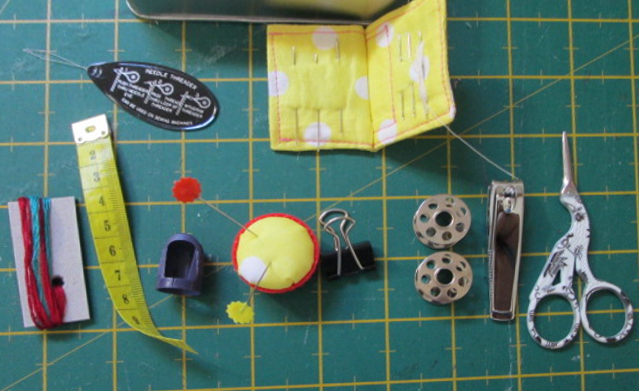
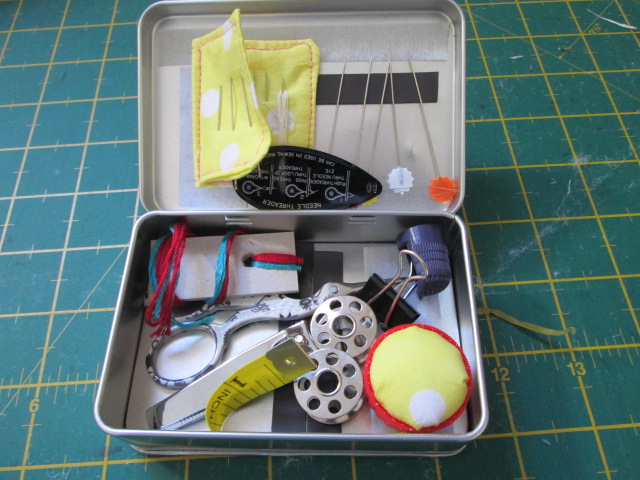
A great gift for a quilter?

Yes, I know. It is silly. But silly things make me laugh.

This is my 'quilt-tin'. It is so useful that I keep one in my handbag, so wherever I am, when I have time on my hands, I have something nice to keep me occupied. 

As it is small and self contained it is also perfect for travel - so if you are on a train, plane in the car or on the bus, you can pull it out and get going on a little project!

I made it from bits and bobs I already have - or scraps I found in my recycling bin.


Picture


So this is what is in my 'quilt-tin'?


I started with a small tin with a hinged lid 
needle threader
some pre-threaded needles
pre-cut embroidery thread - on a piece of thick card
a short piece of tape measure
thimble
bottle top pin cushion
a tiny 'bulldog' type clip
2  bobbins wound with thread
nail clippers
cheap scissors (blades shorter than 4 inches*)


and in the lid section.....
5 pre threaded needles
5 pins


Picture
Start with an empty tin and add a few strips of loop side velcro and stick on magnet strips.
Picture
The contents of the tin
Tips for making a useful tin

  1. A hinged lid is helpful. It is one less thing to fall on the floor.
  2. Stick strips of stick on velco (loop side) and/or stick on magnets inside. It keeps your bits and bobs firmly in place.
  3. Pre-threaded needles are good if you are in a bouncy vehicle - that can make threading needles very challenging!
  4. Metal bobbins stick to the magnetic strip so don't fall out of the tin so easily.
  5. Nail clippers are aeroplane friendly. 

6.     Scissors with blades less than 4" in length are allowed on aeroplanes. Be ready to lose them however, as not all airport security is familiar with the law!

7.      A little 'bulldog' clip is super handy - put one or two in the tin.

8.     Make a bottle top pincushion and stick a piece of (loop side) velcro on the base to keep it in the tin. The loop velcro also sticks on all sorts of surfaces if you take it out.

9.      Keep to 5 pins - it is usually enough, and security checks don't seem to bothered with just a few. (Technically you are allowed as many as you want).


Picture
Sew Easy make a thread cutter on a lanyard which you can sometimes get onto a plane - they are cheap enough to risk losing. Clover make a heart shaped alternative too.


Alternatives to scissors or nail clippers
Picture
Recycle an old dental floss container - it has a very effective 'thread' cutter. If you can open it you may even be able to fit a bobbin of thread inside.

Picture


Bottle top pincushion

I stick a piece of hook side velcro (the scratchy side) on the bottom of my bottle top pincushion. It sticks to the loop side velcro in the tin - but also to lots of other surfaces too. 


I love these tins so much I actually have lots of them - one for beading projects, one for a small handbag.......


Picture


and the last one I have just because I love the tin! (bottom left) I found it at a junk shop and it used to hold throat sweets. 


I am planning some big travel over the next few weeks and months - so my quilt-tins will be coming in very handy. I will blog some pictures of them on my travels soon! 


I can recommend making up a portable little sewing kit if you don't already have one - keep it small and neat and I am sure you will be surprised at how often you can use it. They also make great gifts for quilting friends!


Thanks for reading.


Please feel free to share my website or blog with your friends by using the buttons to the right. 
If you would like to receive an e mail each time I post a new blog, please click here. I promise to never send you junk or give your address to anybody else.


An idea for getting started on a new piece of work

19/1/2015

 
Picture
To give you a flavour of what you will find in my new book I am sharing a method you can use to get you started with some ideas for a new quilt. It is not copied and pasted from the book, but is a brief explanation of just of one of the many varied approaches I demonstrate and explain.  

When I am looking for inspiration for a piece of work I sometimes turn to photographs to start my ideas.

I usually keep a small camera in my handbag and take photos of almost anything that looks ‘interesting’. It might be a pile of rubbish on a street corner, or even something washed up on the beach. I keep a folder on my computer for the photos and can quickly scan through them when I need an idea.

Sometimes, however I do not have what I am looking for. That is when I turn to Wikimedia Commons. (More on that at the end of this post)

Picture


To demonstrate one way that you can use photos to help develop ideas for a piece of work I have used a picture which I found on Wikimedia Commons, taken at Park Gϋell in Barcelona, a beautiful public park that was created by Antoní Gaudi from 1900 onwards. I have not yet been lucky enough to visit, but if you go the following website you may see why it is on my list! http://www.parkguell.cat/en/

Parc Guell entrance
This is the picture I have chosen. It was taken by  someone who goes by the name of Olavfin;
"HUS GUELL 2" by Olavfin - Own work. Licensed under Public Domain via Wikimedia Commons - 
http://goo.gl/uCis8p

The distinctive roof shape and pattern is what caught my eye.

Here is a simple process you can try to generate some images which you can play about with.

Picture
To reduce the amount of detail in the photo, and to make it more manageable, trace the main outlines that strike you as most interesting. 

Picture
Look at the shapes on the tracing and begin to add lines or erase certain sections to see what happens.  You can also rotate the image, take certain parts and combine them with other parts or overlap different parts . Experiment and see what happens.

Picture
Once you have played around you will hopefully have a small, simple outline that you can begin to use. Develop it more by adding more or erasing more lines.

In this example, the original roof shaped tracing has yielded a figure shape that I will now use as a motif to try out various ideas. By tracing the shape again you can experiment with decorating it in different ways, changing its size, colour, orientation and position. You could cut out the shape and use it as a template to draw around, create a stencil, photocopy it to gets lots of them to play around with or use a computer to replicate the shape and play about with it from there. I usually just get a pile of scrap paper and experiment.

Here are some of the results I got from playing about for an hour.

Picture
The simple outline drawing derived from the rooftop tracing.
Picture
Add some lines to create a more interesting background.
Picture
Try some different lines and see how the effect changes.
Picture
Take the image and change it a little. Here I made it more curved and then cut it up into squares.
Picture
Overlap 3 figures to give a little perspective and interest.
Picture
Add a little colour and see how it changes.
Picture
Try a few shapes in the background. These remind me of bubbles.
Picture
I put some lines beneath each figure to suggest they were standing rather than floating.
Picture
How about some icicles?
Picture
Filling the figures with different shapes.

Picture
Adding a more complicated background.
Picture
Another variation.
The nice thing about this method is that it is completely spontaneous. You don't really need to begin with any preconceived ideas - the picture starts the process and you take it from there. 

I doubt that I will ever make any of these images into a quilt - but I will keep them in my sketchbook and when I flick through it in the future, whilst looking to develop my ideas for another project, some of these images may just spark off an idea in my mind.

However one of these could easily be made into a small project - a 12" x 12" type square for example - where you could try out some new or different techniques without having to invest too much time or money.


Wikimedia Commons
What is Wikimedia Commons?

Wikimedia Commons (or simply ‘Commons’) is an online repository of free-use images, sound, and other media files. In simple words – it is a great place to find images that you can download and freely use without fear of infringing anyone’s copyright. (Just be sure to read the terms listed by the owner of the files and comply with their wishes)

The aim of Wikimedia Commons is to provide a media file repository "that makes available public domain and freely-licensed educational media content to all, and that acts as a common repository for the various projects of the Wikimedia Foundation." The expression "educational" is to be understood according to its broad meaning of "providing knowledge; instructional or informative.

Here is a link to the site: http://commons.wikimedia.org/wiki/Main_Page

When you have some spare time, visit the site and type something into the search box at the top right of the screen and you will quickly get an idea of how useful the site can be when you need an image or some inspiration.


Thanks for reading!


Please feel free to share my website or blog with your friends by using the buttons to the right. 

'Quilting Originals'    A new book for 2015

12/1/2015

 
Picture

Hello!
I am a bit excited today as after nearly two years of work I finally sent my book to the publisher this morning. This is the cover - you might recognise it as my 'Sardine Run' quilt. It was my first attempt at creating my own original work, and for that reason has a special place on my wall.

When I started this piece I had no real idea of how to go about designing an original quilt. For that reason it took a very long time to create, and a lot of trial and error went into the process. I have no formal training in art or design, but I do have a lot of patience and a willingness to squirrel out information. Since making this first quilt I have done a lot of research and spent a lot of time learning how to turn my ideas into successful quilt designs which I thought I could pass on to others. 

There are lots of great books on the market which aim to help you design and create your own work. I know - I own most of them! 

The problem is that they have often been written by people who do come from a background in art, fine art or design. No bad thing I think - learning from the experts.  But when I read them I find they introduce so many  concepts, ideas and new vocabulary that I can't fit it all together to get a coherent plan in my head. It is like having a huge pile of jigsaw puzzle pieces poured out of the box before me. I can see the individual pieces - but struggle with how to fit them all together to get the big picture. 

Picture

So I decided to start from scratch and figure it out for myself: I studied colour theory and graphic design;  I started drawing in a sketchbook every day; I read about composition and then tried out literally hundreds of ideas in art journals; I looked at the work of other quilt artists and visited galleries and museums; I bought myself a nice set of water colours and pencils and gave myself time to explore and experiment with them, and gradually I came up with some ideas for new quilts - my 'Destination' series. You can see the quilts here.

I kept detailed notes of all I learned and after I had made about 12 quilts a friend suggested I should formalise it all and write a book. At first I thought she was mad, but then I figured why not?  So I decided to write it - a book about quilt design,  but from the point of view of the non-expert.  It took so much longer than I thought, and really did push the limits of my  patience, but today it is finished. Here is a tiny preview!


Picture
Picture
Picture
So, the book is now out of my hands at last. I am launching it on May 1st at my upcoming exhibition - more on that soon. 
If you would like to purchase a copy they are £18.95. Please contact me and I can organise getting one to you.
Thanks for reading!


Please feel free to share my website or blog with your friends by using the buttons to the right. Thanks!  

Surface Design Roundup

5/1/2015

 
Picture
Happy New Year!
Hi again.
I have blogged a lot about my favourite ways to make the fabric I use more interesting. I thought it might be useful to bring together all of the different posts I made in 2014 into one place. So, here are the best. Click on the picture to go to the original post.

Picture
Hectograph - AKA Jelli plate mono printing. 1 year old and still going strong!
Picture
Hand carved print blocks
Picture
Markal / Shiva Paint Sticks
Picture
Freezer paper stencils
Picture
Derwent Inktense - possibly my favourite favourite
Picture
Screen prints
Picture
Free Motion Quilting Part 1

Please feel free to share my website or blog with your friends by using the buttons to the right. Thanks! 
Picture
Free Motion Quilting Part 2


Thanks for reading
    Picture
    Picture
    Picture
    Picture


    Click here if you would like to receive an e mail when I add a new blog post.
                       OR

    Follow my blog with Bloglovin
    Picture

    Categories

    All
    Challenges
    Classes
    Colour
    Cool-ideas
    Courses
    Designing
    Doodling
    Dye
    Exhibitions
    Experimenting
    Festival-of-quilts
    Flower-bowls
    Gelli-plates
    Hanging-sleeves
    How-to
    Inspiration
    Line
    Lino Blocks
    Making
    Marbling
    Mending
    Mono Printing
    Mosaic
    New-products
    Purchasing
    Quilt Gallery
    SAQA
    Sew On The Go
    Sketchbooks
    Software
    Stencils
    Stitch
    Surface Design
    Talks
    Thread
    White Horses
    Workshops
    Yarn Bobming

    Archives

    December 2020
    September 2020
    August 2020
    July 2020
    May 2020
    February 2020
    December 2019
    October 2019
    September 2019
    July 2019
    May 2019
    March 2019
    February 2019
    January 2019
    December 2018
    November 2018
    September 2018
    August 2018
    July 2018
    June 2018
    May 2018
    April 2018
    March 2018
    February 2018
    January 2018
    December 2017
    November 2017
    October 2017
    September 2017
    July 2017
    June 2017
    May 2017
    April 2017
    March 2017
    February 2017
    January 2017
    December 2016
    November 2016
    October 2016
    September 2016
    August 2016
    July 2016
    May 2016
    April 2016
    March 2016
    February 2016
    January 2016
    December 2015
    November 2015
    October 2015
    September 2015
    August 2015
    July 2015
    June 2015
    May 2015
    April 2015
    March 2015
    February 2015
    January 2015
    December 2014
    November 2014
    October 2014
    September 2014
    August 2014
    July 2014
    June 2014
    May 2014
    April 2014
    March 2014

    RSS Feed

    Picture
    Picture
Powered by Create your own unique website with customizable templates.