CLAIRE PASSMORE blog

Surface design favourite #1: lino printing

19/6/2018

 
Lino printing is one of my favourite methods of mark making on fabric - along with mono printing from glass sheets covered in ink. Although two quite different processes I have found the two generally go hand in hand. In this post I'll share the lino prints I am making and in my next post I will show you how the mono printing is going.

Picture
Carved lino block and Caligo safewash relief inks rolled onto a glass plate.

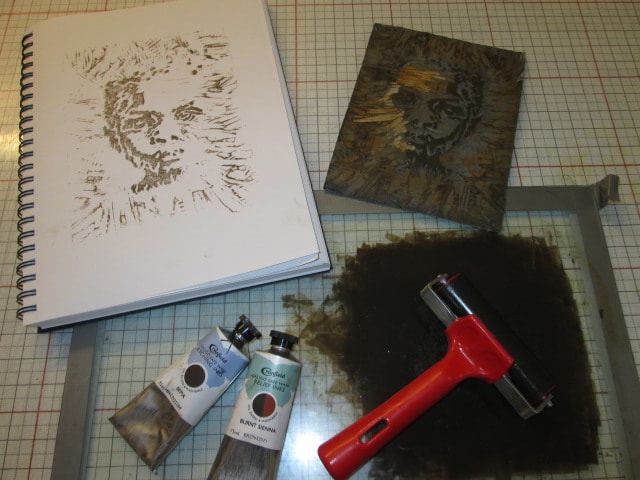
A few weeks ago I went on an excellent course at Ardington School of Crafts in Oxfordshire. It is a lovely place and is very well run by Simon and Yvonne Sonsino. The course was run by painter and printmaker Jessica Rose (www.jessicaroseartist.co.uk) and was one of the best I have been on in a long time. Jessica is lots of fun and very knowledgeable. She passed on all sorts of helpful information - the sort you just can't get from watching a YouTube video!

This is the print block I made on the day, reworked a little to clean it up (hence the pale coloured gouges you can see on the lino block above). 
At the course I learned a clever technique that allowed me to make prints with the block on Japanese gampi paper and then add colour to a separate layer behind the paper. The effect is very delicate and as it uses different layers is a technique I would like to explore with fabric.
Picture
Picture
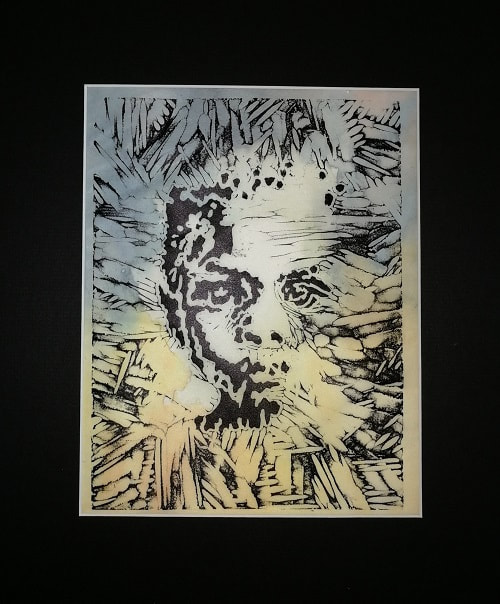
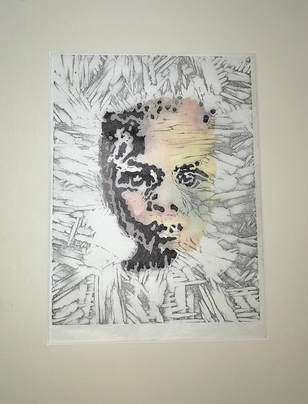
Mono print and ink wash layers: print on Japanese gampi paper, ink on watercolour paper

​I love the way the bold black printed image on the left is really crisp - the black mount around it really enhances the print. In contrast, the white mount of the right subdues it considerably. (same print in both)
I also like the way the water based ink wash that is placed behind the print subtly shows through the beautifully thin and floaty gampi paper. (Carrying a wet fresh print on gampi paper across a crowded workshop requires a lot of planning and no sudden wafts of air!)
​
Now I have had time to experiment with this technique a little more I have made some samples that I want to use in a small new series that will join the others in my In Their Shoes series. The quilts I want to make are going to focus on the many forms of child labour, from children working within a family setting all the way to child slavery.

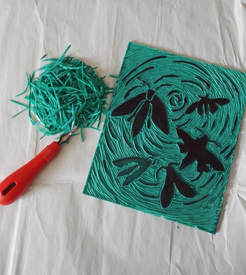
Up until now all my lino printing has been self taught. I have learned a lot by myself and really enjoy spending a few hours carving away at various different blocks. As a novice I generally prefer to carve the softer vinyl blocks that are available in most art shops and on line to the harder and sometimes more crumbly grey lino, often referred to as 'Battleship'. (The green block below is an example of one of the softer relief vinyls which is easier to cut, but can be a little stretchy, causing other issues as you carve.)
Picture
Blocks made from linoleum
Picture
Block made from soft plastic type material

​As I was going to the course I decided I really needed to make the most of having an expert to teach me, so I had a splurge and bought a selection of different types of lino block material and new set of carving tools. 

In the past I have relied on the cheap and cheerful red plastic handled cutting tool with interchangeable blades. I must say, there is nothing terribly wrong with them and I have made some great print blocks using them. But my blades are all blunt and rather than spend another £10 on a new set of blades I decided to see what else was available. Turns out there are lots to choose from and a lot of money can be spent! 
​
For a brief moment I did consider the beautifully made Pfeil carving tools but I just couldn't figure out which of the huge number of different shapes and sizes I should buy (too much choice is no choice at all as the saying goes). They were too expensive for me to just guess so I decided to look elsewhere. (Since then I have discovered this fantastic website and blog which might have helped my had I found it earlier: https://www.drawcutinkpress.com/pfeil-lino-cutting-tools-guide/ )
Picture
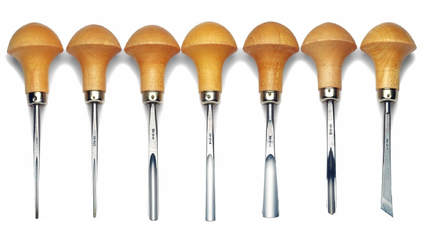
Pfeil Lino cutting tools
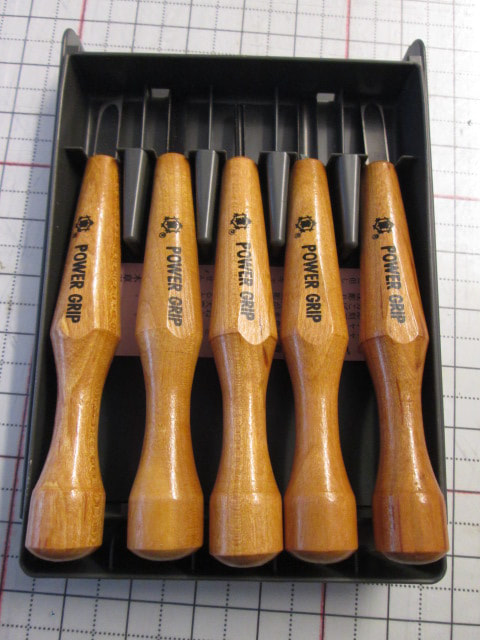
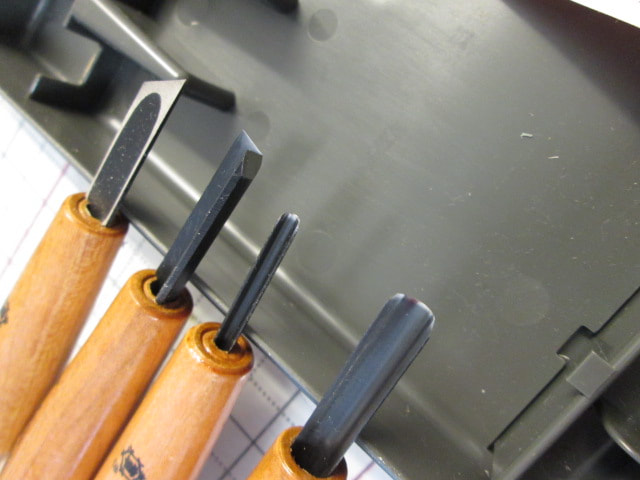
After much searching I ended up choosing this set of Japanese wood carving tools - and they have turned out to be fabulous to use. Of the 5 in the box I have found 4 to be just the sizes I need. (I'm not really sure what to do with the 5th one yet!). Compared to the small red handles tool these cut through even old tough lino with ease. 
Picture
Power Grip Japanese Wood Cutting Tools - also great for lino
Picture
​My 4 favourite tools:
3mm #9 U shaped gouge,
6mm #8 U shaped gouge, 

4.5mm V gouge
7.5mm skew chisel,
 They also come in a neat storage box
This is a close up of the block I carved at the course with my lovely new cutters. I used a piece of fresh grey lino - and was amazed at how easy it was to cut compared to using the little red handled cutter - I know it is an old chestnut, but it really was like cutting into butter. I needed no real effort at all to cut the lino and the lines I cut were very clean allowing me to get lots of detail and fiddly bits. In future I think I will be choosing grey lino blocks rather than the easy carve vinyl if these tools continue to perform as they did on first use. (But, if I do use one of those little red cutters again I think I will prefer to choose one of the softer types of lino substitutes and sacrifice the fine detail).
Picture

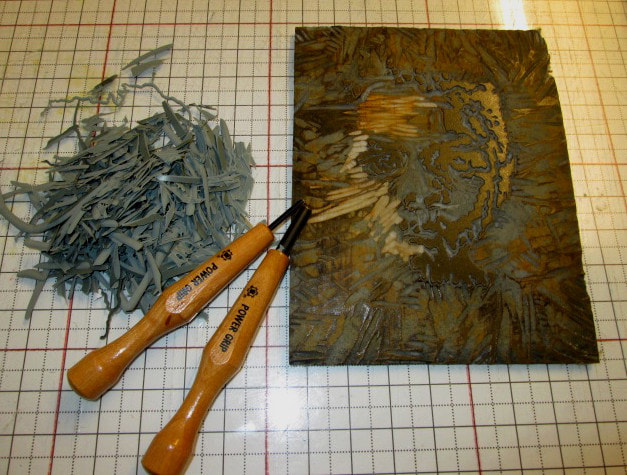
And this is a piece of white Kona cotton fabric that I printed using the block. 
Picture

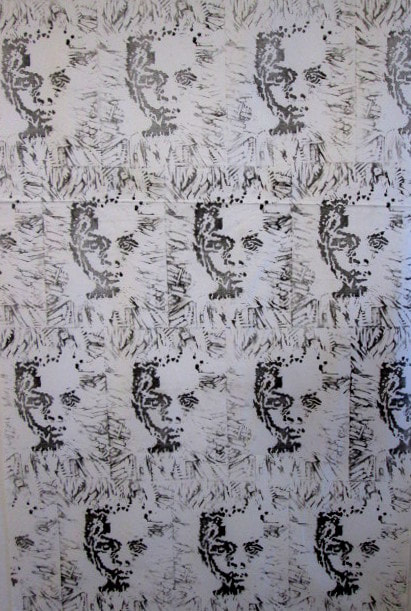
I plan to use this fabric and lots more in a new series of quilts I have in mind to make concerning child labour. In my next post I will share the mono prints that I plan to use along with this fabric. 

Thanks for reading.
Please feel free to share my website or blog with your friends by using the buttons to the right. If you would like to receive an e mail each time I post a new blog, please click here. I promise to never send you junk or give your address to anybody else.

The copper quilt is finally coming together

15/12/2017

 
This copper quilt is driving me mad! I don't think I have ever spent so long over the development of a quilt as this. For once I I had too many ideas and I decided to explore all the possibilities, which has all taken time:

copper used for electrical wiring, circuits & microschips;
copper fixed to the hulls of ships to reduce the amount of fouling and thus make them faster, so slave ship owners would loose less of their 'perishable' human cargo;
copper mined in Cornwall and refined in South Wales, forming the backbone of the economy for the south west until cheaper copper was found elsewhere;
the little known copper-age, ( about 4500 B.C. to 3500 B.C.) where copper metal was worked on a relatively large scale in part because it is found in "large pure ingots in a natural state" in many different locations around the world;
Copper used in medicine as an antiseptic to sterilize, cure eye ailments, help with immunity and TB treatment, give relief from arthritis and as a contraceptive .....

The list goes on, but I wanted to research each of these ideas  before I  narrowed down my options.
Happily, today, I made a final decision and brought together my refined ideas to form a resolved design. It is a huge relief!

I finally decided the narrative for this quilt would be the Roman goddess Venus,  who, in Western classical tradition, is the most beautiful of all goddesses and is the living embodiment of fertility, love and sexuality. Her birth and subsequent life story is inextricably linked with the island of Cyprus, ancient home of the metal copper.  


Picture
Botticelli's 'Birth of Venus'
Venus is also known as the 'Alchemical goddess', because she alone had magical powers that could cause both gods and mortals to do as she wished. One thing I rather like about Venus is that she does not fit the image of a 'vulnerable' woman as do many other goddesses, and in classical times was never victimised or made to suffer because she was a woman. She was mother of Cupid and many, many others; she cast spells which resulted in mortals and gods falling in love and conceiving new life; she turned a statue into a living woman for Pygmalion; she inspired poetry and declarations of love. Whole goddess cults grew around her, (some still continuing to this day) focusing on fertility and love. Such was her popularity and power, even Julius Caesar himself declared her an ancestral relative.

During the Renaissance Venus's popularity as a 'sexual' goddess made her a subject of great interest and depictions of her became the classical nude figure. What is interesting to me is though, is how, over time, such depictions have gradually transformed the notion of 'Venus the revered goddess' into a simple nude female sex object. ​This change is what I decided to explore with my quilt. 
Picture
Botticelli's Venus transformed into a line drawing
I have decided to call this quilt 'Goddess or Sex Object?' and have used Botticelli's painting of Venus as a starting point. 

I have kept the quilt top in two parts, to reflect this dual view of Venus and have cut into the quilt to create a large venus symbol. To join the two sides I have created something 'appropriate' - I hope people can figure out what they are supposed to be!

This is how the quilt currently looks.....
'Goddess or Sex Object?' Art quilt by Claire Passmore
'Work in progress on 'Goddess or Sex Object' by Claire Passmore ©2017
It still isn't finished as I have more to work on at the top of the quilt, but I am finally happy with the direction it is going. 

​Thanks for looking.
Please feel free to share my website or blog with your friends by using the buttons to the right. If you would like to receive an e mail each time I post a new blog, please click here. I promise to never send you junk or give your address to anybody else.
 

Stitched Alchemy: 'Carusi'

15/12/2016

 
I am still working on my sulfur quilt and as I have been working in creating the fabrics I have been thinking about the life the carusi must have endured. Sold to the mine owners or workers for an agreed number of years, what must they have thought of their lives as they hauled heavy loads of sulfurous rock from deep underground up to the surface? They often lived, ate and slept somewhere in the mine, having no proper home to return to.  For many boys their only escape from this dreadful life was to be rescued  by being called up for military service. 

Picture
Painting by Onofrio Tomaselli, for the 1906 World's Fair in Milan depicting the carusi
​The artist Onofrio Tomaselli created this painting in 1905 after staying for some time with Baron La Lumia, a wealthy sulfur mine owner, and witnessing at first hand the fate of the carusi.  The painting was exhibited in 1906 in Milan at the World's Fair and was a tribute to 19 carusi who lost their lives in one of many terrible accidents at La Lumia's sulfur mine in Gessolungo, which occurred in 1881. I guess it shows that there were, at least, some people with a conscience at the time.
(Source: Davide Mauro (Own work) [CC BY-SA 4.0 (http://creativecommons.org/licenses/by-sa/4.0)], via Wikimedia Commons)
For the fabrics, I dyed lots of yellows as you would probably expect. Starting with lemon and golden yellow fiber reactive dye I added very small amounts of orange, rust, bronze and chartreuse to create interesting mottled backgrounds. Onto that I monoprinted shapes, words and other marks that help tell the story of the carusi.
Picture
Picture
Picture
Picture
Picture

The fabrics have turned out to be very interesting - I added very dense print marks, which may mean the quilt will end up with very 'busy' look, so I will have to be very careful when positioning the different pieces.
​
Planning ahead, I decided to check out how the straight quilting lines would look over the young boy's face, so I made a small trial piece. Although it may seem like an extra step, I prefer to try out important design features to ensure I am happy with the effect before moving on with a design. I have used this simple but effective straight line quilting pattern on the other quilts in this series, so I was keen to continue using it, but not if it comporomised the overall look of the quilt. Happily, I think it works well.
As I have no plan for this small sample I have entered it into that SAQA 2017 trunk show. I hope it arrives in time!
Picture
'Carusu' 7" x 10" © 2016 Claire Passmore

I am now in the process of positioning the fabrics on the design wall to create the quilt top. I usually take a quick photo of several different variations and then look at them to see what works and what needs to be changed. Somtimes a layout just falls into place, but when it doesn't I find this really helpful.
Picture
Picture

I'll let you know how it develops in my next post. Until then, thanks for reading.
​
​Please feel free to share my website or blog with your friends by using the buttons to the right. If you would like to receive an e mail each time I post a new blog, please click here. I promise to never send you junk or give your address to anybody else.
Click to set custom HTML

Printing with lino blocks

16/8/2016

 
If you went to Festival of Quilts, I hope you had a lovely time. As usual there was lots of excellent work to see, old and new friends to meet, and a hint of controversy too. 
My mum and I spent a great weekend together and came away with lots of ideas and a little bit of shopping too. One of our favourite galleries was that belonging to Russian artist Lyubov Lezhanina. (Click on her name for a link to her Facebook page). It was tucked away right in the back corner, so if you didn't get down there, here are some photographs of her wonderful work.


And now back to work....
​
On October 2nd I have a new 'Further Techniques' workshop coming up at Midsomer Quilting where we will be taking a more considered approach to some of the ideas used in the original 'Techniques 1' workshop. The aim of the new workshop is to add surface design to large pieces of fabric in order to  create a co-ordinated collection that can be used to create a unique art quilt.  

​
One of my favourite ways to create interest on fabric is to print, and there are so many ways. For the workshop, amongst other things, we will be making hand carved lino blocks. They are reasonably easy to create and are make beautiful graphic marks on fabric. To give you an idea,  this morning  I decided to start a new block based on a moth that flew in through the window last night. 

After looking carefully at it I did a quick search and discovered it is a Pale Shouldered Brocade, Lacanobia thalassina. It is beautiful, don't you think? 
Picture

Not only is is an interesting little creature to look at, it is also a very simple shape with some interesting marks which will transfer nicely as a lino block. 

To start the block I made a very simple drawing of the shapes I wanted to carve. You can see that there is no detail here - just the outlines of some vaguely moth shaped creatures and some lines giving the idea of movement. (Please ignore the faint beetle and ant shapes in pencil - this is a recylced piece of paper and they have nothing to do with the moths)
Picture

This is what I intend to carve into the piece of 'lino' (I like to use a soft plastic type material as a substitute for lino as it is much easier to cut into and doesn't crumble like lino can if it gets cold or dries out). The moth shapes will remain whole on the block and the lino material all around them will be carved away.

Using a very soft pencil I traced the outlines then transferred them onto the lino block, ready to carve.
​
Picture

You can see the smudgy pencil outlines of the moth shapes and also see where I have started to carve into the block, taking out the green plastic material with the cutting blade. However, it is already starting to get a little confusing as to what should be carved away and what should remain, so I took a black marker pen and coloured in all the areas I want to stay. That way I hope I wont make any mistakes and carve out a section that should stay. Once it is gone, it is gone and there isn't a lot that can be done!
​
Lino printing block Claire Passmore

I hope this photo makes it all clearer. The black sections will be left alone for the time being, and all the green areas need to be carved away with the cutting tool. All those little grooves that remain in the carved away section produce beautiful graphic marks on your prints, so don't try and make it all super smooth.

SAFETY FIRST: If you try this then you MUST only ever carve away from yourself. That blade is super sharp and not only does it really hurt when you slip and stick it into yourself, it goes in deeply too and there will be a lot of blood and maybe tears. You need quite a lot of pressure to carve into the lino so accidents, which do happen, are not nice. 

Make sure the hand which is holding the lino block is never in front of the hand holding the carving tool. Although this sounds obvious, it is easy to forget and let that free hand hold the block in such a way as to almost guarantee you will get cut. Turn the lino block often to make sure you are always cutting away from yourself and your free hand. 
​

Picture

It took about half an hour to carefully carve away all the green material around the black shapes, and the block was ready to have its first trial to see what else was needed to add interest. Using a roller and some printing ink I inked up the block and made a trial print onto a piece of scrap paper. Unfortunately I forgot to take a photo of this very first print, but once I could see how it looked I wiped the block clean with a tissue and carved a little more removing areas where I wanted more definition and where I wanted more detail. This is the print I made next.

Picture
You can see it is not a good print, but the purpose of this one was simply to see how the extra detail I added looked. The moth on the right was looking more like a wasp with the marks I carved into the wing sections - so I knew I needed to cut some more into that area to sort out that problem. But I do like the small straight lines I made in the body of the moth on the left.

After that I made a further trial print. The photo below shows this and the ink and roller I used to ink up the lino block. Again, it is a terrible print, but it showed me enough detail of the marks I had cut into the lino. I still don't like the waspy looking one though. Those lines on the wings are all wrong. I'll have to work on that some more.
​
Lino print for surface design by Claire Passmore
Here is the finished block - still a bit wet after washing off the ink under the tap.
Picture
Picture
And here are two of the early prints in my sketchbook. I have added a little colour to the one on the left with Markal oilstick. I had intended working onto it with watercolour paint and pencils - but I have discovered that the new ink I have purchased is not permanent once dry and so is pretty useless for my purposes! Aagh!! The moment any water touches the print the black ink smears all over the place and not only ruins the print, but turns everything black. So choose your ink carefully, or use acrylic paint which also works well, and is permanent once dry.

I will work on this block some more, make some better prints and then print up some nice fabric to share in a few weeks time. If you decide to have a try at lino cutting, and it is great fun, please do take care. Put your work onto a non-slip mat or a whole newspaper (to protect your table in case of slips) and remember to keep your free hand behind the cutting tool!

Thanks for reading. 
​
Please feel free to share my website or blog with your friends by using the buttons to the right. If you would like to receive an e mail each time I post a new blog, please click here. I promise to never send you junk or give your address to anybody else.
 
Click to set cu stom HTML

Messy marbling for a mini quilt inspired by Monet 

28/7/2016

 
Picture
'Grandmother's Flower Garden' by Anna
Picture
'Not my Grandmother's Flower Garden' by Claire
Picture
'Not my Grandmother's Garden either' by Claire
Picture
'Not Monet's Lily Garden' by Claire
I decided to make a little quilt this week for the workshop I am teaching on Sunday at Midsomer quilting. The workshop is called 'Not my grandmother's garden' and is very loosely based on the very traditional quilt made solely from hexagons - just like the first picture up above on the left. The first piece of patchwork I ever made (when I was 11 years old) was just 7 hexagons big, and I must say, it didn't inspire me to carry on with patchwork at that time. Too many fiddly bits for an impatient eleven year old! However, several years ago I made the yellow quilt (above) for a Quilting Arts Magazine challenge, and used the traditional hexagon quilt as the starting point. Hopefully you can see the hexagonal 'flowers' behind all the paint, thread and buttons. 

For this weenend's workshop we will be using hexagons (well..... maybe!) as the starting point to create an art quilt something along the lines of the yellow quilt above. I wanted to explore different possibilities, so I made a further two quilts to try out a few more ideas (see images above). The green one is similar in many ways to the yellow one, and the last one doesn't use hexagons at all - but Suffolk Puffs, another very traditional and English patchwork piece (currently known by the more funky name 'yoyos'). Thanks to Jamie Malden for sharing her 'how to' video on youtube on the right.
​
The inspiration for this last quilt came from one of Monet's paintings of the waterlily ponds at his home in Giverny. The top section of the green quilt reminded me of a watery pond, and made me think of Monet. Changing the shape of the hexagonal flower into a rounded flower is the sort of variation I was looking to explore for the workshop. It also meant I learned another new patchwork technique - Suffolk Puffs. 
​
Picture
Nymphéas (Waterlilies), 1914-1917, National Gallery of Australia
 
To make my version of the lily pond I needed to start with a watery blue background fabric - but my stash of such fabrics is rather depleted at the moment, so I needed a quick way to make a suitable piece. I decided to try my hand at marbling with shaving foam, as I believe it is quick and easy (nobody ever seems to mention how messy, however!). 

If you haven't had a go at this technique it really is fun - but I do recommend wearing an apron and having lots of newspaper and a large bucket of water and a bin at your side!
(Arthur Comstock - a little bird told me that you love the gelli plates, so I think you might like to have a go at this too!)

This is what I did...

Picture
You will need: a tray or other flat surface, cheap shaving foam, acrylic paint, a big and a small scraper (ruler and a credit card), a stick, cloths, bucket of water and a bin
Picture
1. Squirt out lots of shaving foam onto the tray.
Picture
4. swirl it about with a stick
Picture
6. Lift the fabric up and lay on a flat surface, foam side upwards.
Picture
2. Spread it out with a credit card.


​
I discovered that the paint took up better onto fabric that was moist (not soaking wet). I got the best results when I misted the fabric with water from a spray bottle and let it sit for about ten minutes to penetrate the fibres.


​
Picture
7. Use a ruler to scrape off the excess foam from the fabric.
Picture
3. Add some spots of acrylic paints. You don't seem to need a lot.
Picture
5. Lay a piece of damp fabric on top and pat down gently all over.
Picture
8. Allow to dry. Press with a hot iron covered with a piece of paper. Wash if required.
The shaving foam on the tray can be used several times, spreading it out again and adding more paint. My foam did start to break down and 'curdle' after a while, so when that happened I scooped what was left into the bin and started again. 

The whole process took less than 3 or 4 minutes per piece of fabric,  so was a quick project which yielded several very nice pieces of fabric, each a little different.
​
I'll add some photos of the quilts made at the workshop as soon as I can.

​Thanks for reading.
​
Please feel free to share my website or blog with your friends by using the buttons to the right. If you would like to receive an e mail each time I post a new blog, please click here. I promise to never send you junk or give your address to anybody else.
 

Avocado dye part 2

2/5/2016

 
I hope you will be as pleasantly surprised with the results of the avocado dyeing experiments I did last week. You can see the results below. After soaking overnight in the dye bath, I laundered the fabric and the result was a beautifully soft dusty pink (it is the fabric in the centre). The other wonderful thing is the fabric had the most lovely smell - a slightly perfumed citrussy freshness. I wish I could bottle it!

I think the 3 fabrics below look beautiful together don't you? - The original white, the avo dyed fabric and then the walnut dyed fabric I made a few months ago.

Picture
Left: original white fabric; Middle: dusty pink avo dyed fabric; right walnut dyed fabric

Adding the iron after mordant
 If you have ever tried working with indigo or wode then you will know about the magic that happens once the fabric comes out of the vat - well, a similar thing happens with avocado dyed fabric once it hits the iron after mordant. It is like magic! ​
Picture
The iron after mordant - effectively rusty water!

​I think the best way I can show you what happens is in pictures..............

I decided to try a folding technique and dip the dyed fabric into the iron after mordant to see what would happen. I folded the fabric following the instructions in this video 
https://www.youtube.com/watch?v=eTaAl4us8aY

Picture
Fold the fabric accordian style into pleats
Picture
This is how it looks when it is opened up.
Picture
Start by folding the corner up into a triangle
Picture
Then fold the triangle back on itself to make a new triangle
Picture
Keep going until the whole strip is folded up
Picture
Secure with elastic bands to stop it all unfolding

Once it was folded I poured the iron after mordant I made last week into a bowl and briefly dipped the edges of the fabric into it. As soon as I took the fabric out and the air hit the fabric it began to change colour.
​
Picture
Picture
Picture

​
The whole reaction takes place in a matter of seconds, and the more of the iron mordant you add the darker the fabric becomes. I had not realised quite how strong or quick the reaction would be, and unfortunately on this occasion I think I rather overdid the dip! Still - it was a great learning experience, and next time I will be much more light handed.

I have also experimented with other methods of applying the iron water by painting lines and dripping it onto the fabric. There is a lot of opportunity to experiment here.
​
Picture
The results of the dip dye
Sadly the lovely smell is now gone, replaced instead with that curious metallic smell which reminds me of blood (that'll be the iron!) Still, it turned into a pretty interesting piece of fabric.

And to my friend k3n - you are absolutely right - 'saddened' is a very good adjective! (see the comment k3n left at the end of  last weeks post) I Hope you have fun if you have a try.

Thanks for reading!

Please feel free to share my website or blog with your friends by using the buttons to the right. If you would like to receive an e mail each time I post a new blog, please click here. I promise to never send you junk or give your address to anybody else.

Two new design workshops for the summer - both based on a flowery theme

21/3/2016

 
As you may well know, I have a bee in my bonnet about encouraging people to feel more confident about creating their own original work. I do understand why people want to come to a workshop  where everyone makes a quilt that is almost the same as the model the teacher provides; you know what you are aiming for, you know which resources to bring, and you know what you will go home with. Job done. But that scenario makes me just a bit twitchy. If you are going to pay your hard earned money to attend a workshop why not go to one where learn to make something just a bit more than someone else's quilt? Why not take the first steps towards learning how to design your own? Sure, it is a bit more effort, and you do risk it not turning out the way you expect - but you also gain by creating something completely your own at the end of the day. You gain by learning more than just techniques - you learn how to create something new and how to take more control of the process so that next time you will be more confident when it comes to trying out something new.

That is what I am hoping for with these two new workshops - 'A Garden of Roses' and 'Not My Grandmother's Garden'.


A Garden of Roses workshop
​

Garden of Roses quilt by Claire Passmore from her quilt design workshop
A Garden of Roses I
Garden of Roses quilt by Claire Passmore from her workshop on quilt design
A Garden of Roses 2
In this workshop we will look at the two quilts above and analyse some of the design elements and principles I have used to arrive at the finished design. More specifically we will examine the lines, shapes, use of space & colour, and how these elements have been pulled together to ensure harmony, balance, contrast and rhythm to give an overall unity to the finished quilts. Don't worry - it wont be boring, and we wont spend hours on theory! We will just be looking at real quilts and pulling out what is relevant to us as quilters. Using this information you will then design your own quilt by selecting your own variations of the design elements and principles and get started on making it. It isn't difficult and I will guide you though the whole process, giving you lots of ideas for creating your own work. 
 
I'll also teach
 you the techniques of free cutting and piecing gentle curves if you wish to incorporate that into your design and I  I used make your own interpretation. Let

Of course, if you don't want to alter the design and you would simply like to make either of these quilts then I am very happy for you to do just that, so don't feel you have to get into the design process if you don't wish to go down that path.

​
​
Not My Grandmother's Garden

Picture
Not my grandmother's garden by Claire Passmore ©2013
In this workshop we will be learning how to use different surface design techniques to build up a quilt design. We will take a short  look at the theory of design layouts but most time will be spent on how to use techniques such as creating and using stamps to embellish fabric with fabric paint,  adding visual interest with gold leaf and paper, and texture with stitch. 
After some experimenting you will start by choosing the size and colours you wish to use, then build up a plan for the layers you will add to the quilt top. This will be your design. From there on you will begin work on your own unique quilt. 

​If there are other materials you wish to explore or experiment with, bring them along and together we will try and find a way to incorporate them into your design. 

Once again, if you don't want to alter the design and you would simply like to make a copy of this quilt then I am very happy for you to do just that, so don't feel you have to get into the design process if you don't wish to go down that path.


For more information on these and my other workshops I have created brochures which you may like to look at. You can find information on all my workshops by clicking on the WORKSHOPS tab at the top of any of my web pages - or by clicking on the pictures below.
Picture
Click for 'Garden of Roses' brochure
Picture
Click for 'Not My Grandmother's Garden' brochure

​Thanks for reading.
​
Please feel free to share my website or blog with your friends by using the buttons to the right. If you would like to receive an e mail each time I post a new blog, please click here. I promise to never send you junk or give your address to anybody else.

Credit cards and milk bottles

14/3/2016

 
A new week - a new quilt.

Now that the roses quilt is finished I have moved on to the next quilt idea which has been buzzing around inside my head for a while. This one concerns credit - and more specifically credit cards. I wont relate the story behind this quilt just yet, (I'll save that for another day once I make a bit more progress with the quilt) but instead I want to share an idea I had for recycling plastic milk bottles.

I don't know about you, but I end up with a lot of plastic milk bottles in my recycling bin each week. Not only are they quite bulky, (even when squashed down) but it just seems wrong to throw them away. They seem too 'good' to just use once and then discard into landfill (and although 72% of bottles were recycled in 2010 in the UK, 20,000 tonnes were sent to landfill) . So, I keep them. But when you have a bag full and then a box full - what do you do? 

​There are lots of ideas on the internet for how to use them - do a search and you will be amazed. These are a few of my favourite ideas......
Picture
How cool is this?

​Although I think this skeleton is really cool, the practical side in me can't help making scoops, and gardening stuff.
Picture
So practical!
Picture

....back to the quilt (but I do love that skeleton)......

My idea for the quilt requires that I put numbers onto the fabric using a font similar to that found on credit cards. Finding different fonts on the internet is easy - and once you find the one you like, download it  to your computer. Using something like  MS Word you can then write what you want and resize the characters to suit your needs. This is how I created the digits below.
​
Picture

​

To apply the numbers to the fabric I chose to stencil them on using Markal paintsticks. I like these as when you apply them lightly they provide a hint of colour - which is the effect I was after.
​
Markal Paint sticks stencilled onto fabric by Claire Passmore
Gold Markal paintstick, lightly applied using a stencil and my finger

In the past, when making stencils for a one off project I usually choose freezer paper as it is easy to cut and has the benefit of being able to be ironed to the fabric. This stops the stencil from moving about as you apply the paint (or whatever you are using) and limits seepage under the edges of the stencil. One drawback, however,  is that they aren't really all that robust, and easily tear after a few uses, especially when the stencil has fine detail or bridges and islands like the number 8 above.

As numbers can be quite useful in lots of contexts I may well use these stencils again in the future, so thought it might be a better idea to spend the time cutting them from something more robust. Stencil plastic is the obvious choice, and I have also used laminating sheets in the past to make very good stencils, but I don't have either of those to hand at the moment. So I started to look around to see what else I could find - and that is when I remembered the box of bottles. Bingo!

As it turns out, the slightly opaque HDPE plastic makes a fabulous material from which to cut stencils as it is possible to see through the stencil edges, making placement easy. 

​
A word of caution

I used a craft knife and an old pair of small scissors to cut through the plastic. I also used an old cutting mat to protect the table and took great care when using the knife. TAKE GREAT CARE WHEN CUTTING THROUGH THE PLASTIC AND MAKE SURE YOU TAKE THE NECESSARY PRECAUTIONS WHEN USING SHARP BLADES. Blood on stencils never looks good.

Creating stencils by recycling plastic milk bottles by Claire Passmore
1. Use a sharp knife to cut the flat sections of the bottle into pieces.
Creating stencils by recycling plastic milk bottles by Claire Passmore
3. Trace the shape you want to cut onto the flat piece of plastic bottle
Creating stencils by recycling plastic milk bottles by Claire Passmore
5. Make a small cut / slit on the line where you wish to start cutting
Creating stencils by recycling plastic milk bottles by Claire Passmore
7. Keep the shapes you cut out - they will be useful as masks
Creating stencils by recycling plastic milk bottles by Claire Passmore
2. The tools and the correctly sized digits ready to trace and cut
Creating stencils by recycling plastic milk bottles by Claire Passmore
4. The shape to cut out is clearly visible on the plastic
Creating stencils by recycling plastic milk bottles by Claire Passmore
6. I found it easiest to use scissors to cut the rest of the shape. You may prefer to use the knife
Picture
8. All the stencils, 0 - 9 stencils

All in all it probably took me about an hour to cut out all 10 digits, not much longer than it would have taken had I just cut the stencils from freezer paper. For this set of stencils I used 3 bottles, and since I had lots more I made a little box to keep them in. I couldn't resist it. Click on the photo on the right to go to the tutorial I used.
Picture
Picture
Click on the photo above to go to the website learn how to make the cute little storage box
 ​   Photo left: A handy little box, folded from yet another        milk bottle.

 
Below are a few pictures of the fabric embellished using the stencils with a selection of Markal oil stick colours.
Picture
Put some of the paint onto a palette. I used a piece of freezer paper
Picture
Tranfer some of the paint onto your finger, brush, cotton bud or other applicator
Picture
Rub the paint over the stencil and onto the exposed fabric
Picture
Picture

I can see no reason why other recyclable materials could also be useful for stencil making, but the HDPE milk cartons certainly work well. (After a little further investigation I have discovered this type of plastic can be easily transformed into other shapes by melting and reforming it. With a little care it is safe to do as the melting point is around 180 decrees c - and no fumes are given off at this temperature. Try an internet search - you will be pleasantly surprised I am sure!)

Thanks for reading. If it turns out well I will keep you posted as to how this quilt develops.
 
By the way.... I have recently created a Facebook page where I will be posting information on my current workshops and other quilt related interesting things. If you would like to follow the page I have a link at the bottom of the page. Alternatively you can click here to go to the pag
e and then click LIKE.

Please feel free to share my website or blog with your friends by using the buttons to the right. If you would like to receive an e mail each time I post a new blog, please click here. I promise to never send you junk or give your address to anybody else.
 

Printing on fabric - with the help of a gelatine plate

4/1/2016

 
Happy New Year!
​
Update on the agar agar & gelatine plates
Two weeks after making the gel plates I thought I would let you know how they are looking.
​
Picture

​I am happy to confirm that they have been sitting on a shelf in my garage in a plastic bag and are in perfect condition. They have not melted or gone mouldy and are as good (if not better) as the day I made them. 

​
Quilt Inspiration: Pinterest
Many thanks to everyone who joined the Pinterest board and already added to it - there are some interesting images that may be the spark that leads to a new quilt. Anyone can join at any time - all you need to do is drop me a message and I will send you an invitation to join the board.
Follow claire's board Quilt Inspiration on Pinterest.

​A slightly different way to use the gel plate

​As I had the gel plates out today I decided to use the large plate to help me create a piece of fabric for a new quilt I have in mind.

The quilt needs a long thin piece of fabric with foliage hanging downwards. Whilst I was walking through Sydenham Botanic Park this morning I collected a small bag full of organic bits and bobs from the ground. One of them was a small piece of twig from a beautiful Jacaranda tree which I thought would be perfect for the job. It was the right size and scale and was flexible enough to make the gently curving foliage.
Picture
Picture
Picture
Picture

I decided to use the Jacaranda twig to print the delicate little leaf shapes onto the fabric. As each twiglet (I don't think that is the real name, I just made that up) has 20 or more tiny leaves it was going to be tricky to ink up the whole thing for printing. Normally I would use a sponge or roller to put the ink on - but I knew this would probably damage the delicate little leaves - so I decided to put the ink onto the gel plate paint and then press the leaves gently onto the plate to apply the ink. When I pulled the ink covered twig away from the plate it was ready to print onto the fabric. 
​
Picture
The Jacaranda twig I found at the park
Picture
The Jacaranda twig on the inked up gelli plate
Picture
Gently pressing the twig and leaves onto the plate with a moist sponge
Picture
The inked up twig pressed onto damp fabric
Picture
Covering the twig with paper allowed me to smooth over the whole thing without damaging the leaves or marking the fabric with mucky fingers
Picture
The first print from the twig
Picture
10 minutes later I had lots of prints across the top of the strip of fabric. Just what I had in mind!
I now need to work on this piece of fabric some more, to add more interest and depth. I'm not exactly sure how it will turn out yet, but that is all part of the excitement and fun!

​Thanks for reading.

​
Please feel free to share my website or blog with your friends by using the buttons to the right. If you would like to receive an e mail each time I post a new blog, please click here. I promise to never send you junk or give your address to anybody else.

Agar and gelatine based Gel plates for fantastic mono printng fun

21/12/2015

 
I recently ran two workshops at Midsomer quilting covering a range of exciting techniques to add surface design to fabrics. Both days were great fun - if a little hectic - and lots of beautiful fabric samples were made.

One of the techniques we covered was monoprinting using gelatine plates. I wrote a blog quite a long time ago covering how to make your own reusable 'long-life' gelatine plate (I will put my recipe for a gelatine plate further on in this post), but as I had two ladies at one of the workshops who preferred not to use a product created derived from pork / beef I have been busy trying to perfect a non gelatine based plate. Messing about like this appeals to the chemist side of me, and along the way I have discovered some very interesting things - a few of which I will share for those who are interested!


Picture
Using gelli plates to make mono prints on paper and fabric at Midsomer Quilting
I also received a lovely message from Sue who also attended one of the workshops. She had a problem buying regular gelatine in her local supermarket - they only had Vege-gel in stock.  This is a carrageenan based product - something I can't find here in New Zealand (at the moment!) so for the time being this is my agar agar based recipe. (Note: agar agar is known by many names; China grass, Faluda, Japanese Moss, Ceylon Moss and Bengal Isinglass to name a few) I have done some research into Vege-gel and have some ideas which I list further down that you could try if you want to make a vege gelli plate. I would suggest trying out a just a small quantity  and see how your plate turns out.
​
Picture
Agar-agar powder - I bought mine in my local Korean food shop - but I have seen it in Waitrose, Lakeland, Holland and Barrett and in many small food shops which sell spices etc.
Picture
Carrageenan based gel. This brand (there are others) is more widely available in the big supermarkets - but I have not had experience of using it


My agar agar based gelli  plate recipe

Ingredients:
50g agar agar powder
600ml water (approx 2.5 cups)
2 teaspoons of salt
225ml glycerine (approx 1 cup)

(with these quantities I made one 18cm x 18cm gelli plate and two 18cm x 10cm gelli plates)


 INTERESTING STUFF

Both agar agar and carageenan are derived from red seaweed. On food labels is also known as E406

My 'Telephone Brand' agar is pure agar. No added anything. A little goes a L-O-N-G way!

Vege-gel is a commercially created product made for cullinary use. It is a mixture of carageenan, locust bean gum and other substances. The gum helps to stop the gel being so brittle, and stops the prepared gel from 'weeping' - an important difference from the pure agar agar powder.

A special property of agar is the large difference between the gelling temperature and the melting temperature. (known as hysteresis).
Although it melts at 85 °C (185 °F) it solidifies from 32–40 °C ( 90–104 °F) so – it won’t melt on you on a hot day like gelatine can. A useful property in warm climates.


So - this is what you do...........................
​
Picture
Gather together the ingredients and a few utensils.

Agar agar, glycerine, salt, water
Saucepan, tray to mold your gelli plate, whisk, teaspoon, spatula.


I have added salt to my recipe as I wanted to increase the pH. I read that pH noticeably affects the strength of the agar gel; as the pH decreases, the gel strength weakens.  Having tested this out I have noticed the addition of salt really makes a much less brittle plate.
Picture
Mix the salt into the water and then add the agar agar, whisking with a balloon whisk to make sure all of the powder is wet and incorporated. You don't want any dry lumps on the bottom or around the edges.
I left mine to sit for about 5 minutes to make sure it was nicely mixed and the water absorbed.
Next, put it on a medium heat and stir gently. You will feel the mixture begin to thicken and also turn a little more transparent. (This is difficult to see from the pictures.)
 

A major difference between agar agar and gelatine is that you must heat agar agar to around 90
 °C and boil for 2 minutes before it creates a decent gel. 
Picture

For our purposes we want to plasticise it - and for that we need to stir in glycerine. 

Not only does the glycerine act as a plasticiser, it also acts as a humectant, stopping the agar agar drying out. 
You could now leave the mixture to set. However, I would not recommend it. At this stage the agar agar will be very brittle. Put a little blob on the work surface or a plate and allow to cool - you will see what I mean. It is the weirdest thing - a 'crunchy' gel! If you sweeten it now you can use it for a jelly based desert. ​
Picture
Picture
​Once the glycerine is thoroughly mixed in, pour the hot mixture into your mold. Something with a very smooth, flat base (such as a baking tin or flat bottomed pyrex bowl) is ideal. This tray has a tiny plastic circle in the base, left from when it was molded, so isn't perfect, but I don't mind that much.


​
After about ten minutes gently ease the set gel away from the edges of the container. It will not feel elastic the way gelatine does - but it does have a soft and slightly giving feel.
Then simply turn the container over and allow the gelli plate to fall out onto your hand.


Agar agar sets at room temperature within a few minutes and doesn't need to be put in the fridge at all.

Gelatine needs at least an hour or two to set in a cool place.
​
Agar agar plates do seem to 'weep'. This is known as syneresis. If you can get hold of some Locust Bean Gum (also known as carob gum or E410) a small amount of this is said to stop the problem. I haven't been able to get any - so I am unable to comment. 

​
So - what if you have the sachets of Vege-gel, the Carrageenan based gel?

As I can't get the Vege-gel I can only make some educated guesses, but it sounds promising doesn't it, as the locust bean gum is already in there - so hopefully no syneresis!  

So, this is what I would do.................

Make a small batch with just one packet of the gel using the following recipe as a starting point, and see how it turns out.

1 sachet of Vege-gel powder
200 ml water (approx 3/4 of a cup)
80 ml glycerine (1/3 of a cup)

Make it in the same way as the agar agar plate - making sure you do not add the salt. I can't find any evidence that salt will help - so start by leaving it out. Leave it to set and see what you get.

Use this as your starting point, and then tweak the recipe according to what you see. If the plate is too brittle, try remelting it and adding 50 to 100ml more water and see what happens. By remelting and making small changes you can tweak the recipe to see what works best, then make a bigger plate with your preferred combination of ingredients.

I would love to hear if anyone does try this - as you know, I am a big believer in sharing information - it can only benefit all of us!


​Carrageenan has an unusual reaction when mixed with locust bean gum - 
Kappa carrageenan ( a particular type of carrageenan) shows an unusual synergism with locust bean gum in aqueous gel mixtures. The interaction is marked by a considerable increase in the gel strength, an improvement in water binding capacity, a change in gel texture from brittle to elastic, and a reduction in the degree of syneresis (that is the expulsion of liquid that I am seeing with the agar agar gelli plate). I guess that is why Dr Oetker puts it in his little packets!


             And now for my new and improved gelatine based gel plate recipe..............

​
Ingredients:
40 g gelatine powder (250 bloom)
100 ml warm water 

175 ml glycerine
160 ml Surgical spirit *
(also known as rubbing alcohol or isopropyl alcohol)

If you are unable to purchase isopropyl alcohol, you can substitute plain water. There is very little difference in my experience, but if I can get it I add the alcohol - maybe I am wasting my money!!
Picture

To make the gelatine plate, dissolve the gelatine powder in the water and stir well. Allow to sit for around ten minutes to make sure the gelatine absorbs the water fully. Next, put it into the microwave and zap for 30 seconds of so. BE CAREFUL - this mixture will be hot and WILL BURN YOU. Take it from the microwave and stir in the glycerine and surgical spirit (if using). Stir very well, then return to the microwave for a further minute of so. Keep your eye very carefully on the gelatine mixture. You do not want it to boil. If you do it will not gel properly. 

You are aiming for a clear, golden liquid which has the same consistency as runny honey.

Once it has reached this stage take it carefully from the microwave and pour it into your mold. Place on a flat surface and allow to cool before putting it into the fridge. It is likely to take at least an hour to set - maybe more. 

Once set, remove from the fridge and gently ease the edges of the gelli away from the container. It should feel bouncy and rubbery, and should not want to tear or rip. Turn the container upside down and ease the plate out onto your hand.
​


​MORE INTERESTING STUFF


Gelatine is derived from collagen and is extracted from the skin, bones, and connective tissues of animals such as domesticated cattle, pigs and fish. It is an ingredient in many of the foods we regularly eat. By itself it is flavourless and colourless.

Also known as E441 on food ingredient labels.

Gelatine dissolves best in warm to hot water which is why synchronised swimmers use it to hold their hair in place whilst performing. The cold water does not dissolve the gel! 

The strength of gelatine is measured in a unit called BLOOM. The higher the number, the stronger the gel

Dr Oeker brand  has a rating of 250 bloom.
Knoxx has a rating of 225 bloom.

Sugar, milk and alcohol increase the strength of gelatine (which is why I add the alcohol)


Re-forming the plates
​

One of the things I like about these home made gel plates is that once they get a bit grubby, scratched or otherwise not in tip-top shape, you can cut them up, melt them and form them into a new plate. This also means you can make a big one into several smaller ones, or vice versa. 
Picture


Cut or rip the gel plate you wish to recycle into chunks. This helps speed up the melting process.

Put it into a microwave bowl and heat for around 1 to 2 minutes on full power (I have a 750W microwave). Keep your eye on it and give it a stir after a minute. If you need to add more time do it in short bursts and watch it at all times. You want the mixture to just bubble up but not over the edges.
If it spills over, don't wipe it up - just allow the hot gel to cool then peel it off and stir it back into your molten gel.
Picture


This is almost ready - it is beginning to bubble. Keep your eye on it though - it foams up quite quickly at this stage. 

Also - TAKE CARE - this is hot - at around 90 °C, so it will burn you.

Once ready take it out of the microwave and pour into a new mold. 


​                    Suppliers you may find handy to know about


​


UK


​
​

​​Glycerine and gelatine from MM ingredients

http://mmingredients.co.uk/
​
Glycerine BP (that means pharmaceutical grade) can a be bought more cheaply in chemists (such as Boots) than in supermarkets where you find edible grade glycerine. 

Isopropyl alcohol - also commonly known as 'surgical spirit' or rubbing alohol in the UK. Don't bother with Boots for this one - the thought police have been there and they just give you 'the look' when you ask for it. Last time I tried Superdrug still sell it.


​New Zealand


Glycerine and Isopropyl alcohol from Pure Nature
http://www.purenature.co.nz/
​
Gelatine I buy at the supermarket


I hope you will find some of this info useful should you wish to try making a gelli plate for yourself. I would love to hear if you do try any of the recipes - and have any feedback . They really are quite fun to use and you can make some very beautiful papers and fabrics using them. I will let you know how my agar agar plates hold up - I don't intend putting them in the fridge - so I will see if they go mouldy or not.

Thanks for reading.

​
Please feel free to share my website or blog with your friends by using the buttons to the right. If you would like to receive an e mail each time I post a new blog, please click here. I promise to never send you junk or give your address to anybody else.
<<Previous
    Picture
    Picture
    Picture
    Picture


    Click here if you would like to receive an e mail when I add a new blog post.
                       OR

    Follow my blog with Bloglovin
    Picture

    Categories

    All
    Challenges
    Classes
    Colour
    Cool-ideas
    Courses
    Designing
    Doodling
    Dye
    Exhibitions
    Experimenting
    Festival-of-quilts
    Flower-bowls
    Gelli-plates
    Hanging-sleeves
    How-to
    Inspiration
    Line
    Lino Blocks
    Making
    Marbling
    Mending
    Mono Printing
    Mosaic
    New-products
    Purchasing
    Quilt Gallery
    SAQA
    Sew On The Go
    Sketchbooks
    Software
    Stencils
    Stitch
    Surface Design
    Talks
    Thread
    White Horses
    Workshops
    Yarn Bobming

    Archives

    December 2020
    September 2020
    August 2020
    July 2020
    May 2020
    February 2020
    December 2019
    October 2019
    September 2019
    July 2019
    May 2019
    March 2019
    February 2019
    January 2019
    December 2018
    November 2018
    September 2018
    August 2018
    July 2018
    June 2018
    May 2018
    April 2018
    March 2018
    February 2018
    January 2018
    December 2017
    November 2017
    October 2017
    September 2017
    July 2017
    June 2017
    May 2017
    April 2017
    March 2017
    February 2017
    January 2017
    December 2016
    November 2016
    October 2016
    September 2016
    August 2016
    July 2016
    May 2016
    April 2016
    March 2016
    February 2016
    January 2016
    December 2015
    November 2015
    October 2015
    September 2015
    August 2015
    July 2015
    June 2015
    May 2015
    April 2015
    March 2015
    February 2015
    January 2015
    December 2014
    November 2014
    October 2014
    September 2014
    August 2014
    July 2014
    June 2014
    May 2014
    April 2014
    March 2014

    RSS Feed

    Picture
    Picture
Powered by Create your own unique website with customizable templates.