CLAIRE PASSMORE textile artist

Selected works from the SAQA exhibition 'Textile Posters' : currently featuring in Quilting Arts Magazine

12/7/2018

 
Picture
Quilting arts magazine, August/September 2018
I had a lovely surprise yesterday morning. As I ate my breakfast and browsed through my news feed  I saw a post from fellow SAQA member Heather Pregger, http://www.heatherquiltz.com/ in which she mentioned that her quilt 'VOLCANO' features in the August/September edition of Quilting Arts magazine. Her fabulous quilt, along with 23 others is part of the SAQA exhibition Textile Posters and I am very proud to say that my quilt '3 Wise Words' is one of those quilts selected by the juror, Joseph Lupo, and also features in the magazine. Thanks for passing on the good news Heather!.

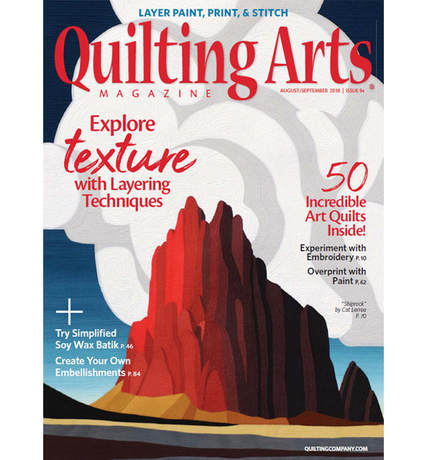
I am even more pleased that the message contained in the quilt is being spread just a little bit further. 

The cover of the August/September edition of Quilting Arts features Cat Larrea's fabulous quilt named 'Shiprock' and you can see images of all 24 of the posters im the exhibit on the SAQA website by clicking here. 
​
Picture

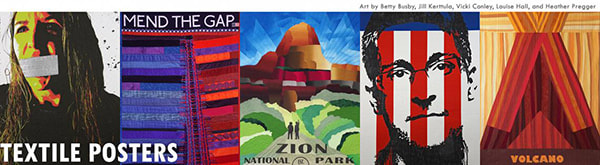
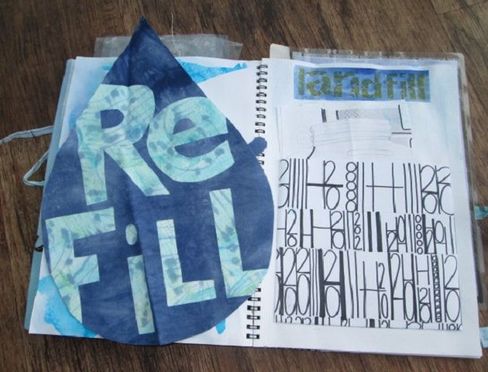
​I wrote a blog post about the '3 Wise Words' quilt back in February 2017 when I found out it had been selected for the exhibition and you can read that post by clicking here. 

The quilt features a BIG water tap and the words: 'refill, not landfill'. Back in early 2017 the whole issue of plastic waste, and in particular single use water bottles was beginning to be widely discussed and more recently we frequently see the most terrible photographs of mountains of plastic bottles washed up on beaches, floating around in the oceans and inside the stomach's of dead sea animals. It really is intolerable.
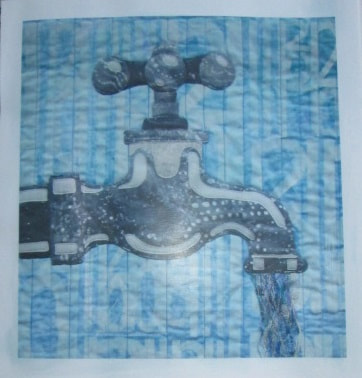
​
Picture
BIG tap!
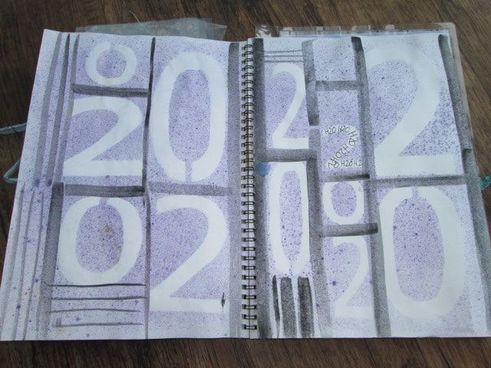
Here are a few more images from the sketchbook that I used in the planning of the quilt that I thought might be interesting to share. My sketchbooks are my way of making sense of ideas, seeing what might work and keeping things organised; I hope you enjoy the glimpse.
Picture
Why did it suddenly become necessary to drink water from a plastic bottle rather than from the tap??? Water drops and bubbles - all potential ideas.
Picture
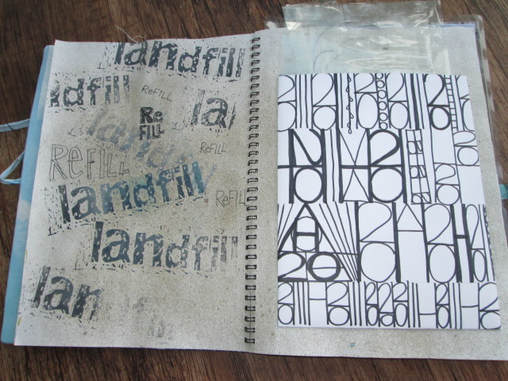
What happens to all these bottles once they are empty???? Playing about with different ways to write the formula H20
Picture
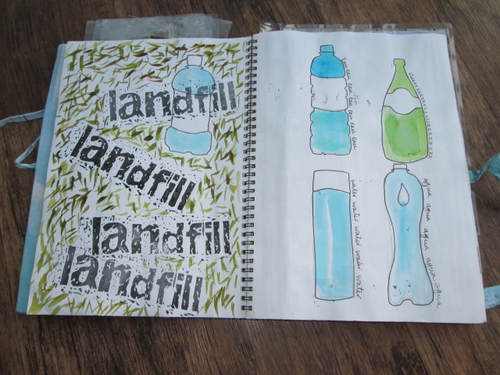
How to make water so much more appealing.......the many shapes of water bottles. Recognise the brands without their labels?????
Picture
Good old H20. Exploring different ways to mark the fabric - this time with spray paint and a mask.
Picture
Back to the water drop idea. I didn't use it in the end - but it might feature in another quilt someday. It is safely tucked in the sketchbook if I ever need it!
Picture
Using up scrap pieces of fabric from the quilt to make a cover for the sketchbook.

The sketchbook also serves as a nice place to store the left over bits and pieces from the quilt - stencils, lino print blocks, unused fabrics etc. Earlier this year I had a request to make another quilt for someone (on a different theme) and I was able to go back to that particular sketchbook and 'raid' it for leftovers - and was able to create and ship a brand new quilt within a week. I was amazed (and so was she!)


​A very high quality catalogue to accompany the exhibition is still available on the SAQA website by clicking here.
Picture

​Thanks for reading. 
Please feel free to share my website or blog with your friends by using the buttons to the right. If you would like to receive an e mail each time I post a new blog, please click here. I promise to never send you junk or give your address to anybody else.

Playing about with autumn leaves

15/5/2017

 
Autumn has arrived here in New Zealand, and it is beautiful. This is the tree just outside our house; I don't think I have ever seen such vibrantly coloured leaves.
Picture
Walking among the fallen leaves, I can't resist picking up handfuls and throwing them in the air then watching them tumble down like confetti.

Just for fun I decided to collect some of the most brightly coloured specimens and spend the day playing around with them. These are just a few pictures.

First I just spent time looking at them closely, arranging them in different ways. 
Picture
I spread them randomly on the floor
Picture
made more formal arrangements
Picture
Persimmon leaves are slightly waxy and have the most amazing variety of orange hues
Picture
I like the shadows cast by the low sun

I took photos and played around, creating layers using GIMP - the free version of Photoshop. It is so easy to experiment in ways that would be so difficult to do without such software.
Cropping and rotating images using GIMP by Claire Passmore
Cropping and rotating
Picture
Picture
Shifting colours 
Picture
Then I moved on to working in a sketchbook with acrylic paint, a fine black pen and a craft knife
Autumn leaf sketchbook by Claire Passmore
Picture
And finally I stitched a few bundles of leaves together. Whilst they are soft and supple it wasn't too difficult. They are now under a heavy weight to try and keep them flat whilst they dry out. I have no idea what will happen to them!
Stitched leaf pile by Claire Passmore
A few simple stitches hold a little bundle of leaves together
I have no plans for any of this,but sometimes it is nice to do something for no good reason!

​Thanks for reading.
Please feel free to share my website or blog with your friends by using the buttons to the right. If you would like to receive an e mail each time I post a new blog, please click here. I promise to never send you junk or give your address to anybody else.

Inspiration for my new series: Words of Wisdom

11/1/2016

 
Between finishing my last white horse quilt and making a lot of flower bowls I have been thinking about beginning my new series of work. For quite a long time I have wanted to create a series that was based on 'advice'. It seems to me that no mater how old you are or  who you speak to,there is always someone who is only too happy to offer up their two penn'orth!
​​
Some people enjoy people watching, but I like people listening (I think you could also technically call it eavesdropping, but I don't listen to personal stuff, and anyway, the stuff I like to listen to is meant to be heard) so over the past 6 months or so I have been recording some of the more pithy and witty things I have overhear in my day-to-day life. Here are a couple so you get the idea.
​
Picture
Picture
Picture

I was too busy to do much 'making' in the summer, what with moving house, assisting with the organisation of the Contemporary Quilt Group's 'elements' challenge and a busy teaching schedule that somehow I just couldn't get started. Just before Christmas I did manage to make one new quilt - which unfortunately I can't yet show - so I decided I would wait until the New Year before I would begin. I did, however, start a sketchbook to begin to develop some ideas.

It isn't a pretty sketchbook this time - it is mostly full of text - the quotes I overhear and my thoughts and ideas that spring from them. The few sketches that I have done are all still pretty rough - sometimes just lines and scribbles in response to words. I need to work on these to refine my thought and ideas and get some concrete images or shapes to work with. 

​
Picture
Picture

The one thing I have decided, however, is that I want to include lots of hand stitching to embellish the surface of the quilts. ​I want them to be really interesting to look at, so by adding both surface design techniques and stitch I am hoping they will encourage people to come close and take a really good look.
I bought a lovely old book on my last day in South Africa, (a kind of souvenir? )in a second hand book shop that promised that  it has every embroidery stitch I will ever need. I'll let you know if it is true!
​
Picture
Picture

I have decided to call the series 'Words of Wisdom', and the first quilt I am tackling concerns some advice I heard one teenage girl offer to her friend. I was quite shocked at the bluntness of it at the time - but upon reflection I think it hit the nail on the head. This is what she said;

"Go easy on the makeup; you aren't as ugly as you think."

​Using a photograph of my sister to work from, I made a sketch to base the quilt on....
Sketch of my sister by Claire Passmore. All rights reserved.
I decided the best way to recreate the face on fabric was with Derwent Inktennse Pencils. I enlarged the sketch and then placed it behind a piece of white cotton and effectively 'traced' the face onto the fabric. 
​
Picture
Picture
Picture

So far, so good! I am very pleased with the way the pencils were able to make such fine and detailed lines on the fabric. I used aloe vera gel to fix the pencil lines, which worked perfectly. I must admit, when I put it into a sink full of water once it was finished I did hold my breath - but not a single part of the black ink ran. Huge relief! 
​I will post the progress of this quilt in a few weeks time.

Thanks for reading.
​
Please feel free to share my website or blog with your friends by using the buttons to the right. If you would like to receive an e mail each time I post a new blog, please click here. I promise to never send you junk or give your address to anybody else.

Make an easy slip over cover for your sketchbook

16/11/2015

 
Last week I posted some pictures of several of the art journal slip on covers that use the fabrics I made whilst exploring and experimenting with different surface design techniques. 

Quite a few people got in touch with me to ask how I made the slip on covers, so I thought it would be a good idea to try and write a post to show you how I go about it. They are quite straightforward to make- so I hope my explanation doesn't make it seem too complicated.

Picture
1. Measure the book you wish to cover
In this example I measured a spiral bound sketchbook. It is important to make sure that you measure the thickness of the spine as well as the front and back cover - especially with a book like this that has a particularly fat spine.

Make sure you note down the measurements - as you need to add a bit to them in the next step.
Picture
2. Add a seam allowance
Take each measurement and add a generous quarter of an inch all around.

In this example the width of the front and back covers will become 9 inches,
the height of the front and back covers will become 12 and a quarter inches and the spine will become 1 and a half inches wide.

In my example I have pieced some fabrics pink and green fabrics to create the front and back covers. It would look equally good if you used a whole piece of fabric for each section - or even a whole piece of fabric for the whole cover. 
Picture


​3. Join the sections together

​Join the sections to create a whole piece which will wrap around  the whole book cover, with a little extra fabric (a quarter of an inch) on each edge.
Note:If you were using a whole piece of fabric you would already be at this step.
Picture

4. Make two tie closures
Either make two very thin strips from a co-ordinating fabric, or cut two pieces of tape or ribbon. These will be the ties that you use to keep the book closed. You can make them as long or short as you like -  long ones will wrap around the book before you tie them, short ones you can just knot or tie in a bow.
These two are about 8 inches and 10 inches long.
Picture
5. Cut 2 further pieces for the inner cover
​Next you need to  cut two pieces of co-ordinating fabric that are the same height as the front and back cover sections and  little narrower. Don't worry about the exact width. 

On each piece neaten one of the long sides by folding the fabric over and pressing and then folding it over again. Stitch down the neatened edge using a straight or decorative stitch. You should now have two rectangles, each with one neat long side and one raw edge. The short sides will both be raw. 
Picture
6. Add a pocket if you wish
​As an optional extra, you can stitch a pocket onto one or both of these rectangles. For your first attempt it might be worth skipping this stage until
you have seen how the finished cover turns out.

These pieces will eventually be on the inside of the book covers. If you want you could make a long, thin pocket to perhaps hold a pen or pencil.
Picture


7. Add a bit of quilting
​Go back to your front/back and spine piece. Quilt it all over as much or as little as you like. Just a few lines of stitching will be enough. I just like to go a bit mad.
Make sure you lay the finished piece with the right side up.
Picture

8. Attach the ties
​When you are happy with that, take the two thin strips and pin them, horizontally, onto the right side of the cover. Pin one one each of the short sides, roughly half way down.Make sure to let them overhang the short edge a little - about a quarter of an inch or so. 
Picture

9. Pin the inner cover pieces in place
​Next, still with the right side of the cover uppermost take the two smaller rectangles and pin the to either side of the cover. Match the raw edges to the edges of the cover and have the neatened edges facing inwards.

Pin them in place.
Picture


10. Add a final piece to cover the gap
​Look at that gap that is left in between the two pieces you have pinned in place - where you can still see the quilted cover fabric. You need to cut a piece of fabric that is about 3 inches wider than this gap. Leave all the edges raw - they wont be on show. 
Picture


11. Pin, pin, pin

Place this piece over the gap - roughly centrally so that it overlaps the other two pieces of fabric you pinned on earlier. Pin this in place too
Picture

12.Stitch all the way around
With a straight stitch, sew all the way around the whole piece with a scant quarter inch seam. When you come to the place where the thin strips are located on the short sides go over them a few times - reverse stitching to make sure the ties are firmly attached. 
Carefully clip the corners if you think it is bulky
Picture

​13. Start to turn it right side out
Nearly there!
Now start to turn the cover inside out. Start with the central rectangle. In this picture the rectangle of fabric has been turned to the back, revealing the cover once again.
Picture


14. Keep going
​Now turn one of the long rectangles on the side inside out. Use a pencil to poke out the corners.
Picture


15. Ta da!! Done!
​And finally turn the other rectangle inside out. Give the whole cover a good press and roll the seams so they lie flat. 

You are now looking at the inside of the book cover.
Picture

16. Slip your sketchbook into the cover
Now take the back cover of your sketchbook and slide it into the jacket. It might need a wiggle to get it to right up to the end and into the corners.

​Then do the same with the front cover.
Picture


17. Admire your work
​And then close up the journal and tie it closed. 

Done!
Picture
Picture
I hope that makes sense. It really isn't difficult. The thing tat sometimes goes wrong for me is that I make it too small - so be generous when you add your seam allowances - you can always re-stitch around the edges if it is too big. 

​If you make one I'd love to see it!

Thanks for reading.
​Please feel free to share my website or blog with your friends by using the buttons to the right. If you would like to receive an e mail each time I post a new blog, please click here. I promise to never send you junk or give your address to anybody else.

When you are searching for inspiration, try looking at everyday things

4/9/2015

 
Picture

When you need inspiration....

It happens from time to time - that 'what next' feeling. 

After finishing the flower bowls that have kept me busy recently I had a few days space to fill this week. Not long enough to settle down and get into something big, but too long to just let it slip by. It was one of those 'what next?' moments.

I got out a few of my sketchbooks and looked through them for something to inspire me. I didn't find anything that I wanted to tackle at the moment, but I was reminded of some techniques I haven't used for a while. 


To help me decide on a motif to use I decided to take a walk and look what I found! I have been noticing all kinds of fruit in the hedgerows along the sides of the road these past few weeks - it amazes me that people don't stop and pick a little. So far I have had blackberries (a firm favourite), plums and now apples. There were lots on the floor that were perfect for cooking - so I gathered up my skirt and chose about 20 of the nicest ones to take home. 

As well as making a delicious crumble and some apple sauce for the freezer, I saved a few of the mangiest ones and started a new sketchbook. Problem solved!


So far the sketchbook only has a few pages - and is likely to stay that way for a while - but it is the beginning of something that may (or may not) end up as a series of quilts one day. Nevertheless, it will be enjoyable to create and will hopefully give me the opportunity to try out lots ideas, old and new, that I can use in the future. 

Here is a flip book of some of the pages.

Why not try a few ideas in a sketchbook of your own?


Thanks for reading.

Please feel free to share my website or blog with your friends by using the buttons to the right. If you would like to receive an e mail each time I post a new blog, please click here. I promise to never send you junk or give your address to anybody else.

Festival of Quilts 2015 Challenge 'elements' Part 2

16/2/2015


sketchbook ideas for the new challenge 'elements'

Picture
Picture
Iron
Picture
Mercury
Picture
Silver
Picture
orbits
One of my favourite things to do is make a quilt in response to a challenge. I love having something completely new and fresh to think about which gets me out of the routine of whichever quilt series I am working on at the time. 
As my current 'challenge' sketchbook has become quite full I decided to start a new one - another treat! I love starting a new sketchbook - all those empty pages waiting to be filled!

The theme 'elements' can be interpreted in so many ways - but I have chosen to explore the chemical elements, in particular those that were known to the alchemists many hundreds of years ago. I have always been interested in science and as soon as I saw the theme my thoughts immediately turned in this direction.


Picture
A fabric and stitch sample - exploring possibilities
Picture
A symbol for gold
Picture
More gold and tin symbols
Picture
A symbol for tin
Picture
Copper, gold, iron

In my last blog post about this challenge I mentioned I would share some of my sketchbook pages - well, here are some of the nicer ones. I have used the paper and fabric I blogged about in that post. 
As you can see, I have used lots of symbols and marks used in the 'language' of alchemy. It was a highly secretive science, loved and loathed by the rich and influential. They loved what the alchemists could potentially give them; a universal cure for all ills - effectively promising eternal life, and the ability to turn base metals into gold - effectively promising great wealth to those who knew the secret. But they loathed the alchemists because they feared they would not be able to control them  - what would happen if the gold they created fell into the hands of others? The work of the alchemists was therefore a direct threat to the rich, as they risked losing their wealth and power. As a result, many alchemists were tortured for their knowledge and killed to stop others discovering it. As an alchemist it therefore paid to be cautious and clandestine. Hence the symbols, convoluted texts and overall mystery.

I am still working in the sketchbook, messing about with lines, colours, textures and materials. I have already decided on the colours, (dark and mysterious)  and technique (monoprinting) I would like to use. Now I just need to pull some more ideas together for the symbols I want to include and how to create them on the quilt surface. More on that in a week or two!


Thanks for reading. I hope I may have inspired you to join the fun and make a quilt for the challenge too. How would you interpret the theme?


Please feel free to share my website or blog with your friends by using the buttons to the right. If you would like to receive an e mail each time I post a new blog, please click here. I promise to never send you junk or give your address to anybody else.

A new season, a new series                                                                      6 October 2014 

6/10/2014

3 Comments


The White Horses of Wiltshire

So autumn is here at last. Happily it took a long time to arrive, but the nights are starting to draw in and I thought about putting the heating on last night!

So, whilst I was sat in front of my sewing machine yesterday, busy quilting a mountain, (more on that in another post) I started to think in earnest about a series I have wanted to make for a long time. The White Horses of Wiltshire. 
I started my research for this series in the spring, when I went in search of a few of the horses.


White Horse at Cherhill
The White Horse at Cherhill
White Horse at Westbury
The spectacular view from the White Horse at Westbury of the chalk downs and clay valley below
White Horse at Pewsey
The White Horse at Pewsey

Being a mostly rural county of England with lots of beautiful countryside, Wiltshire is characterised by its high chalk downland and wide clay covered valleys. Salisbury Plain is famous as the location of the Stonehenge and to the north you can find Avebury stone circles and other ancient landmarks. Personally, I find these ancient monuments fascinating, but I am presently even more interested in some not-so ancient marks made on the earth that seem curiously overlooked - the 8 visible white horses scratched into the chalk hillsides.

Picture


As a child I remember looking out of the car windows, keeping an eye out for the sight of a white horse on a hillside. I remember being very puzzled by them - they made no sense to me, but they were huge and interesting, and sometimes we even stopped the car and walked the hills to sit on the horse's nose. 
Many years on it is still fun, although the steepness of the slope and the slippery chalk is much more of a challenge than it used to be. I was sliding down the nose like crazy in this picture!


Over the next few days I intend to work in my sketchbook, developing my ideas for the series. If the weather is good I also hope to go and walk the hills to a few of them and take some nice photographs to use too. 

There is a fantastic website with lots of great information about these hill figures;
http://www.wiltshirewhitehorses.org.uk/ , but apart from that there seems to be very little else. I must say I am rather puzzled. They are even poorly marked with regard to road signs - I think Wiltshire is missing a trick here, as I am sure I can't be the only person who thinks these horses are worth a visit! 

So - over the next few days I will post some of my sketchbook pages and share the development of this series as it unfolds. Hopefully I will convince others of the beauty of these curious creatures!
3 Comments

FREEDOM; A quilt for 'Unfolding Stories'

18/9/2014


Unfolding Stories; Exhibition of contemporary art quilts

Picture
    Open From Tuesday 29th September till Sunday 5th October 2014, 10.30 to 5.00 daily
    Late night opening on Thursday 2nd October 10.30am to 8.30pm
    An exhibition of Contemporary Art Quilts by our members here at Contemporary Quilt West.
    Unfolding stories through the use of cloth, paint and dye, hidden within Church Architecture, Old Maps, walks through the landscape and along beaches, Samba Dancing, the Celtic Mythology of Trees
West Barn, Bradford On Avon,Wiltshire, BA15 1LF 

This is a new quilt for my Destination Series of quilts, which will be at the exhibition in Bradford on Avon at the end of this month.  Here is a little insight into how it came to be.

Picture

Sketchbook inspiration for my new quilt, 'FREEDOM' for the Unfolding Stories exhibition. As part of my series on South Africa how could I not have a quilt about the incredible man,  Nelson Mandela? 
Picture

After 27 years in prison, Nelson Mandela finally walked free on 11 February 1990. The image of him finally walking as a free man was shown all over the world. This is the image I chose for my quilt.
Picture

The opening paragraph of The Freedom Charter, a document drawn up in 1955, stating the core principles requested by the people of South Africa. I used part of this text for the quilting.

Picture
Pebeo fabric paints and white PFD fabric ready to be painted for the quilt background.
Picture
Yellow, orange and dark brown mixed and merged to make an interesting stained background.
Picture
The coarse cellulose sponge used to apply the acrylic paint onto the painted fabric. I love these!

Picture
I cut a stencil from freezer paper, temporarily ironed it onto the background to help keep it in place and dabbed grey paint into the space.
Picture
All finished. I used dark grey paint for the largest figure, then gradually lightened it for each smaller figure.
Picture
Peeling away the freezer paper to reveal the images of Madiba, gradually vanishing into the distance.

Picture
More paint to stencil the word FREEDOM.
Picture
This small browser piece is now ready to quilt!

Surface design; making stencils

21/8/2014

 
Another easy and quick way to add some interest to fabric is to use stencils. You can buy stencil plastic if you want to make very durable stencils to use over and over again, but I don't often reuse my stencils that much so I prefer to use freezer paper or recycled materials.

All you need is a sharp knife, freezer paper, a cutting mat and an image to cut out.


Picture
Picture
Picture
Draw onto the paper. Cut out the shape with a craft knife
Picture
Put the stencil onto the fabric. Use a roller or sponge to cover the freezer paper with paint. I used acrylic paint here.
Picture
Keep the piece(s) you cut out to use as a mask.
Picture
Put the mask onto the fabric and using a roller or sponge cover with paint.

Using a stencil to make a SK8R Boy

Using this very simple idea I made a small 8" x 8" quilt of a boy I saw in our local skate park.

The boy I saw flying through the air was wearing dark trousers and a white T shirt. As he flew through the air I noticed his T shirt blended into the sky, which gave me the idea of leaving out his T shirt all together. This was easy to do with the stencil - I just ignored the T shirt when it came to cutting out the stencil pieces.

For the background I used the paint and roller from the earlier messing about I had done with stencils. This was a bit of a 'use up' quilt. I used Derwent Inktense pencils for the graffiti in the corner as I love the intense colour you can achieve with them.

Picture
Start with a drawing
Picture
Add a background
Picture
Add some colour

To make the quilt I started with a small mottled piece of grey hand dyed fabric. In the corner I attempted my version of some of the graffiti I saw at the skate park. It was so vibrant and colourful I thought it would look great in the corner of the quilt and would balance the image of the boy flying through the air. 

Picture
Outline the letters and colour them using Derwent Inktense pencils
Picture
Paint over the coloured area with fabric extender gel
Picture
Add some more detail with the pencils and then paint over again
Picture
Add the sparkly highlights with white fabric paint
Picture
Not too bad! But I have discovered that graffiti style text is really difficult!

Picture
I cut the grey fabric on a curve, joined it to a piece of pale blue fabric and pressed the seam towards the grey fabric. Next I put a piece of batting under the grey area to raise and give it the appearance of being the concrete ramp.
Picture
I stenciled on the boy and then put the mask pieces over the area whilst I spray painted the background with watered down acrylic paint and a toothbrush.

Surface design; Lino printing

14/8/2014

 
Picture
I really enjoy carving lino blocks and I am now  usually able to make one without bleeding too much. I bought some small squares of lino a year or so ago, and then forgot all about them. I then bought some easy-carve type squares and made several nice blocks with them. They cut like butter. If you have the choice - go for these. Softer still are cheap erasers - they are just a bit small - but wow - you could cut these with a spoon (not really, but you get what I mean).

Fast forward to a few days ago. Whilst cleaning out my supplies boxes I found those old lino squares. They are a little dry and crumbly when compared with the smooth as silk easy-carve, but never one to waste things, I decided to carve a block right there and then.

I made a small and simple drawing of 3 cherries, traced it and transferred the outline to my lino square. After carefully cutting it out, this is how it looks.

Picture
Draw some cherries
Picture
Trace the drawing
Picture
Transfer to the lino square carve out the design
When it was finished I made a few test prints, tidied up the last few bumps and then printed several pages in my sketchbook. I made a rubbing too.


Picture
Simple repeated stamp onto old book pages. Coloured with Derwent Inktense pencils.
Picture
Repeating stamps onto gesso covered pages. Painted with Koh-i-noor watercolors.Rubbing over lino block on pink paper
Picture
Koh-i-noor watercolor blob background. Stamped over and colored with Derwent Inktense pencils

Next I found two old erasers. One was a little crusty at the end, so I chopped it off. I drew a single cherry and carved it in less than a minute. Wow - these things are easy to cut! Next I drew a little leaf, and quick as a flash, cut away the exterior. Now I had a cherry and a leaf to play with.
Picture
Cherry and leaf stamp cut from old erasers


Stamping onto a piece of recycled linen. 
Picture

Top tips for cutting lino blocks

  1. Make a lino sampler. Try out your different cutter blades on a scrap piece of lino. Vary the angle of the blade as you cut; cut in little chunks; cut long lines; cut straight; cut wavy; get used to what you can do with the blades before you start. I write on my lino square so I remember which blade did what.
  2. Transfer the image you want to cut onto the lino/ easy-carve/ eraser IN REVERSE with a soft pencil. I do this by tracing.
  3. Colour the parts you want to keep with a dark pen so you know exactly what to cut away and what to keep.
  4. Put the lino onto a protected non-slip surface. I use a cutting mat or board and on top of that one of those spongy draw liner mat type things from the pound shop. You can get fancy bench hooks, but I don't use one.
  5. If the lino is really hard and cold warm it up a bit. Try sitting on it for a while, leave it in the sunshine, give it a blast with a hairdryer, pop it on a radiator.... Otherwise, just start.
  6. CUT AWAY FROM YOURSELF. ALWAYS. Keep your other hand behind the direction of the blade. Otherwise there will be blood, and sometimes lots of blood. Turn the lino block when you need to change direction - don't be tempted to cut towards you or turn your body.
  7. Cut slowly. Start with a small v shaped blade to outline the shapes, then move onto the blades that are wider and remove more lino. Look at your sampler to remind the way the different blades cut.
  8. If a blade becomes dull or wont cut nicely, change it. If you have an expensive cutter, sharpen the blade. If, like me, you have a cheap and cheerful Speedball cutter, just put a new blade in. 
  9. When you think you have finished, ink up the block and try it out. Trim away anything you don't like and neaten up any wonky cuts.


Picture

Picture
Picture
Sample of different cuts made by different blades


Reverse of design traced onto lino


Black parts not to be cut away

White non-slip mat

I hope you give lino cutting a try - it is quick and easy and you can create your own motifs and print with ink, dye, acrylic paint, ink, household bleach, decolourant or anything else you can think of. You can also make rubbings - so you get 2 for one with these! 

I have no idea yet  what I will do with these small stamps - but watch this space!
<<Previous
    BACK TO WEBSITE


    Click here if you would like to receive an e mail when I add a new blog post.
                       OR

    Follow my blog with Bloglovin
    Picture
    Picture
    Picture
    QuilterBlogs

    Categories

    All
    Challenges
    Colour
    Cool-ideas
    Courses
    Designing
    Doodling
    Dye
    Exhibitions
    Experimenting
    Festival-of-quilts
    Flower-bowls
    Gelli-plates
    Hanging-sleeves
    How-to
    Inspiration
    Line
    Lino Blocks
    Making
    Marbling
    Mending
    Mono Printing
    Mosaic
    New-products
    Purchasing
    Quilt Gallery
    SAQA
    Sew On The Go
    Sketchbooks
    Software
    Stencils
    Stitch
    Surface Design
    Talks
    Thread
    White Horses
    Workshops
    Yarn Bobming

    Archives

    October 2019
    September 2019
    July 2019
    May 2019
    March 2019
    February 2019
    January 2019
    December 2018
    November 2018
    September 2018
    August 2018
    July 2018
    June 2018
    May 2018
    April 2018
    March 2018
    February 2018
    January 2018
    December 2017
    November 2017
    October 2017
    September 2017
    July 2017
    June 2017
    May 2017
    April 2017
    March 2017
    February 2017
    January 2017
    December 2016
    November 2016
    October 2016
    September 2016
    August 2016
    July 2016
    May 2016
    April 2016
    March 2016
    February 2016
    January 2016
    December 2015
    November 2015
    October 2015
    September 2015
    August 2015
    July 2015
    June 2015
    May 2015
    April 2015
    March 2015
    February 2015
    January 2015
    December 2014
    November 2014
    October 2014
    September 2014
    August 2014
    July 2014
    June 2014
    May 2014
    April 2014
    March 2014

    RSS Feed

    BACK TO WEBSITE
Powered by Create your own unique website with customizable templates.