CLAIRE PASSMORE blog

More ways to win the battle with troublesome metallic threads

14/4/2016

 
This week I have moved along quite a long way with the 'Am I Beautiful?'  quilts currently on my design wall. I have got to the stage where I need to do quite a lot of free motion quilting using metallic thread. Yikes!  Free motion quilting and metallic thread in the same sentence. I must be nuts.
Picture
Picture
Picture

​If you have ever stitched with metallic thread then I'm sure you have been there - thread going haywire, making birds nests on the underside of the fabric, getting jammed in the feed dogs, snapping every 5 seconds, coiling up like a spring and shredding in the needle. Not all metallic thread is difficult, but if you know what I'm talking about then you will also probably have a few tricks up your sleeve to solve the problem! There are lots of blog posts around where people share their tips and secrets. Here are two  I especially like. Click on the 'see Kate sew' or 'Academy of Quilting' boxes below to go directly to these blogs and see the tips these kind people have shared.

​​
Picture
Picture

​With all that good advice, however, my thread still played up. It was a particularly wiry, extra-shiny silver and no matter which way up I put the spool, it just coiled up as you can see in the picture below.  The thing is  I really wanted to use it, despite having several other silver threads. I should have known better, but I wanted THAT thread - so I persevered.

Picture

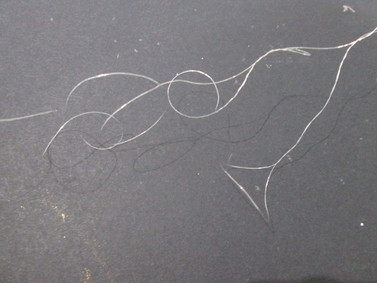
I wont repeat what these two great blog posts have shared - that would be pointless, but  I thought I would share a pass along a few further tips for that I discovered as I  to tried to cope with this coiling monster!

1. Always, always take the time to stitch some samples, until you get the best stitch you can manage. It may not be perfect and you may feel like you are wanting both time and thread - but I promise, it is better to get it sorted out early than risk ruining your work.... and nobody I know likes unpicking!

​
Picture

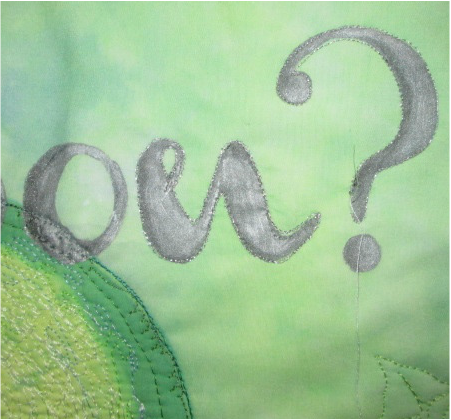
2. If the thread is cross wound, put it into a cup and put the cup on the floor and then let the thread come up and over a thread stand before you thread the machine. Giving that thread lots of room to wiggle and untangle before it gets into your machine is a good idea. My thread wanted to coil up like a spring whatever I did with it, but this did at least let me see (out of the corner of my eye) when the thread was getting too twisted to sew nicely any more.
​
Picture
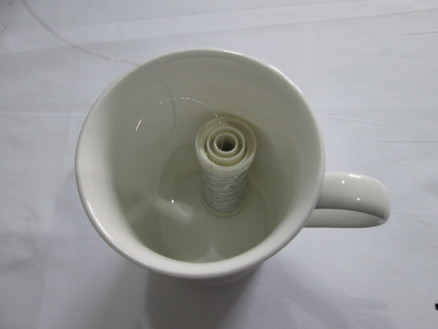
The old 'spool in a cup' trick. You can see, it has coiled already!

When it was just too twisted up I had no option but to uncurl it all before it snapped. However, rather than cut the thread and have to start again I perfected a kind of spinning top method to uncurl it. I stopped stitching with the needle down, then put an elastic band around the spool of thread to stop any more thread from coming off.
​
Picture
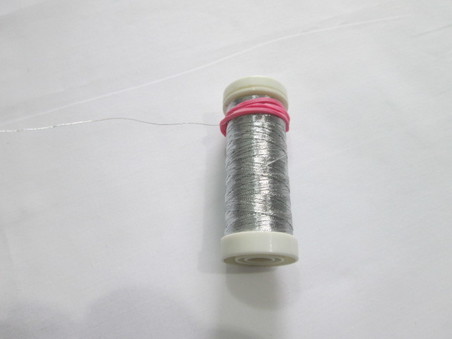
The elastic band temporarily stops any more thread from coming off the spool

Then I stood up and grasped the thread at the point where it went over the thread stand and let the long thread with the spool on the end dangle downwards. Lifting my arm so the spool was just above the floor allowed the spool to rapidly spin around,  getting all those coils out. Once it stopped spinning I removed the elastic band and put the spool back into the cup and carried on stitching. It was a nuisance - but it did stop the thread from snapping and allowed me to carry on stitching. 
Picture
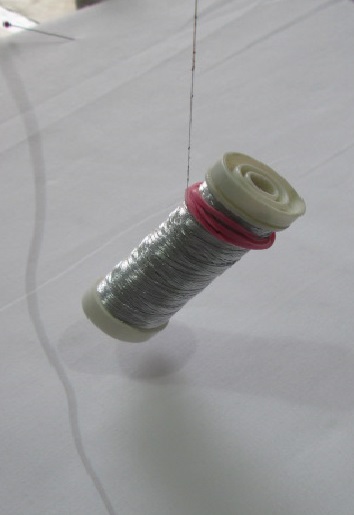
The dangling spool spins like a top until all the coils are gone

​3. The next thing I did was to lubricate the thread with (Collins) Sewer's Aid silicone lubricant. I've had this bottle of magic for years - never really knowing what to do with it. Since learning more about lubricating thread I must say I think it makes a big difference with these troublesome threads. I have just looked it up online - most of the quilting shops stock it, and it is also available on Amazon. The price varies a lot - between £5 and £8 - so shop around!  The main issue that I have with it is how to get it onto the thread without having too little or too much. See below for the solution!
​
Picture
 
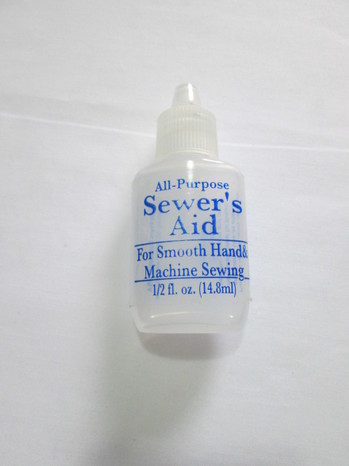
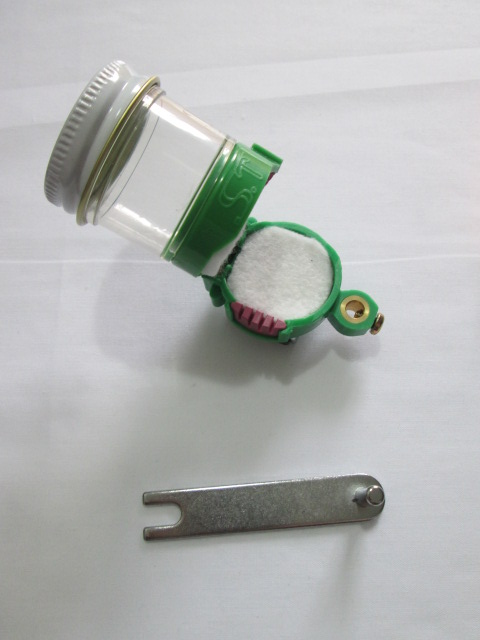
Earlier in the year I read read about a little gadget called a lube box that is used by industrial sewing machine operators. Essentially it is a little jar with a hole in the bottom. Under this are two pieces of thick felt (you can't see them here), through which you pass the thread. It is a dinky little thing. It has a magnet on the base to allow you to attach it to your metal machine, or a little screw clamp if your machine is not magnetic. I've clamped mine to my thread stand and it works brilliantly.
​
Picture
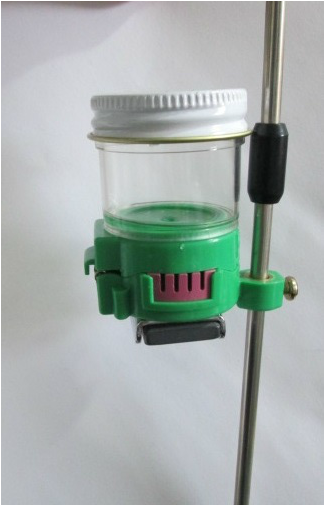
SEWING THREAD MAGNETIC LUBRICATION BOX
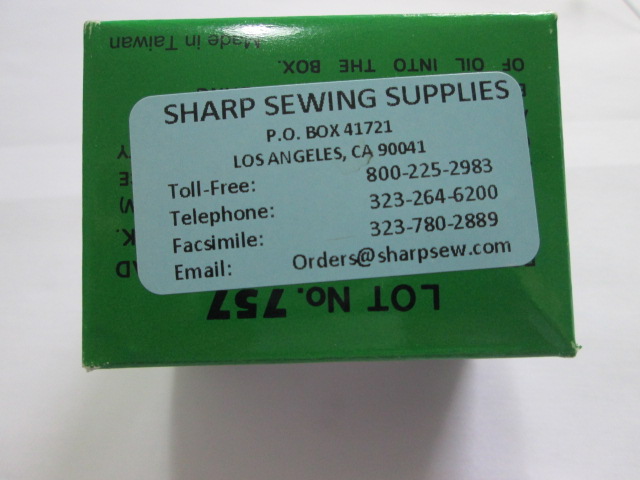
I searched the internet and found them for sale in the USA. I'm sure they must be available elsewhere - but I ordered mine from  Sharp Sewing Supplies via eBay.com for $12 (US) +post. 
                           
Picture
Here are a few more pictures so you can see what it is like
Picture
Picture
MULTIPLE SEWING THREAD LUBRICATION BOX (MAGNETIC) AP30
Picture

All you do it put some Sewer's Aid into the little jar and allow it to penetrate into the felt pads. When you thread your machine you lift the little jar section (above left)  and place the thread between those two white felt pads. Then you close the jar down, trapping the thread and allowing it to pass through to the other side. The brownish part you can see above right has little grooves to guide the thread. You could have as many as 5 threads passing through the lube box - each one getting the perfect amount of silicone lubricant on it. Think of it as hair conditioner for thread!

4. If your thread is straight wound (also known as stacked) then a different approach will probably work better. Rather than standing the  thread vertically, it is usually better to have the spool positioned horizontally. If your machine does not have this set up, then you will need to get inventive. My machine does have a horizontal spool pin, but to give the thread room to uncurl I used my thread stand again. The trouble is, it only has vertical spool pins. However, with a bit of lateral thinking it now has a horizontal option, courtesy of a bent double ended knitting needle and a small piece of foam tube (that used to be a hair roller). Take a look at the picture below to see what I did.

Picture
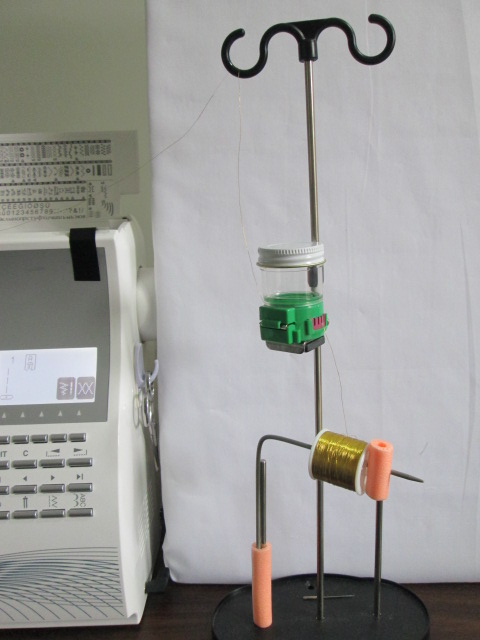
Here you can see some metallic gold thread placed horizontally on my makeshift spool pin. The thread unwinds directly upwards, travels through the lube box, then upwards again to the top of the thread stand and into the machine.

​5. Finally, needles. My preferred needle choice is the Top Stitch needle. I love these for everything, but especially for tricky threads. Personally I don't use metallic needles as I find these better. In my view, try what you have and see what works - don't slavishly follow the rules or what it says on a label - try things out and use what works for you.

Picture


I must say that not all metallic thread misbehaves as badly as this one and I hope you never end up sewing with such troublesome thread, but if you do, and you decide not to throw it out of the nearest window, give these ideas a try. It might just save you some grey hairs.

Thanks for reading.
​
Please feel free to share my website or blog with your friends by using the buttons to the right. If you would like to receive an e mail each time I post a new blog, please click here. I promise to never send you junk or give your address to anybody else.

Trying out a new stabilising product: Terial Magic

23/11/2015

 
I was at Midsomer Quilting last week, teaching my 'Doodle Birds' workshop (more on that later) and was given a present by De - a new product to try out. It is called 'Terial Magic', and I must admit, I had never heard of it until now.

Terial Magic is a slightly sticky liquid that comes in an easy to use spray bottle. According to the instructions it needs to be sprayed onto fabric and allowed to dry naturally for 15 or so minutes, and then ironed.

Once dry it is supposed to make the fabric stiff (like when you use starch) and non fraying. Stiff enough, it is claimed, that no further stabiliser is required for things like machine embroidery or 3D work.

Picture
Trying out Terial Magic

To see how it worked I took a few pieces of cotton quilting fabric from my scraps bag and sprayed them until they were moist. Following the demonstration on the Terial Magic website (click here) I put my fabric into a small tub and sprayed it. Once it was quite moist I squished it about a bit to make sure the liquid had penetrated throughout the whole piece, and then squeezed out the excess liquid (I put this back into my bottle).

Picture
Spray the dry fabric with Terial Magic in a small bowl until saturated
Picture
Squeeze out the excess slightly sticky liquid. I put this back into my bottle

After smoothing it out I left it to air dry on a flat surface for the 15 minutes stated. After this time it was still very wet - it was a winter's day in the UK, so not very warm - so I left it for around another 20 minutes of so, by which time it was only just damp. Obviously the temperature plays an important part in this, so use your judgment.
NOTE:At this stage the fabric was slightly stiff, but not noticeably different to when I had started.

I then took the fabric pieces and ironed them, as per the instructions. I used a hot  iron directly on the fabric (no ironing sheet) and the heat obviously had an effect, as the fabrics became smooth, very crisp and stiff. There was no residue on the iron and no flakes or 'gunge' on the fabric. 
Picture
Pressing the damp fabric with a hot iron. It became very crisp - like a piece of thin card

Comparison with starch

Up to this point I was starting to wonder why I would use this product instead of starch. I do not often use starch on my fabric, but when I do I usually mix my own and apply it in the same way.

I applied the homemade spray starch to the fabric in the same way as I did the Terial Magic and left it to dry until just damp and  then ironed the fabric. It was slightly stiff, but nowhere near as stiff as with the Terial Magic.
To try and get a stiffer result I sprayed the fabric once again with the starch mixture, but this time I ironed it dry straight away. This made a big difference and the fabric now had very similar crispness and stiffness to the Terial Magic soaked fabric. 

There were, however, two things I noticed which were slightly different when using the starch.
1. Small flakey particles of starch came to the surface of the fabric, which easily scorched
2. The sole plate on my iron got covered in a thin film of starch, which also scorched. Not the end of the world, but it meant I had to clean the sole plate of my iron which is always a pain.


My spray starch recipe:

50ml tap water
200ml  hot water

1 to 3 teaspoons of cornflour

Mix the cornflour and the
cold water to a smooth paste.
Add the hot water and whisk / shake until well mixed.
Pour into a spray bottle.

​According to the blurb that comes with Terial Magic these are two of the drawbacks of using starch. Another thing they mention is that insects like to eat the starch and therefore your fabric. I must say that I have never noticed this, but I am not a regular 'starch user'(!) so I am not able to say whether this is an issue or not. They also say the stiffener in Terial Magic is not edible by insects - so if this is important to you it may influence your choice.

What to do with this stiffened fabric

​The stiffened fabric was interesting.
It folds crisply - just like thin card, so if you have a project that needs firm creases or needs to stand without support this may be a good product to use. 

I tried a few origami ideas...​
Picture
This is a single layer of fabric folded to make a star
Picture
A single layer of fabric folded to make a dress. Next to it is a banknote I was once given, also folded into a dress shape
Picture
Folded hexie yoyo - easy once you have got the hang of it! (trouble is it took me an hour to get the hang if it)
The crispness of the fabric made it perfect for folding techniques. I can imagine it would also be particularly good when piecing small, fiddly shapes or pieces cut on a bias.

Origami links for the above 
For the folded dress, click here
For the yo-yo hexie, click here


​Next I tried some needle turn applique
Picture
1. The stiff fabric was easy to cut. I chose this fabric as it was particularly bad at fraying prior to treatment
Picture
4. The needle and thread slipped through the fabric easily - it was a pleasure to stitch
Picture
6. Fabric soaked in starch - cut well and no noticeable fraying
Picture
2. After cutting I finger pressed the seam allowance over. The crease stayed perfectly


The green fabric stiffened with the Terrial Magic did not fray at all and was very easy to stitch. I was pleased to note that there was no resistance to the needle from the product in the fabric


To make a fair comparison I repeated the process with a piece of yellow fabric soaked in starch. It cut well and creased well, just the same as the Terial Magic soaked fabric. The only difference I noticed was that when I came to stitch the needle and thread were not at all easy to pass through the fabric. It was much more difficult and made hard work of a simple job.
Picture
3. I pinned the leaf shape in place ready to stitch down
Picture
5. The finished leaf shape stitched down
Picture
7. The two leaf shapes; the green fabric was easy to stitch, the yellow much more difficult.

And then I tried stitching some raw edged leave to a piece of fabric
​​
Picture
Holly leaf shapes cut from Terial Magic soaked fabric
Picture
Place 12 in a circle, and stitch down the centre of each leaf. It looks better in real life than this photo!
The stiffness of the leaves made it easy to position them on the fabric and the raw edges, once again, did not fray.

The blurb also says you can use the stiffened fabric for machine embroidery without and further stabiliser. As I don't have an embroidery unit I can't let you know about that - but if anyone does and has experience of this product it would be good to find out if the claims are true. 

So - do I like Terial Magic? Yes, I think I do. It is similar to starch, but has a nicer feel, doesn't gunk up my iron and the treated fabric is nicer to stitch. I don't often need fabric that is stiff or crisp, but when I do I think this product would be a useful addition to the tools I already use. Thanks De - when I run out I will be buying another bottle from you!


Now for those Doodle birds!
These are a few pictures I took during the workshop at Midsomer quilting last weekend. Brilliant aren't they?

And how about these two amazing Doodle Poodles?  My thanks to Chris D who was so inspired when she got home that she made these two fantastic pieces. I just love them! Thanks for sharing them, Chris, I think you have cracked free motion quilting!
Picture
Picture
I hope you have enjoyed seeing all this brilliant free motion work. Thanks for looking.
​
Please feel free to share my website or blog with your friends by using the buttons to the right. If you would like to receive an e mail each time I post a new blog, please click here. I promise to never send you junk or give your address to anybody else.
    Picture
    Picture
    Picture
    Picture


    Click here if you would like to receive an e mail when I add a new blog post.
                       OR

    Follow my blog with Bloglovin
    Picture

    Categories

    All
    Challenges
    Classes
    Colour
    Cool-ideas
    Courses
    Designing
    Doodling
    Dye
    Exhibitions
    Experimenting
    Festival-of-quilts
    Flower-bowls
    Gelli-plates
    Hanging-sleeves
    How-to
    Inspiration
    Line
    Lino Blocks
    Making
    Marbling
    Mending
    Mono Printing
    Mosaic
    New-products
    Purchasing
    Quilt Gallery
    SAQA
    Sew On The Go
    Sketchbooks
    Software
    Stencils
    Stitch
    Surface Design
    Talks
    Thread
    White Horses
    Workshops
    Yarn Bobming

    Archives

    December 2020
    September 2020
    August 2020
    July 2020
    May 2020
    February 2020
    December 2019
    October 2019
    September 2019
    July 2019
    May 2019
    March 2019
    February 2019
    January 2019
    December 2018
    November 2018
    September 2018
    August 2018
    July 2018
    June 2018
    May 2018
    April 2018
    March 2018
    February 2018
    January 2018
    December 2017
    November 2017
    October 2017
    September 2017
    July 2017
    June 2017
    May 2017
    April 2017
    March 2017
    February 2017
    January 2017
    December 2016
    November 2016
    October 2016
    September 2016
    August 2016
    July 2016
    May 2016
    April 2016
    March 2016
    February 2016
    January 2016
    December 2015
    November 2015
    October 2015
    September 2015
    August 2015
    July 2015
    June 2015
    May 2015
    April 2015
    March 2015
    February 2015
    January 2015
    December 2014
    November 2014
    October 2014
    September 2014
    August 2014
    July 2014
    June 2014
    May 2014
    April 2014
    March 2014

    RSS Feed

    Picture
    Picture
Powered by Create your own unique website with customizable templates.