CLAIRE PASSMORE blog

A new idea.... block of the month anyone?

25/7/2018

 
As you may have noticed, many of the quilts I make can be about subjects that are a bit intense. The subjects are always important to me and I research them carefully before I start work, but it can be a bit depressing. So to lighten the mood it is nice to mix things up a bit and make something fun and lighthearted too.

Each year I make one or more small quilts for the Midsomer Quilting 12 x 12 challenge. You can read more about it here. Their challenge is open to anyone with some sort of link to the shop and an exhibition of the quilts submitted happens at the shop in Chilcompton, UK, in December. It gets better and better each year and many of the quilts are available to buy in a secret auction, the proceedes of which are given to a local hospice known as Dorothy House.

​The theme this year is 'Think of a number'. After a bit of thought I have decided to go big this time and have designed 12 quilts as my contributuion. My mum also gets involved each year and in support of the 'plan' she is making 12 quilts too, putting her personal twist on the designs, but she is making them all by hand!

12 quilts....have you figured it out yet?
Of course, The 12 days of Christmas.

​As I chatted with my mum about it we both thought the designs could make a great project for a group, a family or just one person to work on over the course of a year and end up being a lovely addition to the Christmas decorations. And thus the idea of a block of the month project was born.

Whilst I was up at Midsomer Quilting this past weekend teaching the second part of the Starry Night workshop I spoke to De, Chris, Birgitta and a few of the customers to see what they thought. The upshot is  - it is on!

******************************UPDATED BLOG POST FROM HERE:**********************************


​This is what it looks like!
12 Days of Christmas block of the month project by Claire Passmore and Midsomer Quilting
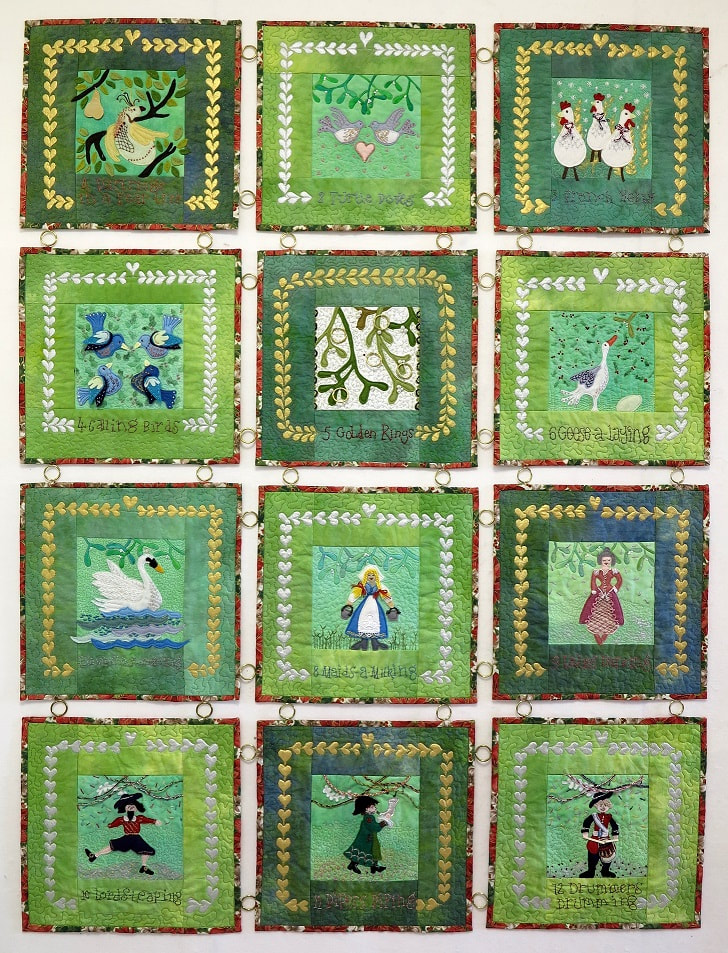
'Twelve Days of Christmas' block of the month project

It will work like this:

Starting in January 2019 the pattern, fabrics, embroidery threads and full instructions for one 12 inch quilt block will be sent by post to all participants. 27 days later you will receive the next instalment, so by the end of November 2019 you should have a completed wall-hanging / quilt/ set of 12 inch squares ready to decorate your home for Christmas. (There is no need to visit the shop to be part of the Block of the Month, making it great for those, like me,  who live far away!)

The nice thing about the designs is that the blocks can be made using a variety of different techniques so is suitable for all levels - from beginner to experienced.

To try and make things a little more interesting I have set up a closed 'secret' Facebook group for participants where we can share our progress, ask questions and generally have a natter about the project as it develops. Of course, if you are not a Facebook person then there is no need to worry about this - it is just an 'extra'.

I also hope to be able to make some short videos showing some of the different techniques used - so watch this space for that (I need to learn how to do it first - but January is ages away!!)

Finally, I am also offering a half day workshop for anyone who would like to learn how to hand dye the fabric you use for the project on JANUARY 12th 2019. The cost is £20 and needs to be booked with De at Midsomer Quilting. There are still a few spaces left for the afternoon session if you wish to join in.  


If you wish to join the fun or are interested in finding out more, then please get in touch with De at Midsommer Quilting (details below).

COSTS:
£10.50 per month for 12 months for UK addresses
£11.75 per month for 12 months for EU addresses
£15.00 per month for 12 months for the Rest of the World 

Payment can be made by cash, cheque or PAYPAL.

CONTACT 
Midsomer Quilting,
The Hayloft,
Manor Farm, 
Church Lane,
Chilcompton, 
BA34HP
  •  Phone:
    01761 239333 or 01761 232509
  •  Email:
    info@midsomerq.com
  •  Shop Opening Hours:
    Fri, Sat, Sun, Mon - 10:00AM - 4:00PM


Thanks for reading.
Please feel free to share my website or blog with your friends by using the buttons to the right. If you would like to receive an e mail each time I post a new blog, please click here. I promise to never send you junk or give your address to anybody else.

Venus art quilt; finished at last

4/2/2018

 
I am really pleased that the quilt I have been working on for quite some time now is finally finished. Yesterday I stitched on the hanging sleeves and put on the label. It is now ready to submit to the exhibition I have made it for (more on that later).
Picture
Goddess or Sex-object? Claire Passmore ©2018 Size: 24" x 41"

There was a slight false finish though, which delayed me just a little longer! As I was pinning the quilt to the design wall ready to photohraph,  despite my very best efforts to get the whole quilt square, it quickly became obvious that the right hand side of the quilt was 1/2 inch shorter than the left hand side. How this happened I just don't know. I must have measured it over 20 times, then blocked it before the final trim and facing. I guess it just goes to show that fabric continually moves and stretches.
So, I unpicked the facing, gave it another trim, reattached the facing, had a gin and tonic, and then resumed with the photography.

Here are a few close-up shots to show you some of the detail....
Picture
Picture
Picture
Picture
Whilst making the quilt I also worked on a number of different samples as I tried out different ideas. Two of these samples were good enough to have been made into small quilts in their own right to accompany this one.  I have decided to mount these onto stretcher bars and place in white floater frames, as you can see below. I will be interested to hear what people think about this finishing treatment as it is not something I normally do with my work.

Picture
Copper Venus I, Claire Passmore ©2018 Size: 17.5" x 17.5" x 2.75"
Picture
Copper Venus II, Claire Passmore ©2018 Size: 17.5" x 13.5" x 2.75"
As I mentioned, I made this work to hang in the upcoming exhibition 'Unfolding Stories 3' which will showcase work by members of the Group Contemporary Quilters West. The exhibition promises to be fabulous and I hope my work will be selected to hang.

The exhibition will premiere at Harbour House Centre for Arts and Yoga in Kingsbridge, Devon. TQ7 1JD from April 27th to May 3rd. I aim be at the exhibition every day and it would be wonderful to see you there if you are down that way. Click on the image below to go to the CQ West website.
Picture

​Thanks for reading.
Please feel free to share my website or blog with your friends by using the buttons to the right. If you would like to receive an e mail each time I post a new blog, please click here. I promise to never send you junk or give your address to anybody else.
 

Slow but positive progress

28/1/2018

 
One week on and this is the progress I have made. It took a lot of thinking about how I want the finished quilts to look. The last group of faces I made were mostly colourless, or very lightly coloured. For these quilts I decided I want to add a new dimension, and colour is going to be my focus.
​
Picture

Over this past week  I have spent a lot of time trying different colour palettes; from realistic to complete fantasy. The image above is what I have decided to go for. It is interesting that in this photo they left eye does not work well, yet when I look at the quilt top it seems fine. I need to find out what is going on, and if necessary make some changes.  

I have never really painted a large face with colour before, and I knew I would need to mix a lot of different tints and values so I could give contour and definition to the face . As you can see, the style I have chosen is not exactly 'realistic'.
​This is what I did.
Like your art teacher probably used to tell you - start with primary colours. 

The paints I used are Daler Rowney Graduate acrylic paints mixed with a little Berol fabric medium. Nothing fancy, but not the budget type of acrylic either. I started with Primary red, blue and yellow. I also used mixing white a bit later. (I didn't use the brown that is in the photo at all.) 
Picture
Picture

I used these 3 colours to create a base colour from which I made all the other tints. 
I began by mixing equal quantities of each colour, but ended up with a sludgy grey yuk. After some trial and error I ended up using 2 parts yellow, 1 part red and 2/3 part blue to yield a dark brownish yuk. I made a small jar of this to use as my base. 
Picture
Picture
This is the yuk that turned out to be perfect when mixed with various amounts of white. 
Picture
Picture

​​I made a (not terribly accurate) record of my mixing in my sketchbook, as you can see below.
Picture

Using just the dark yuk to start, by adding small amounts of white, red, yellow or blue as I worked I was able to paint each part of the face with different values and tints. I also took a photograph of my own face to use as a value reference which proved to be very helpful.

This is how my paint palette looked at the end of the day.

Picture
I had intended taking lots of photos as I worked, but unfortunately I got so engrossed with it all that this is the only photo I took before it was finished. You can see form this image I started by adding the lightest values around the eyes first.

​And this is how both faces look now.  
Picture
Picture

And now the project continues - next stage - how shall I quilt them?????

Thanks for reading. 
​
Please feel free to share my website or blog with your friends by using the buttons to the right. If you would like to receive an e mail each time I post a new blog, please click here. I promise to never send you junk or give your address to anybody else.

rose garden

15/7/2017

 
I recently spent another fabulous day with the members of Walton Textiles, this time making beautiful rose gardens. We had a lot of laughs and everyone was tremendously productive, in fact by the end of the day everyone had pretty much finished their curved-pieced quilt top and covered it with sprays of flowers.  
Picture
Looking great, Gabbie!
​
The nice thing about this workshop is that the pieced quilt top builds quickly. Once you get the hang of the technique of cutting and piecing the gentle curves (not difficult, just different!)  you are off. In just an hour or so everyone had their quilt top done. 
Picture
Free cutting gentle curves with confidence
Picture
Then stitching... look, no pins!
Picture
Zooming along
Picture
All in less than an hour!

By lunch time everyone had a fabulous quilt top to work on.
​
Picture
A clever way to use up some left over pieces of jelly roll
Picture
Picture

After lunch we began adding the flowers. There are so many different options..... We discussed size, shape, colour and layout before everyone got back to work.
​
Picture
Picture
Picture
Picture

Working on layout takes time and space, the floor is often a good place to work!
Picture
Picture
Landscape or portrait? 
The curved background can be used in different ways to good effect.
Picture
Picture
Picture
Picture
Picture
Picture
Picture

Amanda began quilting her fabulous quilt top towards the end of the afternoon.

Picture
I hope you agree, they are all fantastic. I know that at least one is destined to become a cushion, one a wall hanging, one a table runner and another is going to have a twisted log cabin border added. Ladies, I am looking forward to seeing them once they are finished!

To find out more about the 'Garden of Roses' workshop and download the accompanying brochure, please clickhere. 

Thanks for reading.
Please feel free to share my website or blog with your friends by using the buttons to the right. If you would like to receive an e mail each time I post a new blog, please click here. I promise to never send you junk or give your address to anybody else.

Doing the Portrait Shuffle

4/6/2017

 
A few weeks ago a blog post from the members of 'Through Our Hands' dropped into my mailbox. In it they invited anyone and everyone worldwide to join them in creating a small piece of art (A5 in size) to be exhibited at the Festival of Quilts (UK) this summer. Not only is it a great opportunity to have your art hanging in this really exciting exhibition, but if you join in you will be helping them to raise money for the charity 'Save The Children' too.  After the exhibition all the portraits will be 'shuffled' and you will receive someone else's portraits to keep.   It really is win - win!
​
There is still plenty of time to enter, (your entry needs to be completed and with them by 31st July) so why not find out more about the Portrait Shuffle and see if you would like to join the fun too?  Click here or on the leaflet below to go to the Through Our Hands website for full details.
Picture

After paying my entry fee, which covers a minimum donation of £5 to Save the Children, I received my entry pack through the post. In it was a small A5 canvas to work on and a discount voucher for Festival of Quilts tickets. That was a nice surprise!

All I had to do was think of whose portrait I wanted to put onto the canvas and which medium to use. The portrait can be worked in any media you like - photography, drawing, paint, collage, print, textiles........ whatever floats your boat. I chose to make a small quilted piece of fabric to mount onto the canvas. Over the past year or so I have used a lot of portrait style images in my work, so I thought about taking one of these images and creating something similar. 
Picture
Am I Beautiful Yet?
Picture
Ugly?
Picture
Innocence
Picture
I Will be Beautiful Soon
Picture
1 in 4
Picture
Conscience
Picture
Am I Beautiful Now?
Picture
Kate Shepherd
Picture
Carusu
Picture
I Will be Beautiful
Picture
Salt Satyagraha
Picture
Echos of Demons

But then I thought why not make something new? I have a nice photograph of my nephew that I took a few weeks ago and decided to use that to get me started. Here he is! (Well, half of him.) 
Picture
Picture
Using GIMP software I twiddled about with the filters,  levels and threshold settings and arrived at the image on the right which I was able to draw onto a piece of fabric with Derwent Inktense Pensils. 

Picture

I added the rainbow as the last time I saw him we were looking at rainbows together. All that was left to do then was to quilt it. I thought I'd leave the long tail threads on instead of cutting them off, and stretched them over the edge of the little canvas along with the fabric before stapling it all down.
Picture
Rainbow Child by Claire Passmore
I'm popping it in the post tomorrow and looking forward to seeing it alongside all the others at Festival of Quilts. 
Why not have a go yourself - it was lots of fun to make - and for a very good cause too; savethechildren.org.uk

Find out more info from the organisers, the Through Our Hands team by clicking here.

​Thanks for reading.
​Please feel free to share my website or blog with your friends by using the buttons to the right. If you would like to receive an e mail each time I post a new blog, please click here. I promise to never send you junk or give your address to anybody else.

Boroboro : tattered and repaired

28/3/2017

 
I have a favourite pair of shorts. They are old and not particularly special, and certainly not very pretty.... but I like them. They are 'comfortable'. They have been to lots of places and I've had lots of fun whilst wearing them. My most memorable occasion was when I was visiting my friends in Puerto Rico about 8 or so years ago (and they weren't new then). I was walking their lovely Basset hound on a lead and, very unlike me, I decided to jog for a bit. I was a few kilos lighter then, and as I ran the shorts began to slip. Downwards. Then some ducklings crossed our path and Ludovic decided to run a bit faster than me. He wasn't a dog that was typically inclined to move any faster than absolutely necessary, but the next thing I knew Ludo was trying to get away and my shorts were around my ankles. My friends nearly died laughing. It wasn't pretty. 

There is no way that would happen these days (they fit well now!) but those shorts have begun to show serious signs of wear. When I hung them out to dry on the washing line this week a major problem became apparent....
​

Picture
The bum had finally worn through

Not wanting to part with them just yet I decided to do a proper repair job and chose a traditional mending technique; shasiko.  I have only ever played with sashiko stitching on a decorative level before, but this was my chance to have a proper 'go' at it.
​ 
Picture
Blue cotton fabric patch
Picture
A simple sashiko pattern
Picture
Pinned in place
Picture
Dense stitching holding the patch on place
Picture
Better than new!

This is how they look now and I love them even more! 

Next time you have something that needs mending why not see if a traditional technique could help you? 

Thanks for reading!

Please feel free to share my website or blog with your friends by using the buttons to the right. If you would like to receive an e mail each time I post a new blog, please click here. I promise to never send you junk or give your address to anybody else.
 

Stitched Alchemy: 'Carusi'

15/12/2016

 
I am still working on my sulfur quilt and as I have been working in creating the fabrics I have been thinking about the life the carusi must have endured. Sold to the mine owners or workers for an agreed number of years, what must they have thought of their lives as they hauled heavy loads of sulfurous rock from deep underground up to the surface? They often lived, ate and slept somewhere in the mine, having no proper home to return to.  For many boys their only escape from this dreadful life was to be rescued  by being called up for military service. 

Picture
Painting by Onofrio Tomaselli, for the 1906 World's Fair in Milan depicting the carusi
​The artist Onofrio Tomaselli created this painting in 1905 after staying for some time with Baron La Lumia, a wealthy sulfur mine owner, and witnessing at first hand the fate of the carusi.  The painting was exhibited in 1906 in Milan at the World's Fair and was a tribute to 19 carusi who lost their lives in one of many terrible accidents at La Lumia's sulfur mine in Gessolungo, which occurred in 1881. I guess it shows that there were, at least, some people with a conscience at the time.
(Source: Davide Mauro (Own work) [CC BY-SA 4.0 (http://creativecommons.org/licenses/by-sa/4.0)], via Wikimedia Commons)
For the fabrics, I dyed lots of yellows as you would probably expect. Starting with lemon and golden yellow fiber reactive dye I added very small amounts of orange, rust, bronze and chartreuse to create interesting mottled backgrounds. Onto that I monoprinted shapes, words and other marks that help tell the story of the carusi.
Picture
Picture
Picture
Picture
Picture

The fabrics have turned out to be very interesting - I added very dense print marks, which may mean the quilt will end up with very 'busy' look, so I will have to be very careful when positioning the different pieces.
​
Planning ahead, I decided to check out how the straight quilting lines would look over the young boy's face, so I made a small trial piece. Although it may seem like an extra step, I prefer to try out important design features to ensure I am happy with the effect before moving on with a design. I have used this simple but effective straight line quilting pattern on the other quilts in this series, so I was keen to continue using it, but not if it comporomised the overall look of the quilt. Happily, I think it works well.
As I have no plan for this small sample I have entered it into that SAQA 2017 trunk show. I hope it arrives in time!
Picture
'Carusu' 7" x 10" © 2016 Claire Passmore

I am now in the process of positioning the fabrics on the design wall to create the quilt top. I usually take a quick photo of several different variations and then look at them to see what works and what needs to be changed. Somtimes a layout just falls into place, but when it doesn't I find this really helpful.
Picture
Picture

I'll let you know how it develops in my next post. Until then, thanks for reading.
​
​Please feel free to share my website or blog with your friends by using the buttons to the right. If you would like to receive an e mail each time I post a new blog, please click here. I promise to never send you junk or give your address to anybody else.
Click to set custom HTML

Printing with lino blocks

16/8/2016

 
If you went to Festival of Quilts, I hope you had a lovely time. As usual there was lots of excellent work to see, old and new friends to meet, and a hint of controversy too. 
My mum and I spent a great weekend together and came away with lots of ideas and a little bit of shopping too. One of our favourite galleries was that belonging to Russian artist Lyubov Lezhanina. (Click on her name for a link to her Facebook page). It was tucked away right in the back corner, so if you didn't get down there, here are some photographs of her wonderful work.


And now back to work....
​
On October 2nd I have a new 'Further Techniques' workshop coming up at Midsomer Quilting where we will be taking a more considered approach to some of the ideas used in the original 'Techniques 1' workshop. The aim of the new workshop is to add surface design to large pieces of fabric in order to  create a co-ordinated collection that can be used to create a unique art quilt.  

​
One of my favourite ways to create interest on fabric is to print, and there are so many ways. For the workshop, amongst other things, we will be making hand carved lino blocks. They are reasonably easy to create and are make beautiful graphic marks on fabric. To give you an idea,  this morning  I decided to start a new block based on a moth that flew in through the window last night. 

After looking carefully at it I did a quick search and discovered it is a Pale Shouldered Brocade, Lacanobia thalassina. It is beautiful, don't you think? 
Picture

Not only is is an interesting little creature to look at, it is also a very simple shape with some interesting marks which will transfer nicely as a lino block. 

To start the block I made a very simple drawing of the shapes I wanted to carve. You can see that there is no detail here - just the outlines of some vaguely moth shaped creatures and some lines giving the idea of movement. (Please ignore the faint beetle and ant shapes in pencil - this is a recylced piece of paper and they have nothing to do with the moths)
Picture

This is what I intend to carve into the piece of 'lino' (I like to use a soft plastic type material as a substitute for lino as it is much easier to cut into and doesn't crumble like lino can if it gets cold or dries out). The moth shapes will remain whole on the block and the lino material all around them will be carved away.

Using a very soft pencil I traced the outlines then transferred them onto the lino block, ready to carve.
​
Picture

You can see the smudgy pencil outlines of the moth shapes and also see where I have started to carve into the block, taking out the green plastic material with the cutting blade. However, it is already starting to get a little confusing as to what should be carved away and what should remain, so I took a black marker pen and coloured in all the areas I want to stay. That way I hope I wont make any mistakes and carve out a section that should stay. Once it is gone, it is gone and there isn't a lot that can be done!
​
Lino printing block Claire Passmore

I hope this photo makes it all clearer. The black sections will be left alone for the time being, and all the green areas need to be carved away with the cutting tool. All those little grooves that remain in the carved away section produce beautiful graphic marks on your prints, so don't try and make it all super smooth.

SAFETY FIRST: If you try this then you MUST only ever carve away from yourself. That blade is super sharp and not only does it really hurt when you slip and stick it into yourself, it goes in deeply too and there will be a lot of blood and maybe tears. You need quite a lot of pressure to carve into the lino so accidents, which do happen, are not nice. 

Make sure the hand which is holding the lino block is never in front of the hand holding the carving tool. Although this sounds obvious, it is easy to forget and let that free hand hold the block in such a way as to almost guarantee you will get cut. Turn the lino block often to make sure you are always cutting away from yourself and your free hand. 
​

Picture

It took about half an hour to carefully carve away all the green material around the black shapes, and the block was ready to have its first trial to see what else was needed to add interest. Using a roller and some printing ink I inked up the block and made a trial print onto a piece of scrap paper. Unfortunately I forgot to take a photo of this very first print, but once I could see how it looked I wiped the block clean with a tissue and carved a little more removing areas where I wanted more definition and where I wanted more detail. This is the print I made next.

Picture
You can see it is not a good print, but the purpose of this one was simply to see how the extra detail I added looked. The moth on the right was looking more like a wasp with the marks I carved into the wing sections - so I knew I needed to cut some more into that area to sort out that problem. But I do like the small straight lines I made in the body of the moth on the left.

After that I made a further trial print. The photo below shows this and the ink and roller I used to ink up the lino block. Again, it is a terrible print, but it showed me enough detail of the marks I had cut into the lino. I still don't like the waspy looking one though. Those lines on the wings are all wrong. I'll have to work on that some more.
​
Lino print for surface design by Claire Passmore
Here is the finished block - still a bit wet after washing off the ink under the tap.
Picture
Picture
And here are two of the early prints in my sketchbook. I have added a little colour to the one on the left with Markal oilstick. I had intended working onto it with watercolour paint and pencils - but I have discovered that the new ink I have purchased is not permanent once dry and so is pretty useless for my purposes! Aagh!! The moment any water touches the print the black ink smears all over the place and not only ruins the print, but turns everything black. So choose your ink carefully, or use acrylic paint which also works well, and is permanent once dry.

I will work on this block some more, make some better prints and then print up some nice fabric to share in a few weeks time. If you decide to have a try at lino cutting, and it is great fun, please do take care. Put your work onto a non-slip mat or a whole newspaper (to protect your table in case of slips) and remember to keep your free hand behind the cutting tool!

Thanks for reading. 
​
Please feel free to share my website or blog with your friends by using the buttons to the right. If you would like to receive an e mail each time I post a new blog, please click here. I promise to never send you junk or give your address to anybody else.
 
Click to set cu stom HTML

Using 'what if ?'questions to help with quilt design

17/5/2016

 
I met a lovely group of very accomplished traditional quilters this week. We spent a great morning together eating cake, swapping stories and sharing our work. It was a pleasure to see such beautifully made quilts. It always makes me smile, but the world over, quilters always seem to ask the same questions...

'How long did it take to make?'; 'Where do you get you ideas?' and 'How do you turn the ideas into quilts' being the top three that seem to get asked most often.  


Question 1: I honestly can't give a good answer - ages seems to be my best guess!

Question 2 is easier: I keep my eyes and ears open, take lots photos and collect nice images from brochures, magazines and the like, then put them into sketchbooks / workbooks to work on later.
​
Question 3: well, this is the big one, isn't it?
​
Picture
Sample sketchbook page for the roses quilts
​A quick Google search  brings up lots of videos, online courses, tutorials, books, and tips for those who would like to make the transition to designing and making their own work. If you want to get technical you can get into the detail of good design and like many other quilters I have written a book about it. One of the main things to do is to stop wondering about it and take the plunge. Try something small and don't worry if it doesn't work out. But that still doesn't answer the question, does it? 

So, here is one quick and easy technique to at least get started, and once you have started it will all seem a lot easier!

Find something that you like. It might be a picture, a cushion,  your auntie's old tea towel,  or maybe a quilt that has particularly caught your eye. It can be anything. You aren't going to make a copy of it - so no need to fret about copyright. (However it might be polite to ask the permission of the original maker if you think it appropriate.) This is going to be your inspiration and you are going to look at it carefully and ask......... 'what if ?'


​To demonstrate what I mean, here are several quilts made using the quilt 'City of Roses' (a quilt I made several years ago) as the starting point and the 'What if ?' questions that I asked.
​
'City of Roses' ©2012 Claire Passmore

What if................ I changed the colours?
This is a pretty straightforward and not terribly original, but it is a good place to start this explanation.
(note: if you are only changing the colours of a quilt then you really do need to ask the permission of the original maker, as it is a copy). So, instead of green and pink I chose blue & purple and peach & pink. Already it is starting to look different. (I will be teaching this quilt and many options for altering it at Midsomer Quilting on 3rd July)
'City of Roses II' ©2016 Claire Passmore

What if.............................. I modified the shape of the flower motifs?
In my sketchbook I tried several different ideas for the rose shapes. There are lots of different variations that could be made. ​I stuck with roses, but I could have easily changed the type of flower to something like a daisy for a really different look.

Picture
Picture
Picture
Picture
Picture

​I decided to change the way I cut the spiral. Instead of a simple straight edged spiral I made the edge bumpy.

Picture
Simple spirals
Picture
Bumpy spirals

What if ....... I changed the way I put the flowers onto the quilt top?
Instead of using raw edge applique I thought about how else could I put flowers onto the fabric. I made a lino cut stamp and also experimented with Derwent Inktense pencils and mono printing

Picture
Derwent Inktense Pencils
Picture
Lino cut rose shape stamp
Picture
mono printing

​What if............. I add some leaves?

Just a few little green leaves add enough contrast to help define the rose shapes on the busy background. They act as visual cues to say 'we are flowers' and stop the rose spirals from appearing as a big scramble.
​
Picture


What if....................... I changed the background?
As you can see from the quilt below I made quite a few changes to the background. You can read more detail about how I made this quilt in an earlier blog post by clicking here, but basically I cut the quilt into 3 and inserted panels of white fabric in between. On the white fabric I wrote a message with dye to tell the story I wanted to convey.
​
'Before They Fade Away' © Claire Passmore 2016
At a glance this quilt looks quite different from the original, but if you look more closely you will see it shares many similarities with 'City of Roses'. There are changes to the size, colour, overall shape of the quilt, as well as a slight change to the flower motifs and the method of adding the flowers. All this has contributed to making this a new and unique design.
​
What if...................... I simplify the quilt?
Instead of having 3 central panels - how about making it smaller and just having just one? Alternatively how about making it larger and having 5?

'Before They Fade Away II' © Claire Passmore 2016

What if ................. I change the colour of the text?
Rather than have black and grey, what would it look like if I had black and rose coloured text?

The answer turned out to be YUK!! Oh well, sometimes these things happen and when they do you get to try another 'what if ?' to solve the problem.....

What if ................. I change the colour of the white outer fabric?
To quieten down that bright pink writing that was now shouting out I tried painting some weak blue and green dyes onto the fabric. It calmed it down a lot and I like the new look.


What if .................. I change the position of the band of appliqued roses?

To be honest, this happened by accident, but is nevertheless another good example of a 'what if !' When I fused  on the flowers I did not notice I had the quilt upside down, but rather than pull them all off I stood back and looked at the quilt to see whether I liked it or not. I liked the new position - so they stayed and were stitched down.
​
'Before They Fade Away III' © Claire Passmore 2016

Do you notice that the central panel isn't completely square in this one? That would be another good avenue to explore -perhaps trying a parallellogram or trapezium shape instead of the square.


What if............... I added a big extra border?
The blue outer border made me wonder whether another border might look good - giving a much more traditional look to the quilt. 
​
'Before They Fade Away IV' © Claire Passmore 2016
Looking at it now I am thinking what if I extend the flowers across the blue border? I might lay a few on to see how it looks.

​
What if.............. I took the text away and replaced it with some quilting lines instead?
For this one I free motion quilted thorny rose stems and leaves and then added a little colour with Derwent Inktense pencils. It has given a light and delicate  look which I like very much.


What if................ I change the quilting pattern?
Instead of the straight line quilting I used a micro stipple to fill the gaps between the leaves. I think this one might be my favourite!

'Before They Fade Away V' © Claire Passmore 2016

That pretty much explains how I approach the whole 'What if' idea, and it has yielded some interesting results. 

Thanks for reading.

​
​Please feel free to share my website or blog with your friends by using the buttons to the right. If you would like to receive an e mail each time I post a new blog, please click here. I promise to never send you junk or give your address to anybody else.
 

La Liberté - another troubling quilt, and what I have learned from it

19/4/2016

 
We Walk Together / Nous Marchons Ensemble art quilt made by Claire Passmore
My thanks to Uta Lenk & Margaret Pratt for the photograph.
We walk together / Nous marchons ensemble
Imagine packing a single bag, gathering your family together, and closing the door to your home for the last time. You have left your job, your car, your possessions. Everything. And then you start to walk so that you can be somewhere safe. Where? Who knows? But anywhere would be better than here.

I started this quilt back in October 2015, and it is my piece for the French biennial exhibition 'Quilt Expo en Beaujolais 2016'. The theme of the challenge was 'La Liberté'. From the moment I read those words I knew immediately what I wanted to create. Several years ago I made a quilt with the same title - albeit in a different language. That quilt is called 'Freedom' and was my way of telling the story of the end of Apartheid when Nelson Mandela made his now famous 'Long Walk to Freedom'. It is a quilt that tells the end of a dreadful story, but is a celebration of the triumph against the odds. That made it an emotionally easy quilt to create.

Picture
Long Walk To Freedom
 
​This new interpretation of the same theme, 
'La Liberté' comes from a very different point of view and has forced me to consider many things as I made it. 

At the time, October 2015, the UK TV news was becoming more and more filled with stories of refugees and the repercussions of the disturbing events which had been unfolding in Syria since April 2011. The problem for Europe was that now these issues were spilling over borders and into 'our' lives. If you remember, daily we saw the very disturbing pictures of tens of thousands of people arriving into Europe by all means possible: by boat, truck, rail and even literally walking across fields. It was such a terrible thing to watch and I could not even begin to imagine what it must be like to have to leave everything you own, everything have worked for, and just walk to who knows where - just to be safe. 

A lot of things happened as I made the quilt - some of which made me doubt whether I would, or even should finish it. I wondered if I was trivialising the whole terrible situation with the piece. I felt guilt that I was sat in my comfortable studio whilst someone's dead child was washed up on a beach. I felt angry that in our times ordinary people, just like you and I, are being forced to abandon their everyday lives because of the terrible actions of governments - either appointed by the proletariat or by themselves. It seems that as the human race we are determined to ensure we self destruct. 

   
And then the events in Paris happened and I stopped work on it completely. 

After several days I looked at the quilt again. I thought long and hard about why I had chosen this subject for this quilt and decided that, despite those terrible events, the lives of the people whose story I was trying to tell  had not changed. For so many reasons, those people were still searching for freedom.  Their reasons for abandoning all that they had were still the same. They were leaving wherever it was they had come from because they could take no more. Whatever your personal views, and I know this is a very emotive subject, I think nobody can deny that this is a human tragedy of monumental  proportion. 

After much thought and consideration I decided to continue with the piece. When it was finished I contacted Monique Bonnet,  the French organiser and explained my position and my reticence over submitting the piece. I explained that I did not wish to make the events in Paris seem any less important than the story of those the quilt portrays. Monique was very understanding and told me to submit it. 

Much has happened in this story since then. Very little of it good. 

One of the things that this quilt forced me to consider is why I make the work I do and how other people react to it. I have made several quilts now that have been very well received, but each is about something seriously negative. I do not consider myself a negative or depressive person (quite the contrary) - but you might think so from the quilts I am currently creating.  I have come to discover that currently I make my best work about things that upset me personally. I wonder if that is healthy? I have decided it is. Probably like most people, I detest injustice and suffering, and I feel pretty powerless to do much about it. ​We see much on the TV news, although there is a lot of bias in what we get shown. Photographers capture hundreds of images which 'tell a thousand words'.  Journalists write daily,  and in literature authors write books. In all these media there is time for the authors to develop the narrative. The story they are telling can unravel slowly and challenge the reader to contemplate different issues. As a quilt artist, with a single still image,  the story has to be told in one shot. That is my challenge. By making work about those things which concern me gives me the opportunity to vent my distress.  I try not to add my personal views to the work , (I do not believe in imposing my beliefs on others) but rather I try to portray things the way they are, confronting the silence and allowing others to reflect on the piece. My aim is for the piece to give rise to discussion and debate. When things are not openly debated and discussed it allows those things to carry on, usually for the worse. There is a famous quote, which it turns out is very difficult to attribute (see here) which sums up this whole problem.
​
"For evil men to accomplish their purpose it is only necessary that good men should do nothing."

It has taken me a long time to figure out my position - maybe I am a bit slow on the uptake.

I would like to express my thanks go to Margaret and John Pratt for sending my the good news that my quilt won a ribbon, and to Uta Lenk for sending my the photograph of the quilt hanging in the gallery. It was a lovely surprise.

Thanks for reading.

​
Please feel free to share my website or blog with your friends by using the buttons to the right. If you would like to receive an e mail each time I post a new blog, please click here. I promise to never send you junk or give your address to anybody else.
<<Previous
    Picture
    Picture
    Picture
    Picture


    Click here if you would like to receive an e mail when I add a new blog post.
                       OR

    Follow my blog with Bloglovin
    Picture

    Categories

    All
    Challenges
    Classes
    Colour
    Cool-ideas
    Courses
    Designing
    Doodling
    Dye
    Exhibitions
    Experimenting
    Festival-of-quilts
    Flower-bowls
    Gelli-plates
    Hanging-sleeves
    How-to
    Inspiration
    Line
    Lino Blocks
    Making
    Marbling
    Mending
    Mono Printing
    Mosaic
    New-products
    Purchasing
    Quilt Gallery
    SAQA
    Sew On The Go
    Sketchbooks
    Software
    Stencils
    Stitch
    Surface Design
    Talks
    Thread
    White Horses
    Workshops
    Yarn Bobming

    Archives

    December 2020
    September 2020
    August 2020
    July 2020
    May 2020
    February 2020
    December 2019
    October 2019
    September 2019
    July 2019
    May 2019
    March 2019
    February 2019
    January 2019
    December 2018
    November 2018
    September 2018
    August 2018
    July 2018
    June 2018
    May 2018
    April 2018
    March 2018
    February 2018
    January 2018
    December 2017
    November 2017
    October 2017
    September 2017
    July 2017
    June 2017
    May 2017
    April 2017
    March 2017
    February 2017
    January 2017
    December 2016
    November 2016
    October 2016
    September 2016
    August 2016
    July 2016
    May 2016
    April 2016
    March 2016
    February 2016
    January 2016
    December 2015
    November 2015
    October 2015
    September 2015
    August 2015
    July 2015
    June 2015
    May 2015
    April 2015
    March 2015
    February 2015
    January 2015
    December 2014
    November 2014
    October 2014
    September 2014
    August 2014
    July 2014
    June 2014
    May 2014
    April 2014
    March 2014

    RSS Feed

    Picture
    Picture
Powered by Create your own unique website with customizable templates.