CLAIRE PASSMORE blog

Surface design favourite #2: mono printing

19/6/2018

 
​Whilst lino printing last week I had a lot of ink rolled out on the glass plate. Not wanting to let it go to waste I made a few monoprints onto fabric and paper as well. When creating this type of monoprint  I often find there is just too much ink on the plate (no mater how frugal I am) and the first few prints turn out to be very dark and often very blurred, which is fine if that is what you want, but not for what I am looking for at the moment. So, when I want a well defined mono print I often make lino prints first, and then use the remaining ink on glass plate for the monoprints.
  
Monoprint of small child's face on fabric by textile artist, Claire Passmore
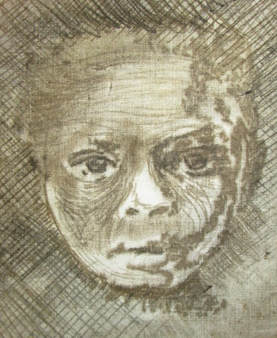
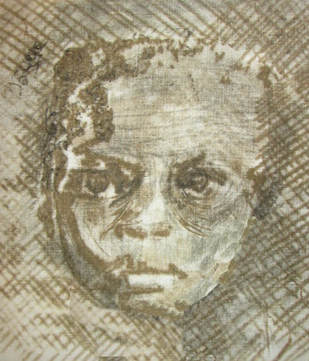
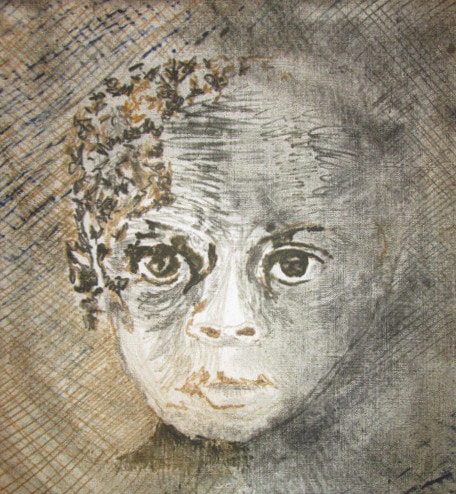
Mono print of a small child's face using Caligo safewash relief ink

I am basing the prints on the same image of the child's face that I  used for  the lino block. The wonderful thing about the mono print is that is has a softer quality and captures the mood I want for the piece I will use these fabrics in.

Monoprint of small child's face on fabric by textile artist, Claire Passmore
Claire Passmore 2018
PictureMonoprint of small child's face on fabric by textile artist, Claire Passmore
Claire Passmore, 2018

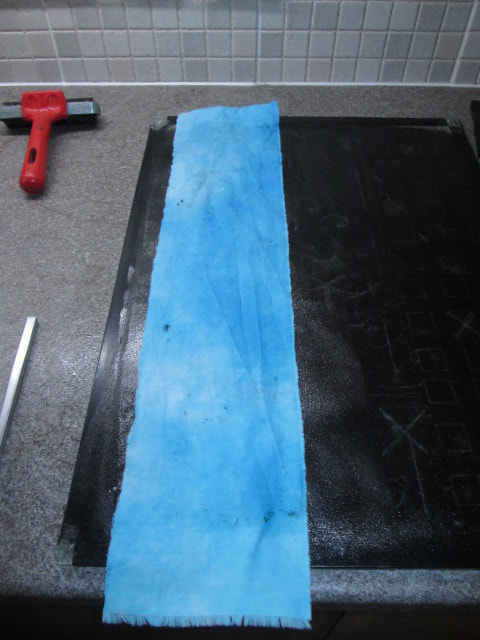
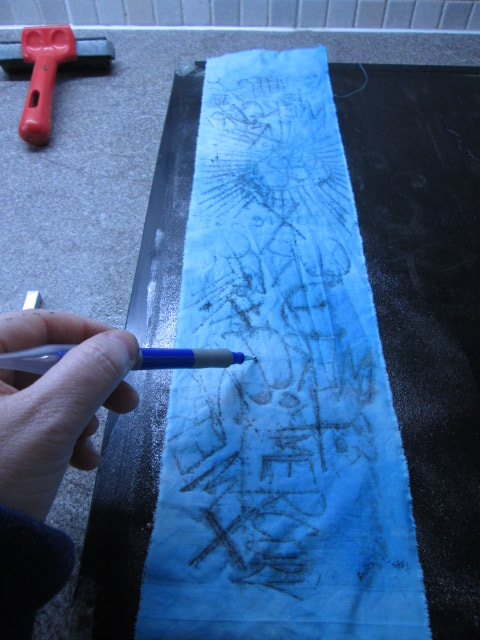
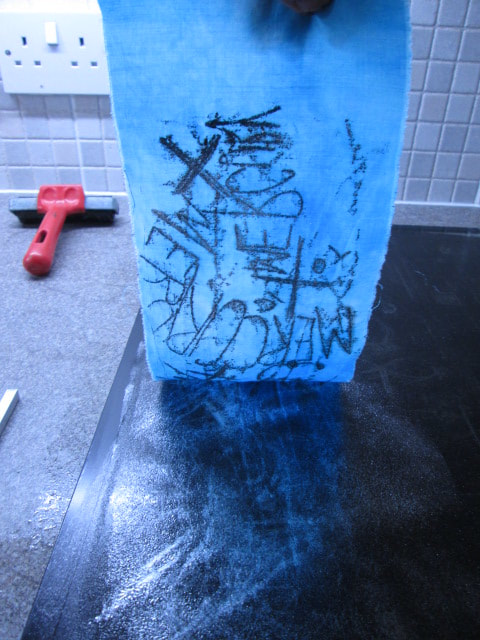
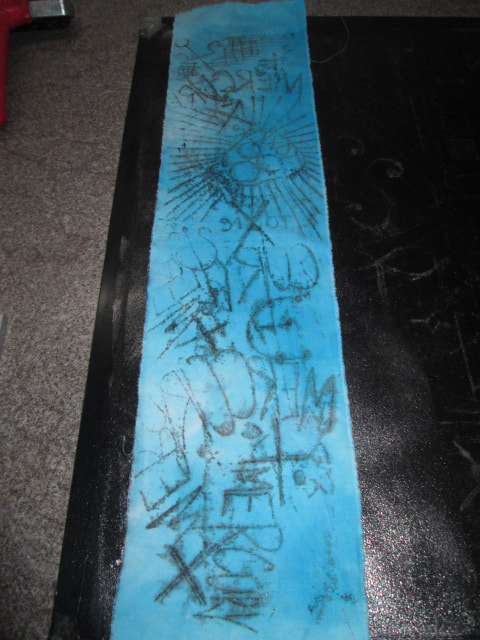
I especially like the way each time a new print is made the child's face changes in subtle ways, but those eyes keep staring right back at you. 


To make the prints I very gently lay a piece of plain fabric (in this case a piece of white Kona cotton) right side down onto the inked glass plate. Because there is not a lot of tacky ink left on the plate I find I have very little transference of ink onto the fabric unless I press onto the back. To hold the fabric in place I either use masking tape at the corners or I use my fingertips to press down in strategic areas where I don't mind the ink transferring. The key is to have a light touch and to be careful.

From then on I simply 'draw' onto the back of the fabric with a tool of some sort. Knitting needles, cocktail sticks, chop sticks and clay shaping tools are all the type of thing I find suitable. Wherever I draw the fabric is pressed into the thin layer of ink and leaves a line. Shading can be achieved by scribbling, cross hatching, making multiple dots or even by gently using a finger or more blunt tool to press and smooth the back of the fabric. It is something that is good to experiment with. The most important thing to remember is that as you are drawing from the back of the image it will be reversed when you finally lift it up from the glass (important if you choose to write words!).

The photos below (reading left to right) are from another piece of work I made a long time ago, but I think they show the process quite clearly. Hover over each photo to see a description of what is going on.

Inked up glass plate
Fabric is placed onto ink
Example of a drawing tool
'Draw' onto the back of the fabric
Lifting up fabric to reveal the marks
The finished print
This week I have also dyed a lot of fabric to piece around these images for my first piece about child labour - this one will be about the chocolate industry. Until now I have had only a low awareness of how some of the worlds poorest children are being exploited for our 'guilty pleasure'. Particularly prevalent in the cocoa bean producing regions of Western Africa, where 70% of the world's cocoa is grown (especially in Côte d'Ivoire
and Ghana) children as young as 10 labour on cocoa bean plantations often lured there on false promises of wages or bicycles. Driven by extreme poverty they have little real choice in their lives but to seek work. I wrongly thought that this practice had been closed down long ago, but in fact it is thriving and involves all kinds of human trafficking, forced labour and human rights violations many of which fall under the category of slavery. 
A quick google search will take you to many websites which show and explain the extent of the problem, demonstrating how all the big chocolate companies are involved in this terrible business. They claim to be trying hard to eradicate the problem, and although there is some effort of their part to make changes, so far their best efforts have not ended the problem and they have effectively kicked the can down the road each time they have been called to account. 

One way to avoid inadvertently supporting this terrible practice is to pressure the big chocolate companies to pay more for their cocoa - and for the suppliers of the cocoa beans to pay their legitimate employees a decent living wage. Other ways are to buy chocolate from producers who source their cocoa from South America where the use of child labour has been almost completely stopped. A third option is to buy chocolate from people who run their manufacture from 'bean to bar' and can prove their ethical standing. Of course, this chocolate is more expensive, but I am happy to pay it to know I am not supporting the use of children to provide the raw material for my 'guilty pleasure'. 

Thanks for reading.

Please feel free to share my website or blog with your friends by using the buttons to the right. If you would like to receive an e mail each time I post a new blog, please click here. I promise to never send you junk or give your address to anybody else.

Surface design favourite #1: lino printing

19/6/2018

 
Lino printing is one of my favourite methods of mark making on fabric - along with mono printing from glass sheets covered in ink. Although two quite different processes I have found the two generally go hand in hand. In this post I'll share the lino prints I am making and in my next post I will show you how the mono printing is going.

Picture
Carved lino block and Caligo safewash relief inks rolled onto a glass plate.

A few weeks ago I went on an excellent course at Ardington School of Crafts in Oxfordshire. It is a lovely place and is very well run by Simon and Yvonne Sonsino. The course was run by painter and printmaker Jessica Rose (www.jessicaroseartist.co.uk) and was one of the best I have been on in a long time. Jessica is lots of fun and very knowledgeable. She passed on all sorts of helpful information - the sort you just can't get from watching a YouTube video!

This is the print block I made on the day, reworked a little to clean it up (hence the pale coloured gouges you can see on the lino block above). 
At the course I learned a clever technique that allowed me to make prints with the block on Japanese gampi paper and then add colour to a separate layer behind the paper. The effect is very delicate and as it uses different layers is a technique I would like to explore with fabric.
Picture
Picture
Mono print and ink wash layers: print on Japanese gampi paper, ink on watercolour paper

​I love the way the bold black printed image on the left is really crisp - the black mount around it really enhances the print. In contrast, the white mount of the right subdues it considerably. (same print in both)
I also like the way the water based ink wash that is placed behind the print subtly shows through the beautifully thin and floaty gampi paper. (Carrying a wet fresh print on gampi paper across a crowded workshop requires a lot of planning and no sudden wafts of air!)
​
Now I have had time to experiment with this technique a little more I have made some samples that I want to use in a small new series that will join the others in my In Their Shoes series. The quilts I want to make are going to focus on the many forms of child labour, from children working within a family setting all the way to child slavery.

Up until now all my lino printing has been self taught. I have learned a lot by myself and really enjoy spending a few hours carving away at various different blocks. As a novice I generally prefer to carve the softer vinyl blocks that are available in most art shops and on line to the harder and sometimes more crumbly grey lino, often referred to as 'Battleship'. (The green block below is an example of one of the softer relief vinyls which is easier to cut, but can be a little stretchy, causing other issues as you carve.)
Picture
Blocks made from linoleum
Picture
Block made from soft plastic type material

​As I was going to the course I decided I really needed to make the most of having an expert to teach me, so I had a splurge and bought a selection of different types of lino block material and new set of carving tools. 

In the past I have relied on the cheap and cheerful red plastic handled cutting tool with interchangeable blades. I must say, there is nothing terribly wrong with them and I have made some great print blocks using them. But my blades are all blunt and rather than spend another £10 on a new set of blades I decided to see what else was available. Turns out there are lots to choose from and a lot of money can be spent! 
​
For a brief moment I did consider the beautifully made Pfeil carving tools but I just couldn't figure out which of the huge number of different shapes and sizes I should buy (too much choice is no choice at all as the saying goes). They were too expensive for me to just guess so I decided to look elsewhere. (Since then I have discovered this fantastic website and blog which might have helped my had I found it earlier: https://www.drawcutinkpress.com/pfeil-lino-cutting-tools-guide/ )
Picture
Pfeil Lino cutting tools
After much searching I ended up choosing this set of Japanese wood carving tools - and they have turned out to be fabulous to use. Of the 5 in the box I have found 4 to be just the sizes I need. (I'm not really sure what to do with the 5th one yet!). Compared to the small red handles tool these cut through even old tough lino with ease. 
Picture
Power Grip Japanese Wood Cutting Tools - also great for lino
Picture
​My 4 favourite tools:
3mm #9 U shaped gouge,
6mm #8 U shaped gouge, 

4.5mm V gouge
7.5mm skew chisel,
 They also come in a neat storage box
This is a close up of the block I carved at the course with my lovely new cutters. I used a piece of fresh grey lino - and was amazed at how easy it was to cut compared to using the little red handled cutter - I know it is an old chestnut, but it really was like cutting into butter. I needed no real effort at all to cut the lino and the lines I cut were very clean allowing me to get lots of detail and fiddly bits. In future I think I will be choosing grey lino blocks rather than the easy carve vinyl if these tools continue to perform as they did on first use. (But, if I do use one of those little red cutters again I think I will prefer to choose one of the softer types of lino substitutes and sacrifice the fine detail).
Picture

And this is a piece of white Kona cotton fabric that I printed using the block. 
Picture

I plan to use this fabric and lots more in a new series of quilts I have in mind to make concerning child labour. In my next post I will share the mono prints that I plan to use along with this fabric. 

Thanks for reading.
Please feel free to share my website or blog with your friends by using the buttons to the right. If you would like to receive an e mail each time I post a new blog, please click here. I promise to never send you junk or give your address to anybody else.

Printing with lino blocks

16/8/2016

 
If you went to Festival of Quilts, I hope you had a lovely time. As usual there was lots of excellent work to see, old and new friends to meet, and a hint of controversy too. 
My mum and I spent a great weekend together and came away with lots of ideas and a little bit of shopping too. One of our favourite galleries was that belonging to Russian artist Lyubov Lezhanina. (Click on her name for a link to her Facebook page). It was tucked away right in the back corner, so if you didn't get down there, here are some photographs of her wonderful work.


And now back to work....
​
On October 2nd I have a new 'Further Techniques' workshop coming up at Midsomer Quilting where we will be taking a more considered approach to some of the ideas used in the original 'Techniques 1' workshop. The aim of the new workshop is to add surface design to large pieces of fabric in order to  create a co-ordinated collection that can be used to create a unique art quilt.  

​
One of my favourite ways to create interest on fabric is to print, and there are so many ways. For the workshop, amongst other things, we will be making hand carved lino blocks. They are reasonably easy to create and are make beautiful graphic marks on fabric. To give you an idea,  this morning  I decided to start a new block based on a moth that flew in through the window last night. 

After looking carefully at it I did a quick search and discovered it is a Pale Shouldered Brocade, Lacanobia thalassina. It is beautiful, don't you think? 
Picture

Not only is is an interesting little creature to look at, it is also a very simple shape with some interesting marks which will transfer nicely as a lino block. 

To start the block I made a very simple drawing of the shapes I wanted to carve. You can see that there is no detail here - just the outlines of some vaguely moth shaped creatures and some lines giving the idea of movement. (Please ignore the faint beetle and ant shapes in pencil - this is a recylced piece of paper and they have nothing to do with the moths)
Picture

This is what I intend to carve into the piece of 'lino' (I like to use a soft plastic type material as a substitute for lino as it is much easier to cut into and doesn't crumble like lino can if it gets cold or dries out). The moth shapes will remain whole on the block and the lino material all around them will be carved away.

Using a very soft pencil I traced the outlines then transferred them onto the lino block, ready to carve.
​
Picture

You can see the smudgy pencil outlines of the moth shapes and also see where I have started to carve into the block, taking out the green plastic material with the cutting blade. However, it is already starting to get a little confusing as to what should be carved away and what should remain, so I took a black marker pen and coloured in all the areas I want to stay. That way I hope I wont make any mistakes and carve out a section that should stay. Once it is gone, it is gone and there isn't a lot that can be done!
​
Lino printing block Claire Passmore

I hope this photo makes it all clearer. The black sections will be left alone for the time being, and all the green areas need to be carved away with the cutting tool. All those little grooves that remain in the carved away section produce beautiful graphic marks on your prints, so don't try and make it all super smooth.

SAFETY FIRST: If you try this then you MUST only ever carve away from yourself. That blade is super sharp and not only does it really hurt when you slip and stick it into yourself, it goes in deeply too and there will be a lot of blood and maybe tears. You need quite a lot of pressure to carve into the lino so accidents, which do happen, are not nice. 

Make sure the hand which is holding the lino block is never in front of the hand holding the carving tool. Although this sounds obvious, it is easy to forget and let that free hand hold the block in such a way as to almost guarantee you will get cut. Turn the lino block often to make sure you are always cutting away from yourself and your free hand. 
​

Picture

It took about half an hour to carefully carve away all the green material around the black shapes, and the block was ready to have its first trial to see what else was needed to add interest. Using a roller and some printing ink I inked up the block and made a trial print onto a piece of scrap paper. Unfortunately I forgot to take a photo of this very first print, but once I could see how it looked I wiped the block clean with a tissue and carved a little more removing areas where I wanted more definition and where I wanted more detail. This is the print I made next.

Picture
You can see it is not a good print, but the purpose of this one was simply to see how the extra detail I added looked. The moth on the right was looking more like a wasp with the marks I carved into the wing sections - so I knew I needed to cut some more into that area to sort out that problem. But I do like the small straight lines I made in the body of the moth on the left.

After that I made a further trial print. The photo below shows this and the ink and roller I used to ink up the lino block. Again, it is a terrible print, but it showed me enough detail of the marks I had cut into the lino. I still don't like the waspy looking one though. Those lines on the wings are all wrong. I'll have to work on that some more.
​
Lino print for surface design by Claire Passmore
Here is the finished block - still a bit wet after washing off the ink under the tap.
Picture
Picture
And here are two of the early prints in my sketchbook. I have added a little colour to the one on the left with Markal oilstick. I had intended working onto it with watercolour paint and pencils - but I have discovered that the new ink I have purchased is not permanent once dry and so is pretty useless for my purposes! Aagh!! The moment any water touches the print the black ink smears all over the place and not only ruins the print, but turns everything black. So choose your ink carefully, or use acrylic paint which also works well, and is permanent once dry.

I will work on this block some more, make some better prints and then print up some nice fabric to share in a few weeks time. If you decide to have a try at lino cutting, and it is great fun, please do take care. Put your work onto a non-slip mat or a whole newspaper (to protect your table in case of slips) and remember to keep your free hand behind the cutting tool!

Thanks for reading. 
​
Please feel free to share my website or blog with your friends by using the buttons to the right. If you would like to receive an e mail each time I post a new blog, please click here. I promise to never send you junk or give your address to anybody else.
 
Click to set cu stom HTML
    Picture
    Picture
    Picture
    Picture


    Click here if you would like to receive an e mail when I add a new blog post.
                       OR

    Follow my blog with Bloglovin
    Picture

    Categories

    All
    Challenges
    Classes
    Colour
    Cool-ideas
    Courses
    Designing
    Doodling
    Dye
    Exhibitions
    Experimenting
    Festival-of-quilts
    Flower-bowls
    Gelli-plates
    Hanging-sleeves
    How-to
    Inspiration
    Line
    Lino Blocks
    Making
    Marbling
    Mending
    Mono Printing
    Mosaic
    New-products
    Purchasing
    Quilt Gallery
    SAQA
    Sew On The Go
    Sketchbooks
    Software
    Stencils
    Stitch
    Surface Design
    Talks
    Thread
    White Horses
    Workshops
    Yarn Bobming

    Archives

    December 2020
    September 2020
    August 2020
    July 2020
    May 2020
    February 2020
    December 2019
    October 2019
    September 2019
    July 2019
    May 2019
    March 2019
    February 2019
    January 2019
    December 2018
    November 2018
    September 2018
    August 2018
    July 2018
    June 2018
    May 2018
    April 2018
    March 2018
    February 2018
    January 2018
    December 2017
    November 2017
    October 2017
    September 2017
    July 2017
    June 2017
    May 2017
    April 2017
    March 2017
    February 2017
    January 2017
    December 2016
    November 2016
    October 2016
    September 2016
    August 2016
    July 2016
    May 2016
    April 2016
    March 2016
    February 2016
    January 2016
    December 2015
    November 2015
    October 2015
    September 2015
    August 2015
    July 2015
    June 2015
    May 2015
    April 2015
    March 2015
    February 2015
    January 2015
    December 2014
    November 2014
    October 2014
    September 2014
    August 2014
    July 2014
    June 2014
    May 2014
    April 2014
    March 2014

    RSS Feed

    Picture
    Picture
Powered by Create your own unique website with customizable templates.