CLAIRE PASSMORE blog

Making use of garden flowers

7/3/2017

 
Hibiscus bush Claire Passmore
We have a beautiful hibiscus bush in our garden. It was only planted last year but is growing like crazy. The bush is absolutely covered in huge flowers that are so large the stems can barely hold the bloom upwards. The flowers last for a few days before fading then falling to the ground. I've been collecting them in a bucket and drying them for the past few weeks ready to use.

In the past I have made hibiscus tea, a slightly tart drink that is very refreshing and is nice hot or cold. I have also read about using it to make ice cream, sorbet, meringues and jam but the problem is I know the plant was sprayed with pesticide earlier in the summer as it had a bad case of blackfly - so I definitely don't want to use them for anything to eat. That leaves me with another great option.............

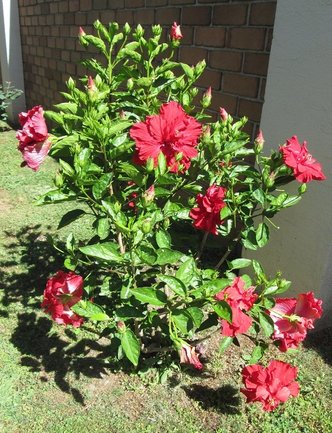
​I'll use them to dye some fabric.
Dried hibiscus flowers ready for dyeing by Claire Passmore
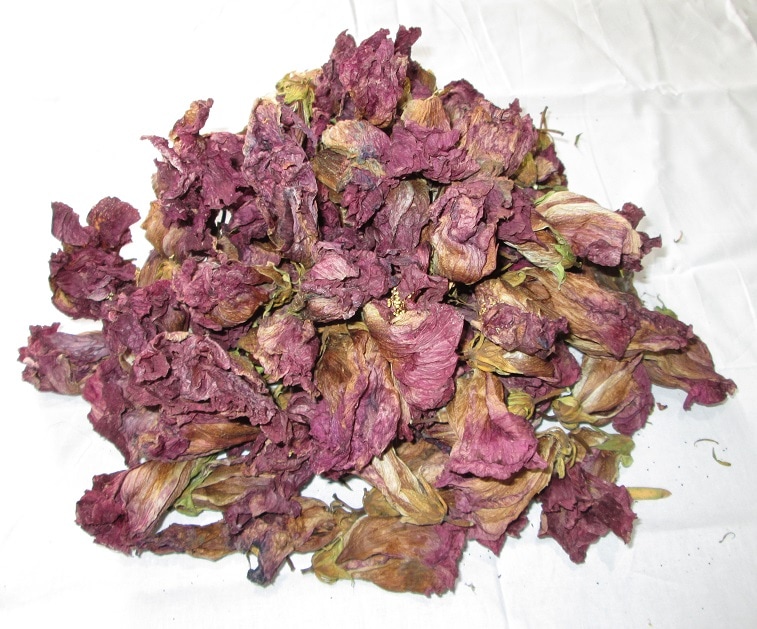
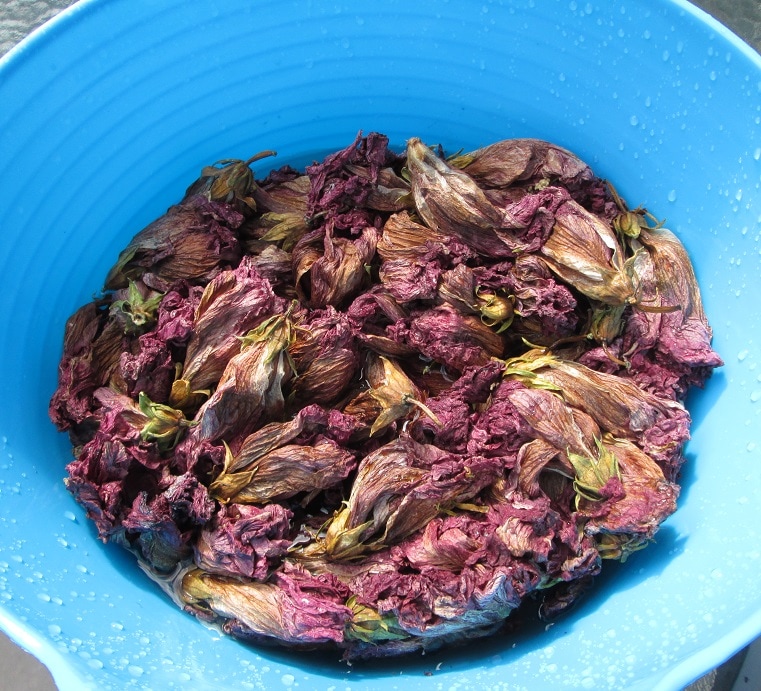
The dried flowers from the bush

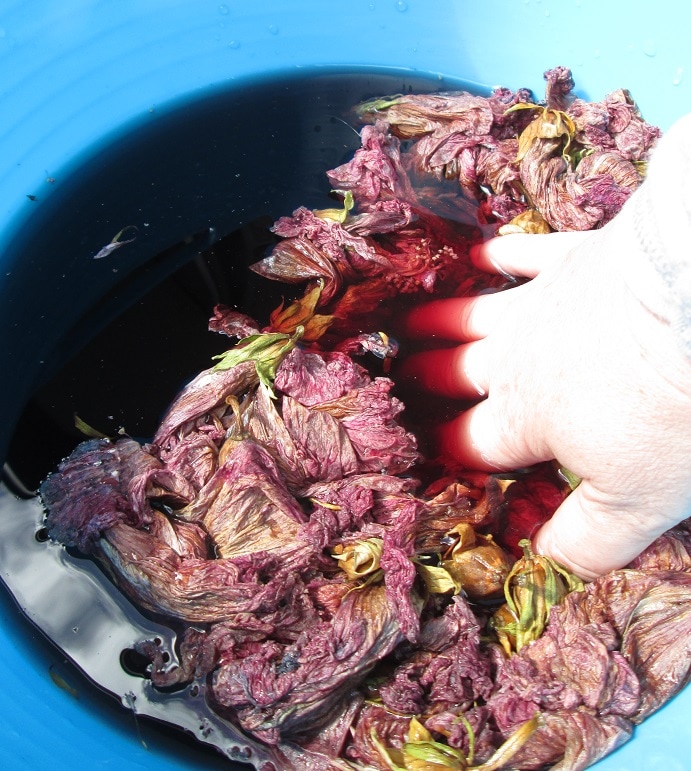
To make the dye I started with about half a bucket full of dried flowers and added just enough cold water to cover them. They were very buoyant and I had to squish them down to get them to start absorbing the water. I left the bucket out in the sun all day to stew.

​
Dried hibiscus flowers ready for dyeing by Claire Passmore
My bucket of dried flowers
Creating red dye from hibiscus flowers Claire Passmore
The water very quickly took on a beautiful red colour
Hobiscus flowers soaking in water Claire Passmoer
Add cold water to cover the flowers
Soaked hibiscus flowers for dyeing Claire Passmore
After 24 hours the flowers were completely saturated and squishy

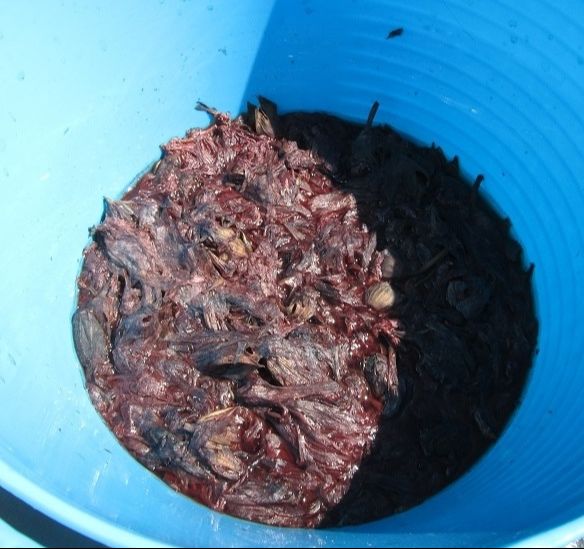
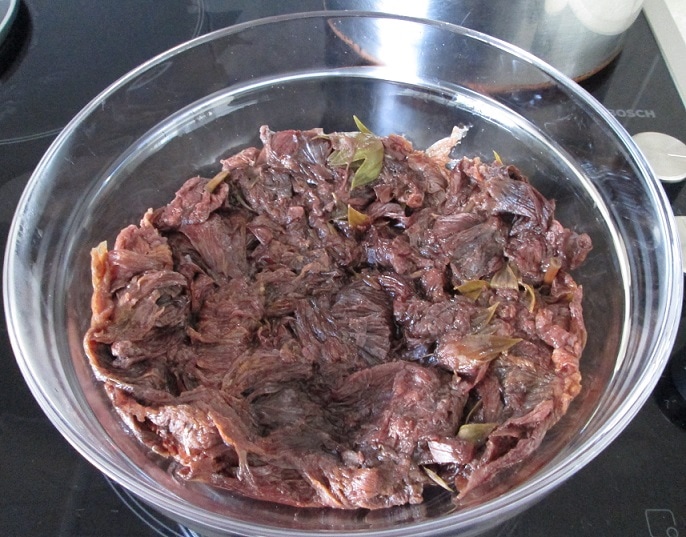
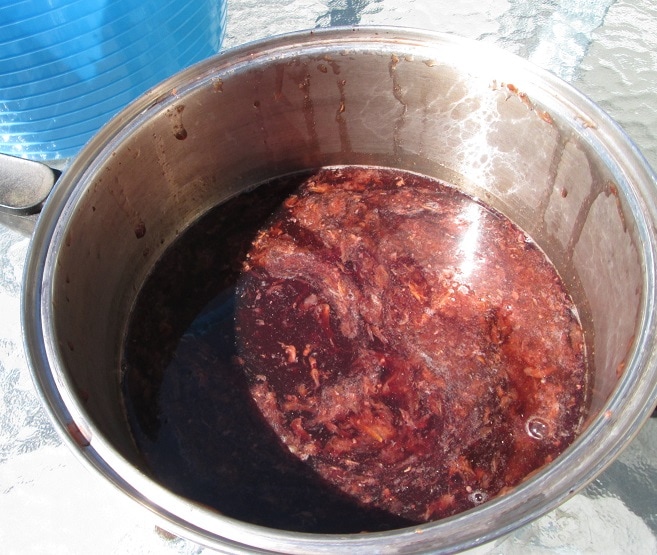
The next day I let the sun warm it all up again then squished the whole lot though an old sieve. The flowers had completely broken down into a silky mush, but the water had taken on an incredibly dark red wine colour. 
Picture
The squished flowers after straining
Hibiscus flower dye
The liquid dye (still a few flower bits left in it)

Before I added the fabric I decided to mordant it in the hope that I would get a better result. I didn't want to use anything toxic, so I chose to use vinegar. All I did was make a mixture of water and vinegar (1 part vinegar to 4 parts water) and simmer the white fabric in it for an hour. After 1 hour I left the fabric to cool in the solution and then squeezed it out ready to dye. If I had been scientific I would have tried a mordanted piece of fabric and a non mordanted piece to see the difference - but if I'm completely honest - I forgot. 
Dyeing with hibiscus flowers Claire Passmore
Simmering for a hour in my dye pan
Hibiscus flower dyed cotton fabric Claire Passmore
Both fabrics looked like this after soaking for 24 hours
 As I had a lot of dye liquid I decided to see whether simmering the fabric in the dye would give a darker colour than simply leaving the fabric to soak in the in the sun. I cut the the squeezed out fabric into two and put one into my dye saucepan and simmered it for an hour then left it to cool overnight. The second piece I just put into the dye bucket and left it out in the sun. 

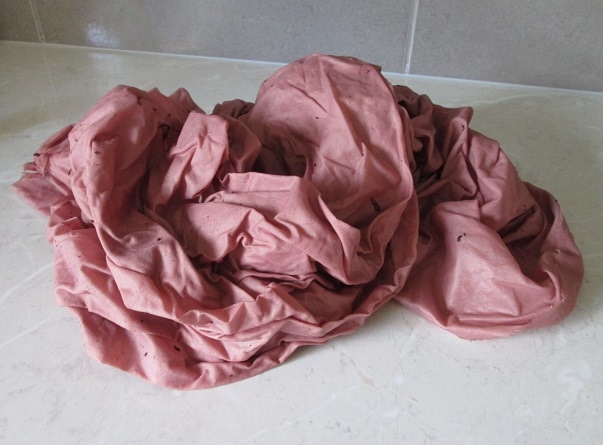
The next day both pieces looked exactly the same.

Finally I put them both into the washing machine and washed them in cold water with a little delicate washing liquid. 
​
Picture
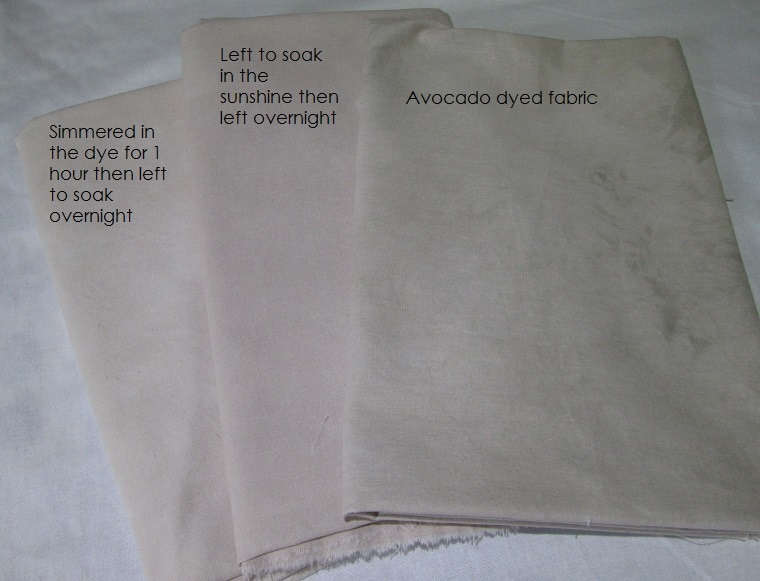
Fabrics washed and dried.
The photo above shows how the two pieces of fabric turned out. They are both almost identical (so there was no need to use any electricity to simmer the fabric at the end - and quite possibly I could have done without simmering the vinegar either - something to explore in the future) and have a very pretty pale pink with a hint of greyness. I suppose I could call it mink. I still have a piece of avocado dyed fabric from last year so I have included that in the photo too (on the right). That has a similar colour but has a little more brown in the pink. It actually goes very nicely with the hibiscus dyed fabric. (You can read the post about dyeing with avocado pits and skins by clicking here and here. 
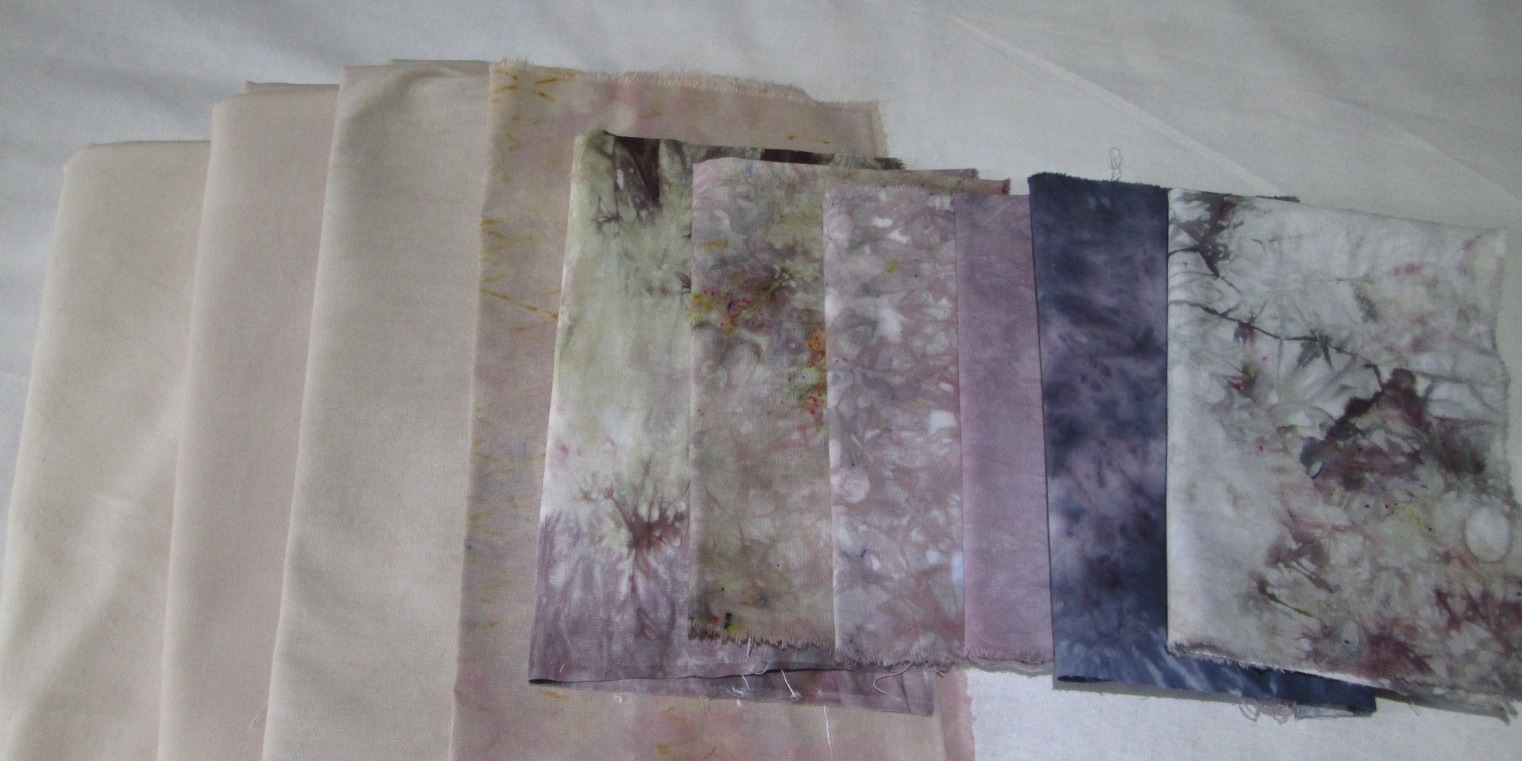
As delicate as the fabric is I think it needs a bit of a kick to create something a little more interesting - so I mixed up some procion to dye some more smaller pieces of fabric to co-ordinate. I used fuscia, golden yellow, charcoal, pewter, my current favourite, cobalt. And this is what I now have - I think it look great. 
Hand dyed fabrics by Claire Passmore Hibiscus flower, avocado and procion mx dyes

​Thanks for reading.
Please feel free to share my website or blog with your friends by using the buttons to the right. If you would like to receive an e mail each time I post a new blog, please click here. I promise to never send you junk or give your address to anybody else.

Messy marbling for a mini quilt inspired by Monet 

28/7/2016

 
Picture
'Grandmother's Flower Garden' by Anna
Picture
'Not my Grandmother's Flower Garden' by Claire
Picture
'Not my Grandmother's Garden either' by Claire
Picture
'Not Monet's Lily Garden' by Claire
I decided to make a little quilt this week for the workshop I am teaching on Sunday at Midsomer quilting. The workshop is called 'Not my grandmother's garden' and is very loosely based on the very traditional quilt made solely from hexagons - just like the first picture up above on the left. The first piece of patchwork I ever made (when I was 11 years old) was just 7 hexagons big, and I must say, it didn't inspire me to carry on with patchwork at that time. Too many fiddly bits for an impatient eleven year old! However, several years ago I made the yellow quilt (above) for a Quilting Arts Magazine challenge, and used the traditional hexagon quilt as the starting point. Hopefully you can see the hexagonal 'flowers' behind all the paint, thread and buttons. 

For this weenend's workshop we will be using hexagons (well..... maybe!) as the starting point to create an art quilt something along the lines of the yellow quilt above. I wanted to explore different possibilities, so I made a further two quilts to try out a few more ideas (see images above). The green one is similar in many ways to the yellow one, and the last one doesn't use hexagons at all - but Suffolk Puffs, another very traditional and English patchwork piece (currently known by the more funky name 'yoyos'). Thanks to Jamie Malden for sharing her 'how to' video on youtube on the right.
​
The inspiration for this last quilt came from one of Monet's paintings of the waterlily ponds at his home in Giverny. The top section of the green quilt reminded me of a watery pond, and made me think of Monet. Changing the shape of the hexagonal flower into a rounded flower is the sort of variation I was looking to explore for the workshop. It also meant I learned another new patchwork technique - Suffolk Puffs. 
​
Picture
Nymphéas (Waterlilies), 1914-1917, National Gallery of Australia
 
To make my version of the lily pond I needed to start with a watery blue background fabric - but my stash of such fabrics is rather depleted at the moment, so I needed a quick way to make a suitable piece. I decided to try my hand at marbling with shaving foam, as I believe it is quick and easy (nobody ever seems to mention how messy, however!). 

If you haven't had a go at this technique it really is fun - but I do recommend wearing an apron and having lots of newspaper and a large bucket of water and a bin at your side!
(Arthur Comstock - a little bird told me that you love the gelli plates, so I think you might like to have a go at this too!)

This is what I did...

Picture
You will need: a tray or other flat surface, cheap shaving foam, acrylic paint, a big and a small scraper (ruler and a credit card), a stick, cloths, bucket of water and a bin
Picture
1. Squirt out lots of shaving foam onto the tray.
Picture
4. swirl it about with a stick
Picture
6. Lift the fabric up and lay on a flat surface, foam side upwards.
Picture
2. Spread it out with a credit card.


​
I discovered that the paint took up better onto fabric that was moist (not soaking wet). I got the best results when I misted the fabric with water from a spray bottle and let it sit for about ten minutes to penetrate the fibres.


​
Picture
7. Use a ruler to scrape off the excess foam from the fabric.
Picture
3. Add some spots of acrylic paints. You don't seem to need a lot.
Picture
5. Lay a piece of damp fabric on top and pat down gently all over.
Picture
8. Allow to dry. Press with a hot iron covered with a piece of paper. Wash if required.
The shaving foam on the tray can be used several times, spreading it out again and adding more paint. My foam did start to break down and 'curdle' after a while, so when that happened I scooped what was left into the bin and started again. 

The whole process took less than 3 or 4 minutes per piece of fabric,  so was a quick project which yielded several very nice pieces of fabric, each a little different.
​
I'll add some photos of the quilts made at the workshop as soon as I can.

​Thanks for reading.
​
Please feel free to share my website or blog with your friends by using the buttons to the right. If you would like to receive an e mail each time I post a new blog, please click here. I promise to never send you junk or give your address to anybody else.
 

Free motion quilting is not difficult - honestly!

18/7/2016

 
If you haven't ever said it, I'm sure you have heard someone else say it....

"I can't do free motion quilting. It is so difficult."

Well, I can honestly say that is a load of rubbish! And here is the proof. Last Saturday I was with a group of ladies at Midsomer Quilting who are the proof that free motion quilting is not only easy to master, but lots of fun too. Some were complete newbies to FMQ - and others had dabbled a little and a few were already confident. Just look at what they made - I bet you can't tell who had never done this before! 
Picture
Picture
Picture
Gill's  brilliant and totally original golf playing bird has just scored a birdie. Get it?!?!?!?! I think he is wonderful.


Picture
Picture
An extinction of Dodos!
Picture
Picture
We had quite a lot of Dodos (incidentally, my favourite Doodle bird
​
Picture
Picture
Funky Fantail
Picture
Picture
Picture
Pon the Peacock
Picture
Picture
Derwent Inktense Pencils
Picture
Picture
Pretty Bird 1
Picture
Picture
Picture
Pretty Bird 2
Picture
Picture
Picture
Robby Robin and his Christmas tree
 So as you can see, a lot of very successful free motion quilting was stitched and a lot of concentration and fun was had. The great thing about making these lovely birds is not only do they look wonderful, but they are great at boosting confidence with free motion quilting. By working on a square of fabric of around 12" it is easy to keep control as you do not have to manage the bulk of a whole quilt in the throat of the machine. You are also free to experiment and try out lots of different patterns. 

Still don't think you can free motion quilt? Why not just have a go? ​

If you would like some tips on how to be successful with free motion quilting take a look at my blog post from back in December 2014. You can read it here. I hope it helps! (Just one thing has changed since I wrote it - I no longer drop the feed dogs when I free motion quilt, - you could give it a try to see if you find it any easier). If you give it a try, I'd love to see what you do. 

​Thanks for reading
​
​
​​Please feel free to share my website or blog with your friends by using the buttons to the right. If you would like to receive an e mail each time I post a new blog, please click here. I promise to never send you junk or give your address to anybody else.

​

When a squeak drives you mad!!

29/5/2016

 
Picture
I had a funny half hour this week. I was quilting a new piece of work and all was going well.  But very gradually a small squeak began. Nothing much, just a little noise. So I ignored it and carried on. Probably not the smartest thing to do, but I had a nice rhythm going and I didn't want to stop. Slowly the squeak became louder and louder until I realised that it wasn't going to go away, and in fact, I might be doing some serious damage to the machine. So I stopped and did the (almost) right thing.

I got my screwdriver out and started to unscrew the most obvious screws I could see. I must say, I did unplug the machine first.

Remember to always unplug the machine from the mains before you go in deep! Not just switch it off, but remove the plug from the wall. I once was at a workshop when a beautiful old Bernina started stitching all by iteslf!
​
Picture
Picture

Starting in the bobbin zone

I started by taking off the foot and needle - pretty standard for when you clean your machine. (You do regularly clean your machine, don't you?) I removed those so I could easily get access to the bobbin zone and not damage myself on the needle.

Picture

Next, I removed the two small screws that hold down the needle plate. 
Picture
Picture

Put the screws into a little pot - or even a few if you are likely to mix up different screws from different places. Those things can get lost at the drop of a hat!

​If you have a machine with a drop in bobbin, you will be looking at something similar to this. See all those little fibres?  If this is the first time you have been in here make a note of which way the dish is positioned. 
​​
Picture
Picture
A quick photo is always a good way to remind yourself of where things were before you started.

On my machines I regularly take out the bobbin case (that little black dish thing). It is amazing how much fluff accumulates there. Depending on what you are stitching you may need to give it a clear out every time you change the bobbin. I clean mine with a tiny soft paintbrush, on both sides. Check it carefully and get your glasses out if you need to!
While it is out inspect the bobbin case all over. As this type is made from plastic they can become accidentally damaged by the needle. Look for scratches, burrs, and other irregularities. If they aren't major you can try to smooth them out with one of those boards you use to buff your nails (not an emery board), but be gentle and be aware that it might make the problem worse, so use your judgement. If there is a big chunk or gouge in the plastic it might just need to replace the whole dish. 
Picture
nail buffer block
Picture
 
Once the bobbin case is out you will see the race mechanism. If you manually turn the wheel on the sewing machine you will see how the parts of the machine move and how it all works. (If your machine has a vertical bobbin it may be a little more difficult to see, and the removal of the bobbin case will be done is a slightly different way. The user manual for your machine will tell you everything you need to know.) 

The amount of fluff, odd threads and dare I say it, broken needle tips that accumulate down here is astonishing. Carefully and gently get as much of it out as possible. Again, I use a small paintbrush and have a good poke around deep into the workings. Get a little torch and shine it in; look for any stray threads that may be trapped or tangled. If you can reach them with a seam ripper gently ease them out. If you can't do this without risking damage to yourself or the machine now is the time to call in a professional.     
*Some people use compressed air from a can - I have used this in the past, and it really does blast out lots of fluff, but I have read it can also blast fibres deep into moving the parts of the machine too, (which can't be good) so I don't use that very often any more. I have also seen little vacuum cleaners for computer keyboards that might be worth trying too.
Picture

Then I went a bit off piste. Do you see those concentric dark circles in the centre of the picture. Right in the middle of that is a little bit of fluffy looking stuff (some machines just have a hole here). I took a pair of pointy tweezers and gently pulled on the fluffy bit which pulled up a long piece of felt that looked a bit like a wick.

Now, my machine manual says there is no need to lubricate. Ever. Well, I disagree. Having lived in hot, humid and sometimes sandy places I have come to realise that a sewing machine likes to be lubricated. So I ignore the 'no-lube' rule and use a tiny amount of very fine sewing machine oil from time to time. I lube wherever metal parts move and touch. So for this machine, I remove the little wick and put one drop of oil down the hole and then replace the wick. 

Satisfied that there was nothing else in this part of the machine that I could do myself, I reassembled the pieces then manually turned the flywheel  to raise and lower the needle post, just to make sure everything was moving freely and that I had put the puzzle back correctly. 
Picture
You did unplug the machine, didn't you?
Picture
Picture

Moving on up to the sewing head

Next I turned my attention to the top part of the machine - somewhere I don't often go!

I had a good look at my machine and found another screw on the back that I could easily remove. This screw hold on the plastic case that covers the sewing head. This is where the squeak seemed to be coming from and where there are lots more of moving metal parts. I was careful to put the screw into my little yellow pot so as not to loose it.
Picture
Picture

If you have never done this it is worth a look. Be careful not to dislodge any of the cables, and don't go poking around too much, but once again I was amazed at the fluff and stuff that had accumulated up here. 
I manually moved the fly wheel again and looked carefully to see what was going on. I could see there was a piece of thread metallic thread (that stuff is so tricky isn't it!!) that had got itself tangled in there. Using long pointy tweezers I was able to easily pull it out. I gave everything a good brush with my little paintbrush, starting from top to bottom and removed quite a few chunks of fluff. 
Picture
I also found a small lump of accumulated lint on the take up lever, which I used the tweezers to ease off. It came off like a tiny doughnut!
Picture
Once all the fluff was gone  I carefully put one drop of oil onto each moving joint for all the parts I could reach, then moved on to the next part of the machine - the tension discs.

​The tension discs on my machine are covered by a small plastic plate with yet another little screw holding it in place. After undoing it I gently eased the plastic cover off. 

Picture
Picture
And there they are - to the left of the big spring - the tension disks! Put the presser foot lever up and down a few times and you will see what happens. 
Picture
Picture
To clean between the discs and under the little thread guide plate I discovered (above right) ​I took a spool of thick thread and put two drops of my old favourite, 'Sewer's Aid' between my forefinger and thumb. I pulled a length of thread between them to add a little lube to the thread. Then I threaded the machine up as normal (minus the needle) and pulled the thread back and forth (think dental floss)  several times through the whole mechanism. Quite a bit of fluff and odd bits of thread were dislodged. To finish I put a drop of oil on the spring area and then put all the parts and screws back into place. 

​
Picture
 It is good to know about how the tension discs are controlled, as when you thread your machine you should always have the foot in the 'up' position so the thread can slide nicely between the discs. Once the foot goes down the discs close together according to the tension setting you have selected.
Picture
Once I had checked that the mechanism was moving up and down freely I replaced the needle and presser foot and plugged it all back in again. To make sure no residual oil would make a mess I stitched onto a piece of scrap fabric for a few minutes - and guess what.............. the squeak was gone! Da da!!

Thanks for reading.

​Please feel free to share my website or blog with your friends by using the buttons to the right. If you would like to receive an e mail each time I post a new blog, please click here. I promise to never send you junk or give your address to anybody else.
 

The importance of a good hanging sleeve and other gelatine related stuff

1/3/2016

 
Picture
Beach treasure
I have had one of those weeks where I was busy and did a lot - but don't have much in the way to show for it. I did lots of walking on the beach and things like sewing on hanging sleeves and making quilt labels, sorting out a big pile of drawings and stitch samples that  needed to be organised and stuck into my sketchbook, making more walnut ink - and dyeing some fabric along the way (which led me to a much needed sort through my hand dyed fabrics) and - horror of horrors - discovering that the vegetarian agar agar gelli plates have gone mouldy!!!! (more on that later).

Hanging Sleeves

Not one of my favourite jobs to do - but if you are going to do something , do it properly, and a nicely made and decently sewn on hanging sleeve makes or breaks even the most amazing quilt. If you don't put it on straight, then the quilt will hang forever wonky. If you make it too tight, then the batton will leave an ugly bump in the front of the quilt. If you put it to high it will show above the top line of the quilt, but too low and the top will droop, or even worse, flop down. So maybe, it is more important to spend time on this little loved part of art quilt making than anything else!

This is the technique I use for all my quilts that are to hang freely. I find it makes an excellent hanging sleeve and the instructions are foolproof. I have taken them from the Contemporary Quilt challenge website, and have copied and pasted the appropriate section from the website. If you would like to visit the website please clickhere. (While you are there, you may want to consider making a quilt to enter the challenge - go on, what have you got to lose??)
​

​
"D" Sleeve (instructions taken from the contemporary quilt challenge website)

These instructions are for a  4 inch wide sleeve. If it is set 1inch down from the top edge and 1in in from the sides it will not show once the quilt is hanging. It will be able to accommodate a wooden batten and not create a bulge in the fromt of the quilt.
​
Picture
Cut a 10 inch wide strip of a reasonably firm weave fabric (muslin is not good).  The length of strip should be 1.5inches shorter than the width of the quilt. 

Then iron a 1/4inch fold on both short ends of the strip and stitch it down.
Picture
Now fold the strip in half lengthways and iron the fold - the orange line.

Then open it up and fold both long sides into the centre fold and iron - the green lines. You now have three lines marking your strip in quarters.
Picture
Now stitch down the quarter folds about 1/8in from the edge - the black line top and bottom of the diagram.
This line of stitching gives your sleeve strength, allows the baton to lie along a straight line and makes it much easier to slip stitch the sleeve onto the quilt.
Picture

​Now put together the two long edges and sew a 1/2in seam. This should be ironed open.


​
Picture
Now put together the two long edges and sew a 1/2in seam. This should be ironed open.

This last seam sits on the back of your quilt. The sleeve should now be 5in at the front and 4in at the back ie puffing up into a "D" shape.

Now you can stitch your sleeve onto your quilt 1in below the top of the quilt. Please sew all the way round the sleeve so that the baton goes onto the sleeve, not behind it.
​

and now on to something a little more exciting........
​

​
Mouldy agar agar plates 

Back just before Christmas  I was busy experimenting with a vegetarian alternative to gelatine plates. You can read the blog post I made and see the recipes for a selection of different types of gelli type plates here.

Well, it is now 1st of March (already!!) and my weekly look at the agar agar plates has revealed..... mould!. Drat.
Perhaps it should not be a surprise. I have not refridgerated them and they have been sitting on a shelf in my garage which hasn't dropped below 25 degrees.They were stored in between 2 sheets of freezer paper and in a plastic bag to keep the dust off. 
Interestingly, the gelatine based plate is still fine.

​
Picture

So what to do? I obviously don't want to inhale any dodgy spores; not sure if they are bad or not, but I would rather not find out the hard way. So I have a choice - throw them away, or see if I can 'refresh' them in some way.

In the interest of science, I chose the latter, but if you feel the risk is too high, then do throw yours away.

Refreshing an agar agar gelli type plate

This is what I did:

With a face mask on I washed the plate under running water, rubbing off the blobs of mould and any furry bits. I then cut it up into small chunks with a pair of scissors,  and placed it into a glass microwave proof bowl (not for food use). I chose this method as this is what  I do with my gelatine based plates - and it works a treat.

Picture

I started by zapping the agar agar chunks in the microwave on full power for 2 minutes. This would normally see my gelatine turn to liquid and the process would be almost complete. However, the agar agar did not budge. So, I gave it another minute, but nothing was happening. 
Being mindful of the process I went through when making the agar agar plate, I decided to abandon the microwave as a method of melting the lumps and tipped the whole lot into my old dyeing saucepan. And I was very glad I did!
​
Picture

After 10 minutes on a medium heat this is how the agar agar lumps looked. I was worried about it catching on the bottom of the pan, so I stayed with it and stirred approximately every minute.
​
Picture

Here we are after 15 minutes. About half melted. Stay with it and keep stirring!
​
Picture

It took around 20 minutes in total to melt all of the lumps and get a thin, runny liquid. To be on the safe side I decided to give it a good boil, to kill any spores and / or lurgy. Then I poured it back into my mould and waited to see if it would set. 

Good news!! I think the newly reformed agar agar plate is even better than before - and no more mould either!
Picture

As ever, I will keep you posted on how it keeps. I am going to leave it in the garage again - so will see how long it lasts.

Sorry for it being a short one this week - I'm working on a large project this week and if it turns out well I will share next time.

Thanks for reading.

​
Please feel free to share my website or blog with your friends by using the buttons to the right. If you would like to receive an e mail each time I post a new blog, please click here. I promise to never send you junk or give your address to anybody else.

Agar and gelatine based Gel plates for fantastic mono printng fun

21/12/2015

 
I recently ran two workshops at Midsomer quilting covering a range of exciting techniques to add surface design to fabrics. Both days were great fun - if a little hectic - and lots of beautiful fabric samples were made.

One of the techniques we covered was monoprinting using gelatine plates. I wrote a blog quite a long time ago covering how to make your own reusable 'long-life' gelatine plate (I will put my recipe for a gelatine plate further on in this post), but as I had two ladies at one of the workshops who preferred not to use a product created derived from pork / beef I have been busy trying to perfect a non gelatine based plate. Messing about like this appeals to the chemist side of me, and along the way I have discovered some very interesting things - a few of which I will share for those who are interested!


Picture
Using gelli plates to make mono prints on paper and fabric at Midsomer Quilting
I also received a lovely message from Sue who also attended one of the workshops. She had a problem buying regular gelatine in her local supermarket - they only had Vege-gel in stock.  This is a carrageenan based product - something I can't find here in New Zealand (at the moment!) so for the time being this is my agar agar based recipe. (Note: agar agar is known by many names; China grass, Faluda, Japanese Moss, Ceylon Moss and Bengal Isinglass to name a few) I have done some research into Vege-gel and have some ideas which I list further down that you could try if you want to make a vege gelli plate. I would suggest trying out a just a small quantity  and see how your plate turns out.
​
Picture
Agar-agar powder - I bought mine in my local Korean food shop - but I have seen it in Waitrose, Lakeland, Holland and Barrett and in many small food shops which sell spices etc.
Picture
Carrageenan based gel. This brand (there are others) is more widely available in the big supermarkets - but I have not had experience of using it


My agar agar based gelli  plate recipe

Ingredients:
50g agar agar powder
600ml water (approx 2.5 cups)
2 teaspoons of salt
225ml glycerine (approx 1 cup)

(with these quantities I made one 18cm x 18cm gelli plate and two 18cm x 10cm gelli plates)


 INTERESTING STUFF

Both agar agar and carageenan are derived from red seaweed. On food labels is also known as E406

My 'Telephone Brand' agar is pure agar. No added anything. A little goes a L-O-N-G way!

Vege-gel is a commercially created product made for cullinary use. It is a mixture of carageenan, locust bean gum and other substances. The gum helps to stop the gel being so brittle, and stops the prepared gel from 'weeping' - an important difference from the pure agar agar powder.

A special property of agar is the large difference between the gelling temperature and the melting temperature. (known as hysteresis).
Although it melts at 85 °C (185 °F) it solidifies from 32–40 °C ( 90–104 °F) so – it won’t melt on you on a hot day like gelatine can. A useful property in warm climates.


So - this is what you do...........................
​
Picture
Gather together the ingredients and a few utensils.

Agar agar, glycerine, salt, water
Saucepan, tray to mold your gelli plate, whisk, teaspoon, spatula.


I have added salt to my recipe as I wanted to increase the pH. I read that pH noticeably affects the strength of the agar gel; as the pH decreases, the gel strength weakens.  Having tested this out I have noticed the addition of salt really makes a much less brittle plate.
Picture
Mix the salt into the water and then add the agar agar, whisking with a balloon whisk to make sure all of the powder is wet and incorporated. You don't want any dry lumps on the bottom or around the edges.
I left mine to sit for about 5 minutes to make sure it was nicely mixed and the water absorbed.
Next, put it on a medium heat and stir gently. You will feel the mixture begin to thicken and also turn a little more transparent. (This is difficult to see from the pictures.)
 

A major difference between agar agar and gelatine is that you must heat agar agar to around 90
 °C and boil for 2 minutes before it creates a decent gel. 
Picture

For our purposes we want to plasticise it - and for that we need to stir in glycerine. 

Not only does the glycerine act as a plasticiser, it also acts as a humectant, stopping the agar agar drying out. 
You could now leave the mixture to set. However, I would not recommend it. At this stage the agar agar will be very brittle. Put a little blob on the work surface or a plate and allow to cool - you will see what I mean. It is the weirdest thing - a 'crunchy' gel! If you sweeten it now you can use it for a jelly based desert. ​
Picture
Picture
​Once the glycerine is thoroughly mixed in, pour the hot mixture into your mold. Something with a very smooth, flat base (such as a baking tin or flat bottomed pyrex bowl) is ideal. This tray has a tiny plastic circle in the base, left from when it was molded, so isn't perfect, but I don't mind that much.


​
After about ten minutes gently ease the set gel away from the edges of the container. It will not feel elastic the way gelatine does - but it does have a soft and slightly giving feel.
Then simply turn the container over and allow the gelli plate to fall out onto your hand.


Agar agar sets at room temperature within a few minutes and doesn't need to be put in the fridge at all.

Gelatine needs at least an hour or two to set in a cool place.
​
Agar agar plates do seem to 'weep'. This is known as syneresis. If you can get hold of some Locust Bean Gum (also known as carob gum or E410) a small amount of this is said to stop the problem. I haven't been able to get any - so I am unable to comment. 

​
So - what if you have the sachets of Vege-gel, the Carrageenan based gel?

As I can't get the Vege-gel I can only make some educated guesses, but it sounds promising doesn't it, as the locust bean gum is already in there - so hopefully no syneresis!  

So, this is what I would do.................

Make a small batch with just one packet of the gel using the following recipe as a starting point, and see how it turns out.

1 sachet of Vege-gel powder
200 ml water (approx 3/4 of a cup)
80 ml glycerine (1/3 of a cup)

Make it in the same way as the agar agar plate - making sure you do not add the salt. I can't find any evidence that salt will help - so start by leaving it out. Leave it to set and see what you get.

Use this as your starting point, and then tweak the recipe according to what you see. If the plate is too brittle, try remelting it and adding 50 to 100ml more water and see what happens. By remelting and making small changes you can tweak the recipe to see what works best, then make a bigger plate with your preferred combination of ingredients.

I would love to hear if anyone does try this - as you know, I am a big believer in sharing information - it can only benefit all of us!


​Carrageenan has an unusual reaction when mixed with locust bean gum - 
Kappa carrageenan ( a particular type of carrageenan) shows an unusual synergism with locust bean gum in aqueous gel mixtures. The interaction is marked by a considerable increase in the gel strength, an improvement in water binding capacity, a change in gel texture from brittle to elastic, and a reduction in the degree of syneresis (that is the expulsion of liquid that I am seeing with the agar agar gelli plate). I guess that is why Dr Oetker puts it in his little packets!


             And now for my new and improved gelatine based gel plate recipe..............

​
Ingredients:
40 g gelatine powder (250 bloom)
100 ml warm water 

175 ml glycerine
160 ml Surgical spirit *
(also known as rubbing alcohol or isopropyl alcohol)

If you are unable to purchase isopropyl alcohol, you can substitute plain water. There is very little difference in my experience, but if I can get it I add the alcohol - maybe I am wasting my money!!
Picture

To make the gelatine plate, dissolve the gelatine powder in the water and stir well. Allow to sit for around ten minutes to make sure the gelatine absorbs the water fully. Next, put it into the microwave and zap for 30 seconds of so. BE CAREFUL - this mixture will be hot and WILL BURN YOU. Take it from the microwave and stir in the glycerine and surgical spirit (if using). Stir very well, then return to the microwave for a further minute of so. Keep your eye very carefully on the gelatine mixture. You do not want it to boil. If you do it will not gel properly. 

You are aiming for a clear, golden liquid which has the same consistency as runny honey.

Once it has reached this stage take it carefully from the microwave and pour it into your mold. Place on a flat surface and allow to cool before putting it into the fridge. It is likely to take at least an hour to set - maybe more. 

Once set, remove from the fridge and gently ease the edges of the gelli away from the container. It should feel bouncy and rubbery, and should not want to tear or rip. Turn the container upside down and ease the plate out onto your hand.
​


​MORE INTERESTING STUFF


Gelatine is derived from collagen and is extracted from the skin, bones, and connective tissues of animals such as domesticated cattle, pigs and fish. It is an ingredient in many of the foods we regularly eat. By itself it is flavourless and colourless.

Also known as E441 on food ingredient labels.

Gelatine dissolves best in warm to hot water which is why synchronised swimmers use it to hold their hair in place whilst performing. The cold water does not dissolve the gel! 

The strength of gelatine is measured in a unit called BLOOM. The higher the number, the stronger the gel

Dr Oeker brand  has a rating of 250 bloom.
Knoxx has a rating of 225 bloom.

Sugar, milk and alcohol increase the strength of gelatine (which is why I add the alcohol)


Re-forming the plates
​

One of the things I like about these home made gel plates is that once they get a bit grubby, scratched or otherwise not in tip-top shape, you can cut them up, melt them and form them into a new plate. This also means you can make a big one into several smaller ones, or vice versa. 
Picture


Cut or rip the gel plate you wish to recycle into chunks. This helps speed up the melting process.

Put it into a microwave bowl and heat for around 1 to 2 minutes on full power (I have a 750W microwave). Keep your eye on it and give it a stir after a minute. If you need to add more time do it in short bursts and watch it at all times. You want the mixture to just bubble up but not over the edges.
If it spills over, don't wipe it up - just allow the hot gel to cool then peel it off and stir it back into your molten gel.
Picture


This is almost ready - it is beginning to bubble. Keep your eye on it though - it foams up quite quickly at this stage. 

Also - TAKE CARE - this is hot - at around 90 °C, so it will burn you.

Once ready take it out of the microwave and pour into a new mold. 


​                    Suppliers you may find handy to know about


​


UK


​
​

​​Glycerine and gelatine from MM ingredients

http://mmingredients.co.uk/
​
Glycerine BP (that means pharmaceutical grade) can a be bought more cheaply in chemists (such as Boots) than in supermarkets where you find edible grade glycerine. 

Isopropyl alcohol - also commonly known as 'surgical spirit' or rubbing alohol in the UK. Don't bother with Boots for this one - the thought police have been there and they just give you 'the look' when you ask for it. Last time I tried Superdrug still sell it.


​New Zealand


Glycerine and Isopropyl alcohol from Pure Nature
http://www.purenature.co.nz/
​
Gelatine I buy at the supermarket


I hope you will find some of this info useful should you wish to try making a gelli plate for yourself. I would love to hear if you do try any of the recipes - and have any feedback . They really are quite fun to use and you can make some very beautiful papers and fabrics using them. I will let you know how my agar agar plates hold up - I don't intend putting them in the fridge - so I will see if they go mouldy or not.

Thanks for reading.

​
Please feel free to share my website or blog with your friends by using the buttons to the right. If you would like to receive an e mail each time I post a new blog, please click here. I promise to never send you junk or give your address to anybody else.

Trying out a new stabilising product: Terial Magic

23/11/2015

 
I was at Midsomer Quilting last week, teaching my 'Doodle Birds' workshop (more on that later) and was given a present by De - a new product to try out. It is called 'Terial Magic', and I must admit, I had never heard of it until now.

Terial Magic is a slightly sticky liquid that comes in an easy to use spray bottle. According to the instructions it needs to be sprayed onto fabric and allowed to dry naturally for 15 or so minutes, and then ironed.

Once dry it is supposed to make the fabric stiff (like when you use starch) and non fraying. Stiff enough, it is claimed, that no further stabiliser is required for things like machine embroidery or 3D work.

Picture
Trying out Terial Magic

To see how it worked I took a few pieces of cotton quilting fabric from my scraps bag and sprayed them until they were moist. Following the demonstration on the Terial Magic website (click here) I put my fabric into a small tub and sprayed it. Once it was quite moist I squished it about a bit to make sure the liquid had penetrated throughout the whole piece, and then squeezed out the excess liquid (I put this back into my bottle).

Picture
Spray the dry fabric with Terial Magic in a small bowl until saturated
Picture
Squeeze out the excess slightly sticky liquid. I put this back into my bottle

After smoothing it out I left it to air dry on a flat surface for the 15 minutes stated. After this time it was still very wet - it was a winter's day in the UK, so not very warm - so I left it for around another 20 minutes of so, by which time it was only just damp. Obviously the temperature plays an important part in this, so use your judgment.
NOTE:At this stage the fabric was slightly stiff, but not noticeably different to when I had started.

I then took the fabric pieces and ironed them, as per the instructions. I used a hot  iron directly on the fabric (no ironing sheet) and the heat obviously had an effect, as the fabrics became smooth, very crisp and stiff. There was no residue on the iron and no flakes or 'gunge' on the fabric. 
Picture
Pressing the damp fabric with a hot iron. It became very crisp - like a piece of thin card

Comparison with starch

Up to this point I was starting to wonder why I would use this product instead of starch. I do not often use starch on my fabric, but when I do I usually mix my own and apply it in the same way.

I applied the homemade spray starch to the fabric in the same way as I did the Terial Magic and left it to dry until just damp and  then ironed the fabric. It was slightly stiff, but nowhere near as stiff as with the Terial Magic.
To try and get a stiffer result I sprayed the fabric once again with the starch mixture, but this time I ironed it dry straight away. This made a big difference and the fabric now had very similar crispness and stiffness to the Terial Magic soaked fabric. 

There were, however, two things I noticed which were slightly different when using the starch.
1. Small flakey particles of starch came to the surface of the fabric, which easily scorched
2. The sole plate on my iron got covered in a thin film of starch, which also scorched. Not the end of the world, but it meant I had to clean the sole plate of my iron which is always a pain.


My spray starch recipe:

50ml tap water
200ml  hot water

1 to 3 teaspoons of cornflour

Mix the cornflour and the
cold water to a smooth paste.
Add the hot water and whisk / shake until well mixed.
Pour into a spray bottle.

​According to the blurb that comes with Terial Magic these are two of the drawbacks of using starch. Another thing they mention is that insects like to eat the starch and therefore your fabric. I must say that I have never noticed this, but I am not a regular 'starch user'(!) so I am not able to say whether this is an issue or not. They also say the stiffener in Terial Magic is not edible by insects - so if this is important to you it may influence your choice.

What to do with this stiffened fabric

​The stiffened fabric was interesting.
It folds crisply - just like thin card, so if you have a project that needs firm creases or needs to stand without support this may be a good product to use. 

I tried a few origami ideas...​
Picture
This is a single layer of fabric folded to make a star
Picture
A single layer of fabric folded to make a dress. Next to it is a banknote I was once given, also folded into a dress shape
Picture
Folded hexie yoyo - easy once you have got the hang of it! (trouble is it took me an hour to get the hang if it)
The crispness of the fabric made it perfect for folding techniques. I can imagine it would also be particularly good when piecing small, fiddly shapes or pieces cut on a bias.

Origami links for the above 
For the folded dress, click here
For the yo-yo hexie, click here


​Next I tried some needle turn applique
Picture
1. The stiff fabric was easy to cut. I chose this fabric as it was particularly bad at fraying prior to treatment
Picture
4. The needle and thread slipped through the fabric easily - it was a pleasure to stitch
Picture
6. Fabric soaked in starch - cut well and no noticeable fraying
Picture
2. After cutting I finger pressed the seam allowance over. The crease stayed perfectly


The green fabric stiffened with the Terrial Magic did not fray at all and was very easy to stitch. I was pleased to note that there was no resistance to the needle from the product in the fabric


To make a fair comparison I repeated the process with a piece of yellow fabric soaked in starch. It cut well and creased well, just the same as the Terial Magic soaked fabric. The only difference I noticed was that when I came to stitch the needle and thread were not at all easy to pass through the fabric. It was much more difficult and made hard work of a simple job.
Picture
3. I pinned the leaf shape in place ready to stitch down
Picture
5. The finished leaf shape stitched down
Picture
7. The two leaf shapes; the green fabric was easy to stitch, the yellow much more difficult.

And then I tried stitching some raw edged leave to a piece of fabric
​​
Picture
Holly leaf shapes cut from Terial Magic soaked fabric
Picture
Place 12 in a circle, and stitch down the centre of each leaf. It looks better in real life than this photo!
The stiffness of the leaves made it easy to position them on the fabric and the raw edges, once again, did not fray.

The blurb also says you can use the stiffened fabric for machine embroidery without and further stabiliser. As I don't have an embroidery unit I can't let you know about that - but if anyone does and has experience of this product it would be good to find out if the claims are true. 

So - do I like Terial Magic? Yes, I think I do. It is similar to starch, but has a nicer feel, doesn't gunk up my iron and the treated fabric is nicer to stitch. I don't often need fabric that is stiff or crisp, but when I do I think this product would be a useful addition to the tools I already use. Thanks De - when I run out I will be buying another bottle from you!


Now for those Doodle birds!
These are a few pictures I took during the workshop at Midsomer quilting last weekend. Brilliant aren't they?

And how about these two amazing Doodle Poodles?  My thanks to Chris D who was so inspired when she got home that she made these two fantastic pieces. I just love them! Thanks for sharing them, Chris, I think you have cracked free motion quilting!
Picture
Picture
I hope you have enjoyed seeing all this brilliant free motion work. Thanks for looking.
​
Please feel free to share my website or blog with your friends by using the buttons to the right. If you would like to receive an e mail each time I post a new blog, please click here. I promise to never send you junk or give your address to anybody else.

Make an easy slip over cover for your sketchbook

16/11/2015

 
Last week I posted some pictures of several of the art journal slip on covers that use the fabrics I made whilst exploring and experimenting with different surface design techniques. 

Quite a few people got in touch with me to ask how I made the slip on covers, so I thought it would be a good idea to try and write a post to show you how I go about it. They are quite straightforward to make- so I hope my explanation doesn't make it seem too complicated.

Picture
1. Measure the book you wish to cover
In this example I measured a spiral bound sketchbook. It is important to make sure that you measure the thickness of the spine as well as the front and back cover - especially with a book like this that has a particularly fat spine.

Make sure you note down the measurements - as you need to add a bit to them in the next step.
Picture
2. Add a seam allowance
Take each measurement and add a generous quarter of an inch all around.

In this example the width of the front and back covers will become 9 inches,
the height of the front and back covers will become 12 and a quarter inches and the spine will become 1 and a half inches wide.

In my example I have pieced some fabrics pink and green fabrics to create the front and back covers. It would look equally good if you used a whole piece of fabric for each section - or even a whole piece of fabric for the whole cover. 
Picture


​3. Join the sections together

​Join the sections to create a whole piece which will wrap around  the whole book cover, with a little extra fabric (a quarter of an inch) on each edge.
Note:If you were using a whole piece of fabric you would already be at this step.
Picture

4. Make two tie closures
Either make two very thin strips from a co-ordinating fabric, or cut two pieces of tape or ribbon. These will be the ties that you use to keep the book closed. You can make them as long or short as you like -  long ones will wrap around the book before you tie them, short ones you can just knot or tie in a bow.
These two are about 8 inches and 10 inches long.
Picture
5. Cut 2 further pieces for the inner cover
​Next you need to  cut two pieces of co-ordinating fabric that are the same height as the front and back cover sections and  little narrower. Don't worry about the exact width. 

On each piece neaten one of the long sides by folding the fabric over and pressing and then folding it over again. Stitch down the neatened edge using a straight or decorative stitch. You should now have two rectangles, each with one neat long side and one raw edge. The short sides will both be raw. 
Picture
6. Add a pocket if you wish
​As an optional extra, you can stitch a pocket onto one or both of these rectangles. For your first attempt it might be worth skipping this stage until
you have seen how the finished cover turns out.

These pieces will eventually be on the inside of the book covers. If you want you could make a long, thin pocket to perhaps hold a pen or pencil.
Picture


7. Add a bit of quilting
​Go back to your front/back and spine piece. Quilt it all over as much or as little as you like. Just a few lines of stitching will be enough. I just like to go a bit mad.
Make sure you lay the finished piece with the right side up.
Picture

8. Attach the ties
​When you are happy with that, take the two thin strips and pin them, horizontally, onto the right side of the cover. Pin one one each of the short sides, roughly half way down.Make sure to let them overhang the short edge a little - about a quarter of an inch or so. 
Picture

9. Pin the inner cover pieces in place
​Next, still with the right side of the cover uppermost take the two smaller rectangles and pin the to either side of the cover. Match the raw edges to the edges of the cover and have the neatened edges facing inwards.

Pin them in place.
Picture


10. Add a final piece to cover the gap
​Look at that gap that is left in between the two pieces you have pinned in place - where you can still see the quilted cover fabric. You need to cut a piece of fabric that is about 3 inches wider than this gap. Leave all the edges raw - they wont be on show. 
Picture


11. Pin, pin, pin

Place this piece over the gap - roughly centrally so that it overlaps the other two pieces of fabric you pinned on earlier. Pin this in place too
Picture

12.Stitch all the way around
With a straight stitch, sew all the way around the whole piece with a scant quarter inch seam. When you come to the place where the thin strips are located on the short sides go over them a few times - reverse stitching to make sure the ties are firmly attached. 
Carefully clip the corners if you think it is bulky
Picture

​13. Start to turn it right side out
Nearly there!
Now start to turn the cover inside out. Start with the central rectangle. In this picture the rectangle of fabric has been turned to the back, revealing the cover once again.
Picture


14. Keep going
​Now turn one of the long rectangles on the side inside out. Use a pencil to poke out the corners.
Picture


15. Ta da!! Done!
​And finally turn the other rectangle inside out. Give the whole cover a good press and roll the seams so they lie flat. 

You are now looking at the inside of the book cover.
Picture

16. Slip your sketchbook into the cover
Now take the back cover of your sketchbook and slide it into the jacket. It might need a wiggle to get it to right up to the end and into the corners.

​Then do the same with the front cover.
Picture


17. Admire your work
​And then close up the journal and tie it closed. 

Done!
Picture
Picture
I hope that makes sense. It really isn't difficult. The thing tat sometimes goes wrong for me is that I make it too small - so be generous when you add your seam allowances - you can always re-stitch around the edges if it is too big. 

​If you make one I'd love to see it!

Thanks for reading.
​Please feel free to share my website or blog with your friends by using the buttons to the right. If you would like to receive an e mail each time I post a new blog, please click here. I promise to never send you junk or give your address to anybody else.

Making your own fabric paints with fabric medium and acrylic paint

20/9/2015


Fabric paints two ways: ready made fabric paints or mix your own....

One of the ways I like to add colour to fabric is with fabric paint. There are lots of brands on the market, all at varying prices. 

'Pebeo', 'Jacquard', 'Dala' and 'Golden' are brands that are readily available. They each give bright, long-lasting colour, leave the fabric with a soft hand (that is, not a stiff or plastic-like feeling on the surface of the fabric), can be heat set easily with an iron and are washable. I have lots of all of these brands and find them equally good. 

So far, so good. The main problem I find with all of these is that they are mostly sold in little pots and can work out to be rather expensive.


Picture
Picture
Picture
Picture

Happily, however, there is an alternative. You can purchase something called FABRIC MEDIUM to mix with ordinary artists acrylic paints which transforms them into fabric paints. Again, there are lots of fabric mediums on the market. In the past I have used 'Golden GAC 900', 'Dala Waterproofing Medium' and 'Liquitex Fabric Medium' very successfully. 
Picture
Picture
Picture

One of the major benefits of using fabric medium is that you can mix it with acrylic paints - and these come in a huge variety of colours, qualities and sizes and are readily available online and on the high street and even in many large supermarkets. For me, this means I have so much more choice.

Another benefit is simply down to cost. Generally speaking, artists acrylic paints are not very expensive and come in a range of sizes from small tube to bucket-sized. Prices vary according to whether you buy student quality, which I find is usually fine, or artists quality which has more pigment and often goes further but is more expensive. 


Picture
Picture
Picture
Picture
Which brings me on to why I am talking about this today. 


I ran out of fabric medium on Friday!


So I took a look online to find some more, and I came across what looked like a bargain - so I bought some to try out. It is a new manufacturer of fabric medium for me. It is made by Berol and comes in a 1 or 5 litre bottle, with 1 litre costing £5 and £6 depending on where you buy it. I purchased mine from Yellow Moon as they were having a promotion and free shipping. It arrived the very next day, which was fabulous. 

I have used it over the weekend on a variety of samples and have found it to be of very good quality. It mixes well with all of the brands of paints I have tried so far and has been great for painting onto fabric with a brush, using with stencils and with hand carved stamp blocks. 
Picture

Here are some of the samples of doodle quilting that I painted 
Picture
Flat F4 brush
Picture
Round R6 brush
Picture
Round R00 brush
Picture

The final thing you need to do when using paint on fabric is to fix it in some way.  If you do not fix the paints you risk them coming off or running when the fabric becomes damp or wet for any reason and after all your work that is probably the last thing you want - so do not forget this last and vital step.

It is usually as simple as ironing the fabric for a certain length of time at a given temperature. There are other ways, however, which I have summarised below. Just be sure to always read and follow the instructions on the particular product you are using.

  • Iron for 3-5 minutes with a medium-hot iron on the reverse side (side opposite of the application). On delicate fabrics where lower heat levels must be used, a longer ironing time will be necessary.
  • Oven: Cure for 1-2 minutes at 300F; 4 minutes at 250F.
  • Clothes / Tumble dryer: Commercial: medium-high temperature for 20-40 minutes. Household: high temperature for 40-50 minutes.

Thanks for reading.

Please feel free to share my website or blog with your friends by using the buttons to the right. If you would like to receive an e mail each time I post a new blog, please click here. I promise to never send you junk or give your address to anybody else.

Sun printing with soy milk

17/8/2015


South African soy and sunshine

Picture


It has been a long time since I started messing about with this new idea, but this weekend I decided to finish what I started several months ago. Before I left South Africa I started an experiment with soy milk , paint and sunshine - and what follows is how it turned out.


Picture

Now I know sun printing is not new - I have tried this fun technique before, when I made the small quilt named 'A Faithful Hand' (above right) using Pebeo Setacolor paints
. When I first tried the technique I was amazed at how simple yet effective it was.  Just by covering fabric with the paint then allowing it to dry in the sun with a solid object placed on the fabric (in this case a stencil I cut from cardboard) I created a beautiful piece of fabric to work with.  However, I discovered one major problem with the paints once the piece was finished. Although I had heat set the fabric (well, I thought I had heat set the fabric), when I came to block the quilt the mist of water I sprayed over the surface sent the blue and orange paint running in all directions. As you can imagine - after completing all that stitching I was not happy!!!!

Lesson learned: Follow the manufacturer's instructions to the letter when you heat set your work, and then check and double check to ensure it is heat set properly before you continue. 

Anyway, after that misadventure, my love affair with the process stopped. Until now.

Thinking back to some of the things I have seen on my travels, I have seen soy milk used as a binder when used with mud (yes, mud!) to colour fabric. Not understanding the process, I began researching the use of mud and soy as a traditional method of adding colour to fabric. As it turns out  the soy milk acts as a very effective 'binder' - in a similar way that a mordant works with other natural dyes. Apparently that is why babies that are fed on soy milk have bibs that never come clean!

The thing with soy milk is that it needs time to do its job - and the longer you leave it, the better the results. So, back in March, before I left the South African sunshine, I decided to try out a new idea.....


sun dyeing with paint and soy milk

Picture
Mixing the paints - soy milk and acrylic paint
Picture
Fabric covered in the soy milk & paint mixture then covered with a windmill shaped mask
Picture
work in progress

The process is pretty simple. All you do it mix the acrylic paint with soy milk until you get a milk-like consistency. You then  brush or sponge the mixture onto damp fabric (I used 100% cotton seed cloth) and cover part of the fabric with a mask. I used a mixture of things - metal letters, foam shapes and wooden die cuts, but you could use anything - natural items like leaves and grasses are very popular. You then leave the whole lot to dry in the sun. 

The way it works is this: the heat from the sun dries the uncovered fabric more quickly than that which is covered by the mask. This dry uncovered fabric then pulls the moisture out from under the mask (you may be familiar with the term 'wicking' it away) and at the same time takes the pigment from the paint with it. Thus, the paint and soy mix is physically drawn out from underneath the mask, leaving a whitish area the same shape as the mask. Clever eh?

This is exactly the same process as you would use if you used the Pebeo paints directly from the pot. The next part, however, is where the properties of the soy milk come in.


Note
It is not the UV from the sun that is important - just the heat. So, if you do not live in a very sunny place, just put your fabric under a heat lamp, taking care to ensure it cannot burn.
Once the fabric is completely dry (and now a little crispy) you remove the mask and you will find a blank patch on the fabric where it was placed. So far so good - the sun print has now been created. With the Pebeo paints you now need to iron the fabric to fix the paint  - that is where it went wrong for me. Because I was trying the soy milk binder the proteins in the soy milk needed time to naturally break down and bind with the fabric, so I needed to pack them away and wait. I believe 3 or so weeks is long enough - but I have not experimented with this to discover. In my case I have waited a little over 4 months (time flies!!) and this is what I discovered.

When I plunged the fabrics into hot soapy water nothing happened! No bleeding of colour, no paint washing out into the water,  NOTHING!! The colour was now completely fixed. Whether that is due 100% to the soy milk I do not know for certain, but what I do know is that it worked really well. Here are some of the results. 

Picture
Picture
Picture
So - some interesting discoveries. I am not sure I will follow through with this much further at the moment - but it is always interesting to explore ideas and experiment with different ways to do things. Who knows what might come of it in the future, and what soy milk could also be mixed with to yield interesting fabric to work with.

Thanks for reading.


Please feel free to share my website or blog with your friends by using the buttons to the right. If you would like to receive an e mail each time I post a new blog, please clickhere. I promise to never send you junk or give your address to anybody else.

<<Previous
    Picture
    Picture
    Picture
    Picture


    Click here if you would like to receive an e mail when I add a new blog post.
                       OR

    Follow my blog with Bloglovin
    Picture

    Categories

    All
    Challenges
    Classes
    Colour
    Cool-ideas
    Courses
    Designing
    Doodling
    Dye
    Exhibitions
    Experimenting
    Festival-of-quilts
    Flower-bowls
    Gelli-plates
    Hanging-sleeves
    How-to
    Inspiration
    Line
    Lino Blocks
    Making
    Marbling
    Mending
    Mono Printing
    Mosaic
    New-products
    Purchasing
    Quilt Gallery
    SAQA
    Sew On The Go
    Sketchbooks
    Software
    Stencils
    Stitch
    Surface Design
    Talks
    Thread
    White Horses
    Workshops
    Yarn Bobming

    Archives

    December 2020
    September 2020
    August 2020
    July 2020
    May 2020
    February 2020
    December 2019
    October 2019
    September 2019
    July 2019
    May 2019
    March 2019
    February 2019
    January 2019
    December 2018
    November 2018
    September 2018
    August 2018
    July 2018
    June 2018
    May 2018
    April 2018
    March 2018
    February 2018
    January 2018
    December 2017
    November 2017
    October 2017
    September 2017
    July 2017
    June 2017
    May 2017
    April 2017
    March 2017
    February 2017
    January 2017
    December 2016
    November 2016
    October 2016
    September 2016
    August 2016
    July 2016
    May 2016
    April 2016
    March 2016
    February 2016
    January 2016
    December 2015
    November 2015
    October 2015
    September 2015
    August 2015
    July 2015
    June 2015
    May 2015
    April 2015
    March 2015
    February 2015
    January 2015
    December 2014
    November 2014
    October 2014
    September 2014
    August 2014
    July 2014
    June 2014
    May 2014
    April 2014
    March 2014

    RSS Feed

    Picture
    Picture
Powered by Create your own unique website with customizable templates.