CLAIRE PASSMORE blog

The importance of a good hanging sleeve and other gelatine related stuff

1/3/2016

 
Picture
Beach treasure
I have had one of those weeks where I was busy and did a lot - but don't have much in the way to show for it. I did lots of walking on the beach and things like sewing on hanging sleeves and making quilt labels, sorting out a big pile of drawings and stitch samples that  needed to be organised and stuck into my sketchbook, making more walnut ink - and dyeing some fabric along the way (which led me to a much needed sort through my hand dyed fabrics) and - horror of horrors - discovering that the vegetarian agar agar gelli plates have gone mouldy!!!! (more on that later).

Hanging Sleeves

Not one of my favourite jobs to do - but if you are going to do something , do it properly, and a nicely made and decently sewn on hanging sleeve makes or breaks even the most amazing quilt. If you don't put it on straight, then the quilt will hang forever wonky. If you make it too tight, then the batton will leave an ugly bump in the front of the quilt. If you put it to high it will show above the top line of the quilt, but too low and the top will droop, or even worse, flop down. So maybe, it is more important to spend time on this little loved part of art quilt making than anything else!

This is the technique I use for all my quilts that are to hang freely. I find it makes an excellent hanging sleeve and the instructions are foolproof. I have taken them from the Contemporary Quilt challenge website, and have copied and pasted the appropriate section from the website. If you would like to visit the website please clickhere. (While you are there, you may want to consider making a quilt to enter the challenge - go on, what have you got to lose??)
​

​
"D" Sleeve (instructions taken from the contemporary quilt challenge website)

These instructions are for a  4 inch wide sleeve. If it is set 1inch down from the top edge and 1in in from the sides it will not show once the quilt is hanging. It will be able to accommodate a wooden batten and not create a bulge in the fromt of the quilt.
​
Picture
Cut a 10 inch wide strip of a reasonably firm weave fabric (muslin is not good).  The length of strip should be 1.5inches shorter than the width of the quilt. 

Then iron a 1/4inch fold on both short ends of the strip and stitch it down.
Picture
Now fold the strip in half lengthways and iron the fold - the orange line.

Then open it up and fold both long sides into the centre fold and iron - the green lines. You now have three lines marking your strip in quarters.
Picture
Now stitch down the quarter folds about 1/8in from the edge - the black line top and bottom of the diagram.
This line of stitching gives your sleeve strength, allows the baton to lie along a straight line and makes it much easier to slip stitch the sleeve onto the quilt.
Picture

​Now put together the two long edges and sew a 1/2in seam. This should be ironed open.


​
Picture
Now put together the two long edges and sew a 1/2in seam. This should be ironed open.

This last seam sits on the back of your quilt. The sleeve should now be 5in at the front and 4in at the back ie puffing up into a "D" shape.

Now you can stitch your sleeve onto your quilt 1in below the top of the quilt. Please sew all the way round the sleeve so that the baton goes onto the sleeve, not behind it.
​

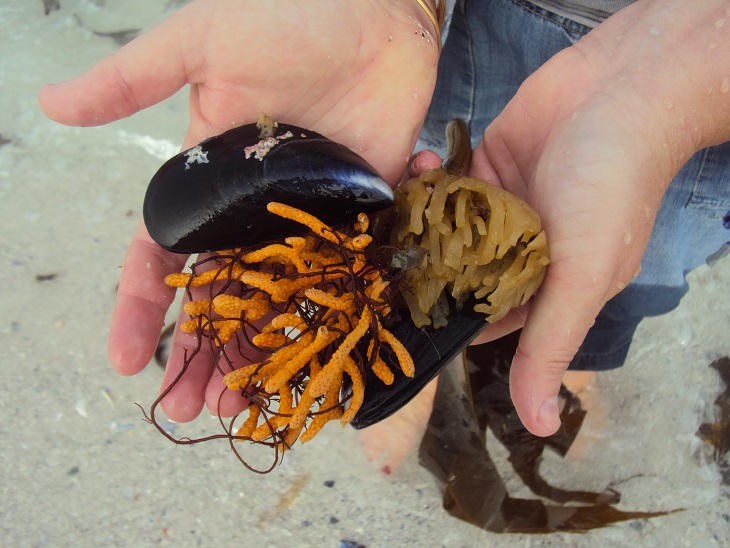
and now on to something a little more exciting........
​

​
Mouldy agar agar plates 

Back just before Christmas  I was busy experimenting with a vegetarian alternative to gelatine plates. You can read the blog post I made and see the recipes for a selection of different types of gelli type plates here.

Well, it is now 1st of March (already!!) and my weekly look at the agar agar plates has revealed..... mould!. Drat.
Perhaps it should not be a surprise. I have not refridgerated them and they have been sitting on a shelf in my garage which hasn't dropped below 25 degrees.They were stored in between 2 sheets of freezer paper and in a plastic bag to keep the dust off. 
Interestingly, the gelatine based plate is still fine.

​
Picture

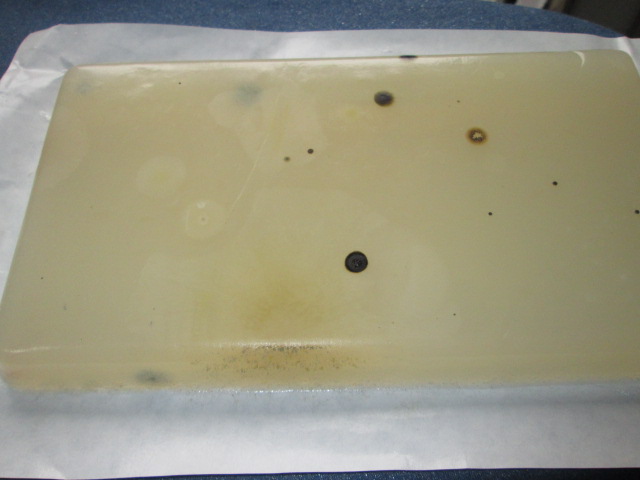
So what to do? I obviously don't want to inhale any dodgy spores; not sure if they are bad or not, but I would rather not find out the hard way. So I have a choice - throw them away, or see if I can 'refresh' them in some way.

In the interest of science, I chose the latter, but if you feel the risk is too high, then do throw yours away.

Refreshing an agar agar gelli type plate

This is what I did:

With a face mask on I washed the plate under running water, rubbing off the blobs of mould and any furry bits. I then cut it up into small chunks with a pair of scissors,  and placed it into a glass microwave proof bowl (not for food use). I chose this method as this is what  I do with my gelatine based plates - and it works a treat.

Picture

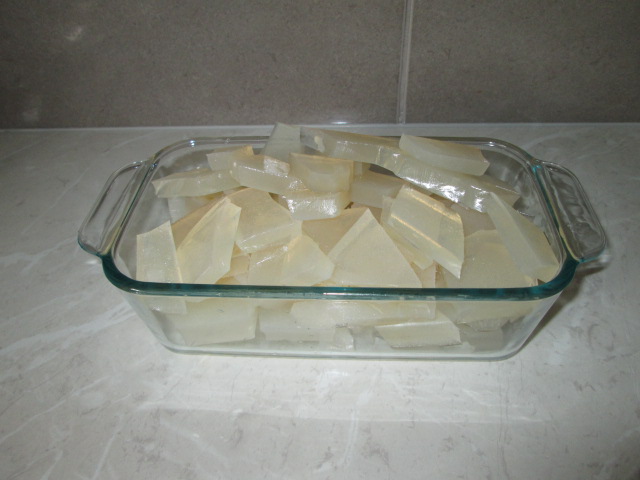
I started by zapping the agar agar chunks in the microwave on full power for 2 minutes. This would normally see my gelatine turn to liquid and the process would be almost complete. However, the agar agar did not budge. So, I gave it another minute, but nothing was happening. 
Being mindful of the process I went through when making the agar agar plate, I decided to abandon the microwave as a method of melting the lumps and tipped the whole lot into my old dyeing saucepan. And I was very glad I did!
​
Picture

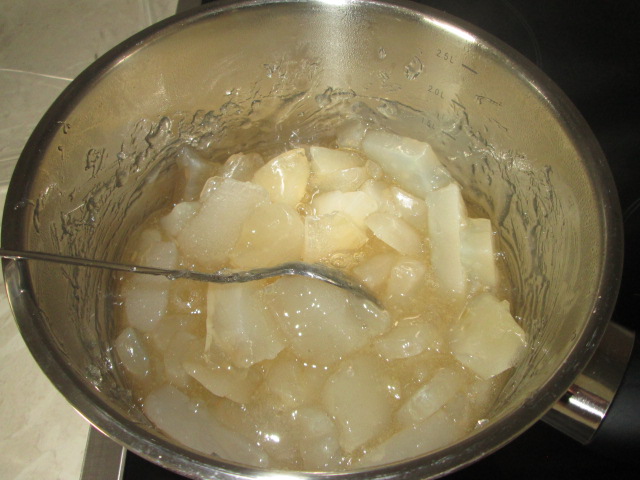
After 10 minutes on a medium heat this is how the agar agar lumps looked. I was worried about it catching on the bottom of the pan, so I stayed with it and stirred approximately every minute.
​
Picture

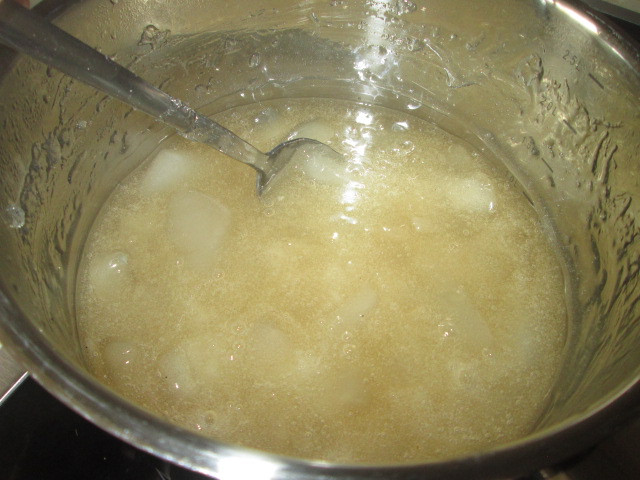
Here we are after 15 minutes. About half melted. Stay with it and keep stirring!
​
Picture

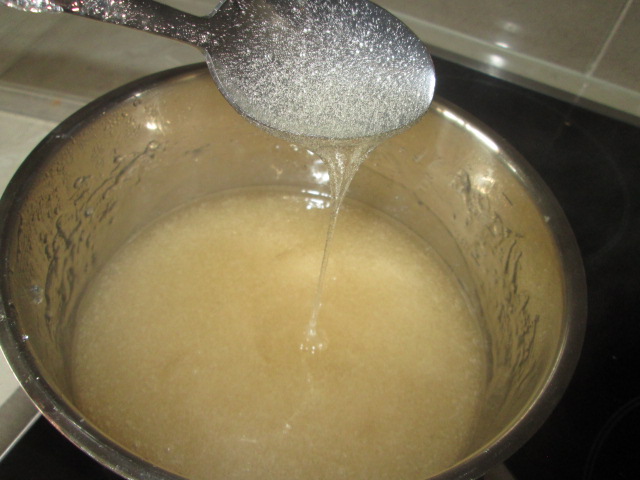
It took around 20 minutes in total to melt all of the lumps and get a thin, runny liquid. To be on the safe side I decided to give it a good boil, to kill any spores and / or lurgy. Then I poured it back into my mould and waited to see if it would set. 

Good news!! I think the newly reformed agar agar plate is even better than before - and no more mould either!
Picture

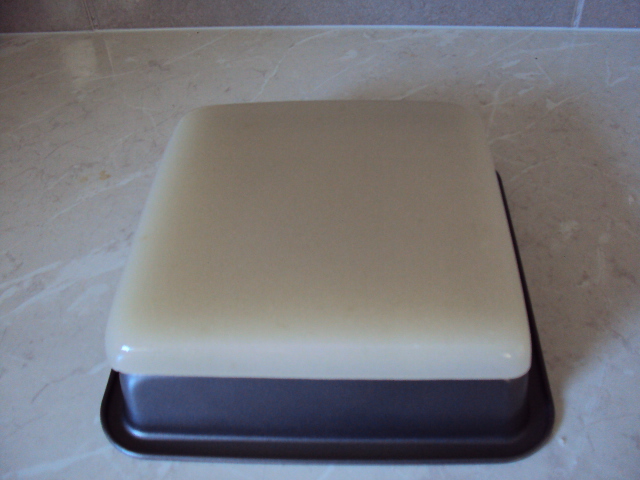
As ever, I will keep you posted on how it keeps. I am going to leave it in the garage again - so will see how long it lasts.

Sorry for it being a short one this week - I'm working on a large project this week and if it turns out well I will share next time.

Thanks for reading.

​
Please feel free to share my website or blog with your friends by using the buttons to the right. If you would like to receive an e mail each time I post a new blog, please click here. I promise to never send you junk or give your address to anybody else.

Printing on fabric - with the help of a gelatine plate

4/1/2016

 
Happy New Year!
​
Update on the agar agar & gelatine plates
Two weeks after making the gel plates I thought I would let you know how they are looking.
​
Picture

​I am happy to confirm that they have been sitting on a shelf in my garage in a plastic bag and are in perfect condition. They have not melted or gone mouldy and are as good (if not better) as the day I made them. 

​
Quilt Inspiration: Pinterest
Many thanks to everyone who joined the Pinterest board and already added to it - there are some interesting images that may be the spark that leads to a new quilt. Anyone can join at any time - all you need to do is drop me a message and I will send you an invitation to join the board.
Follow claire's board Quilt Inspiration on Pinterest.

​A slightly different way to use the gel plate

​As I had the gel plates out today I decided to use the large plate to help me create a piece of fabric for a new quilt I have in mind.

The quilt needs a long thin piece of fabric with foliage hanging downwards. Whilst I was walking through Sydenham Botanic Park this morning I collected a small bag full of organic bits and bobs from the ground. One of them was a small piece of twig from a beautiful Jacaranda tree which I thought would be perfect for the job. It was the right size and scale and was flexible enough to make the gently curving foliage.
Picture
Picture
Picture
Picture

I decided to use the Jacaranda twig to print the delicate little leaf shapes onto the fabric. As each twiglet (I don't think that is the real name, I just made that up) has 20 or more tiny leaves it was going to be tricky to ink up the whole thing for printing. Normally I would use a sponge or roller to put the ink on - but I knew this would probably damage the delicate little leaves - so I decided to put the ink onto the gel plate paint and then press the leaves gently onto the plate to apply the ink. When I pulled the ink covered twig away from the plate it was ready to print onto the fabric. 
​
Picture
The Jacaranda twig I found at the park
Picture
The Jacaranda twig on the inked up gelli plate
Picture
Gently pressing the twig and leaves onto the plate with a moist sponge
Picture
The inked up twig pressed onto damp fabric
Picture
Covering the twig with paper allowed me to smooth over the whole thing without damaging the leaves or marking the fabric with mucky fingers
Picture
The first print from the twig
Picture
10 minutes later I had lots of prints across the top of the strip of fabric. Just what I had in mind!
I now need to work on this piece of fabric some more, to add more interest and depth. I'm not exactly sure how it will turn out yet, but that is all part of the excitement and fun!

​Thanks for reading.

​
Please feel free to share my website or blog with your friends by using the buttons to the right. If you would like to receive an e mail each time I post a new blog, please click here. I promise to never send you junk or give your address to anybody else.

Agar and gelatine based Gel plates for fantastic mono printng fun

21/12/2015

 
I recently ran two workshops at Midsomer quilting covering a range of exciting techniques to add surface design to fabrics. Both days were great fun - if a little hectic - and lots of beautiful fabric samples were made.

One of the techniques we covered was monoprinting using gelatine plates. I wrote a blog quite a long time ago covering how to make your own reusable 'long-life' gelatine plate (I will put my recipe for a gelatine plate further on in this post), but as I had two ladies at one of the workshops who preferred not to use a product created derived from pork / beef I have been busy trying to perfect a non gelatine based plate. Messing about like this appeals to the chemist side of me, and along the way I have discovered some very interesting things - a few of which I will share for those who are interested!


Picture
Using gelli plates to make mono prints on paper and fabric at Midsomer Quilting
I also received a lovely message from Sue who also attended one of the workshops. She had a problem buying regular gelatine in her local supermarket - they only had Vege-gel in stock.  This is a carrageenan based product - something I can't find here in New Zealand (at the moment!) so for the time being this is my agar agar based recipe. (Note: agar agar is known by many names; China grass, Faluda, Japanese Moss, Ceylon Moss and Bengal Isinglass to name a few) I have done some research into Vege-gel and have some ideas which I list further down that you could try if you want to make a vege gelli plate. I would suggest trying out a just a small quantity  and see how your plate turns out.
​
Picture
Agar-agar powder - I bought mine in my local Korean food shop - but I have seen it in Waitrose, Lakeland, Holland and Barrett and in many small food shops which sell spices etc.
Picture
Carrageenan based gel. This brand (there are others) is more widely available in the big supermarkets - but I have not had experience of using it


My agar agar based gelli  plate recipe

Ingredients:
50g agar agar powder
600ml water (approx 2.5 cups)
2 teaspoons of salt
225ml glycerine (approx 1 cup)

(with these quantities I made one 18cm x 18cm gelli plate and two 18cm x 10cm gelli plates)


 INTERESTING STUFF

Both agar agar and carageenan are derived from red seaweed. On food labels is also known as E406

My 'Telephone Brand' agar is pure agar. No added anything. A little goes a L-O-N-G way!

Vege-gel is a commercially created product made for cullinary use. It is a mixture of carageenan, locust bean gum and other substances. The gum helps to stop the gel being so brittle, and stops the prepared gel from 'weeping' - an important difference from the pure agar agar powder.

A special property of agar is the large difference between the gelling temperature and the melting temperature. (known as hysteresis).
Although it melts at 85 °C (185 °F) it solidifies from 32–40 °C ( 90–104 °F) so – it won’t melt on you on a hot day like gelatine can. A useful property in warm climates.


So - this is what you do...........................
​
Picture
Gather together the ingredients and a few utensils.

Agar agar, glycerine, salt, water
Saucepan, tray to mold your gelli plate, whisk, teaspoon, spatula.


I have added salt to my recipe as I wanted to increase the pH. I read that pH noticeably affects the strength of the agar gel; as the pH decreases, the gel strength weakens.  Having tested this out I have noticed the addition of salt really makes a much less brittle plate.
Picture
Mix the salt into the water and then add the agar agar, whisking with a balloon whisk to make sure all of the powder is wet and incorporated. You don't want any dry lumps on the bottom or around the edges.
I left mine to sit for about 5 minutes to make sure it was nicely mixed and the water absorbed.
Next, put it on a medium heat and stir gently. You will feel the mixture begin to thicken and also turn a little more transparent. (This is difficult to see from the pictures.)
 

A major difference between agar agar and gelatine is that you must heat agar agar to around 90
 °C and boil for 2 minutes before it creates a decent gel. 
Picture

For our purposes we want to plasticise it - and for that we need to stir in glycerine. 

Not only does the glycerine act as a plasticiser, it also acts as a humectant, stopping the agar agar drying out. 
You could now leave the mixture to set. However, I would not recommend it. At this stage the agar agar will be very brittle. Put a little blob on the work surface or a plate and allow to cool - you will see what I mean. It is the weirdest thing - a 'crunchy' gel! If you sweeten it now you can use it for a jelly based desert. ​
Picture
Picture
​Once the glycerine is thoroughly mixed in, pour the hot mixture into your mold. Something with a very smooth, flat base (such as a baking tin or flat bottomed pyrex bowl) is ideal. This tray has a tiny plastic circle in the base, left from when it was molded, so isn't perfect, but I don't mind that much.


​
After about ten minutes gently ease the set gel away from the edges of the container. It will not feel elastic the way gelatine does - but it does have a soft and slightly giving feel.
Then simply turn the container over and allow the gelli plate to fall out onto your hand.


Agar agar sets at room temperature within a few minutes and doesn't need to be put in the fridge at all.

Gelatine needs at least an hour or two to set in a cool place.
​
Agar agar plates do seem to 'weep'. This is known as syneresis. If you can get hold of some Locust Bean Gum (also known as carob gum or E410) a small amount of this is said to stop the problem. I haven't been able to get any - so I am unable to comment. 

​
So - what if you have the sachets of Vege-gel, the Carrageenan based gel?

As I can't get the Vege-gel I can only make some educated guesses, but it sounds promising doesn't it, as the locust bean gum is already in there - so hopefully no syneresis!  

So, this is what I would do.................

Make a small batch with just one packet of the gel using the following recipe as a starting point, and see how it turns out.

1 sachet of Vege-gel powder
200 ml water (approx 3/4 of a cup)
80 ml glycerine (1/3 of a cup)

Make it in the same way as the agar agar plate - making sure you do not add the salt. I can't find any evidence that salt will help - so start by leaving it out. Leave it to set and see what you get.

Use this as your starting point, and then tweak the recipe according to what you see. If the plate is too brittle, try remelting it and adding 50 to 100ml more water and see what happens. By remelting and making small changes you can tweak the recipe to see what works best, then make a bigger plate with your preferred combination of ingredients.

I would love to hear if anyone does try this - as you know, I am a big believer in sharing information - it can only benefit all of us!


​Carrageenan has an unusual reaction when mixed with locust bean gum - 
Kappa carrageenan ( a particular type of carrageenan) shows an unusual synergism with locust bean gum in aqueous gel mixtures. The interaction is marked by a considerable increase in the gel strength, an improvement in water binding capacity, a change in gel texture from brittle to elastic, and a reduction in the degree of syneresis (that is the expulsion of liquid that I am seeing with the agar agar gelli plate). I guess that is why Dr Oetker puts it in his little packets!


             And now for my new and improved gelatine based gel plate recipe..............

​
Ingredients:
40 g gelatine powder (250 bloom)
100 ml warm water 

175 ml glycerine
160 ml Surgical spirit *
(also known as rubbing alcohol or isopropyl alcohol)

If you are unable to purchase isopropyl alcohol, you can substitute plain water. There is very little difference in my experience, but if I can get it I add the alcohol - maybe I am wasting my money!!
Picture

To make the gelatine plate, dissolve the gelatine powder in the water and stir well. Allow to sit for around ten minutes to make sure the gelatine absorbs the water fully. Next, put it into the microwave and zap for 30 seconds of so. BE CAREFUL - this mixture will be hot and WILL BURN YOU. Take it from the microwave and stir in the glycerine and surgical spirit (if using). Stir very well, then return to the microwave for a further minute of so. Keep your eye very carefully on the gelatine mixture. You do not want it to boil. If you do it will not gel properly. 

You are aiming for a clear, golden liquid which has the same consistency as runny honey.

Once it has reached this stage take it carefully from the microwave and pour it into your mold. Place on a flat surface and allow to cool before putting it into the fridge. It is likely to take at least an hour to set - maybe more. 

Once set, remove from the fridge and gently ease the edges of the gelli away from the container. It should feel bouncy and rubbery, and should not want to tear or rip. Turn the container upside down and ease the plate out onto your hand.
​


​MORE INTERESTING STUFF


Gelatine is derived from collagen and is extracted from the skin, bones, and connective tissues of animals such as domesticated cattle, pigs and fish. It is an ingredient in many of the foods we regularly eat. By itself it is flavourless and colourless.

Also known as E441 on food ingredient labels.

Gelatine dissolves best in warm to hot water which is why synchronised swimmers use it to hold their hair in place whilst performing. The cold water does not dissolve the gel! 

The strength of gelatine is measured in a unit called BLOOM. The higher the number, the stronger the gel

Dr Oeker brand  has a rating of 250 bloom.
Knoxx has a rating of 225 bloom.

Sugar, milk and alcohol increase the strength of gelatine (which is why I add the alcohol)


Re-forming the plates
​

One of the things I like about these home made gel plates is that once they get a bit grubby, scratched or otherwise not in tip-top shape, you can cut them up, melt them and form them into a new plate. This also means you can make a big one into several smaller ones, or vice versa. 
Picture


Cut or rip the gel plate you wish to recycle into chunks. This helps speed up the melting process.

Put it into a microwave bowl and heat for around 1 to 2 minutes on full power (I have a 750W microwave). Keep your eye on it and give it a stir after a minute. If you need to add more time do it in short bursts and watch it at all times. You want the mixture to just bubble up but not over the edges.
If it spills over, don't wipe it up - just allow the hot gel to cool then peel it off and stir it back into your molten gel.
Picture


This is almost ready - it is beginning to bubble. Keep your eye on it though - it foams up quite quickly at this stage. 

Also - TAKE CARE - this is hot - at around 90 °C, so it will burn you.

Once ready take it out of the microwave and pour into a new mold. 


​                    Suppliers you may find handy to know about


​


UK


​
​

​​Glycerine and gelatine from MM ingredients

http://mmingredients.co.uk/
​
Glycerine BP (that means pharmaceutical grade) can a be bought more cheaply in chemists (such as Boots) than in supermarkets where you find edible grade glycerine. 

Isopropyl alcohol - also commonly known as 'surgical spirit' or rubbing alohol in the UK. Don't bother with Boots for this one - the thought police have been there and they just give you 'the look' when you ask for it. Last time I tried Superdrug still sell it.


​New Zealand


Glycerine and Isopropyl alcohol from Pure Nature
http://www.purenature.co.nz/
​
Gelatine I buy at the supermarket


I hope you will find some of this info useful should you wish to try making a gelli plate for yourself. I would love to hear if you do try any of the recipes - and have any feedback . They really are quite fun to use and you can make some very beautiful papers and fabrics using them. I will let you know how my agar agar plates hold up - I don't intend putting them in the fridge - so I will see if they go mouldy or not.

Thanks for reading.

​
Please feel free to share my website or blog with your friends by using the buttons to the right. If you would like to receive an e mail each time I post a new blog, please click here. I promise to never send you junk or give your address to anybody else.
    Picture
    Picture
    Picture
    Picture


    Click here if you would like to receive an e mail when I add a new blog post.
                       OR

    Follow my blog with Bloglovin
    Picture

    Categories

    All
    Challenges
    Classes
    Colour
    Cool-ideas
    Courses
    Designing
    Doodling
    Dye
    Exhibitions
    Experimenting
    Festival-of-quilts
    Flower-bowls
    Gelli-plates
    Hanging-sleeves
    How-to
    Inspiration
    Line
    Lino Blocks
    Making
    Marbling
    Mending
    Mono Printing
    Mosaic
    New-products
    Purchasing
    Quilt Gallery
    SAQA
    Sew On The Go
    Sketchbooks
    Software
    Stencils
    Stitch
    Surface Design
    Talks
    Thread
    White Horses
    Workshops
    Yarn Bobming

    Archives

    December 2020
    September 2020
    August 2020
    July 2020
    May 2020
    February 2020
    December 2019
    October 2019
    September 2019
    July 2019
    May 2019
    March 2019
    February 2019
    January 2019
    December 2018
    November 2018
    September 2018
    August 2018
    July 2018
    June 2018
    May 2018
    April 2018
    March 2018
    February 2018
    January 2018
    December 2017
    November 2017
    October 2017
    September 2017
    July 2017
    June 2017
    May 2017
    April 2017
    March 2017
    February 2017
    January 2017
    December 2016
    November 2016
    October 2016
    September 2016
    August 2016
    July 2016
    May 2016
    April 2016
    March 2016
    February 2016
    January 2016
    December 2015
    November 2015
    October 2015
    September 2015
    August 2015
    July 2015
    June 2015
    May 2015
    April 2015
    March 2015
    February 2015
    January 2015
    December 2014
    November 2014
    October 2014
    September 2014
    August 2014
    July 2014
    June 2014
    May 2014
    April 2014
    March 2014

    RSS Feed

    Picture
    Picture
Powered by Create your own unique website with customizable templates.