CLAIRE PASSMORE blog

Using bleach for surface design

5/5/2017

 
I've been working on a new quilt for a while now, for the SAQA 'Made in Europe II' exhibition. I am hoping it will be selected to hang in their gallery at Festival of Quilts later this year. It isn't what you would call a 'pretty' quilt, but it is part of the ongoing work I have made this year in terms of its style and inspiration. 
The quilt itself is of fairly simple construction, (much like the others) being made from irregularly sized rectangles pieced together, so nothing much to write home about there. The fun in this quilt has come from creating a particular effect on the fabric I used. I was aiming for a very specific visual texture, the look of iron metal that has been painted and then blistered by rust beneath the surface. The process of creating it was an interesting journey, so I thought I would share a little of the process I used to create it.

I decided to start with a large piece of commercially dyed black homespun  fabric and then remove some of the colour from it. In the past I have used both formusol and discharge paste to remove colour from fabrics, but neither was readily available to me here, so I got out the bleach did some experimenting to find the best way to get the results I had in mind. As it turns out, it worked brilliantly - so much so, I may never bother with the smelly formusol ever again!

Picture
Interestingly enough, here in New Zealand bleach is comparatively expensive. I have no idea why! In the UK it is dirt cheap. I sought out the least expensive bleach I could find - it turned out to be the thin watery stuff - and tried various ways to thicken it so it would be more controllable.

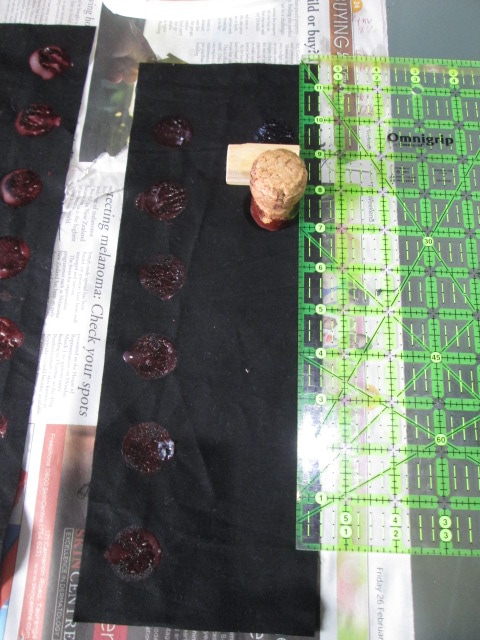
I started with manutex - the sodium alginate seaweed based thickener I usually use with dye: Sadly it was no good. The bleach completely destroyed the viscosity.

Dharma Trading sell a thickener for bleach made by Jacquard (click here to go to their website), but I would have had to import it from the USA and I didn't want to wait for it to arrive, so my search continued.

I found out about fumed silica (click here to find out about this interesting stuff) which would apparently work very well (maybe that is what is in the Jacquard stuff??), but again I would have to order it.

So I decided to try plain old starch - cornflour in water. I mixed two big spoonfuls of cornflour into a little cold water to make a slurry then added another half a cup or so of water and and popped it into the microwave. A few seconds later I had a very thick, gooey transparent paste. I mixed in some thin bleach and gave it all a good stir. It stayed thick and allowed me to draw, dribble and stamp the bleachy paste onto the black fabric.

Picture
Using a cork to stamp the bleachy paste onto black fabric
Picture
After 30 seconds or so the colour of the fabric began to change

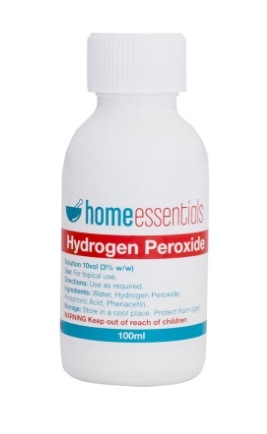
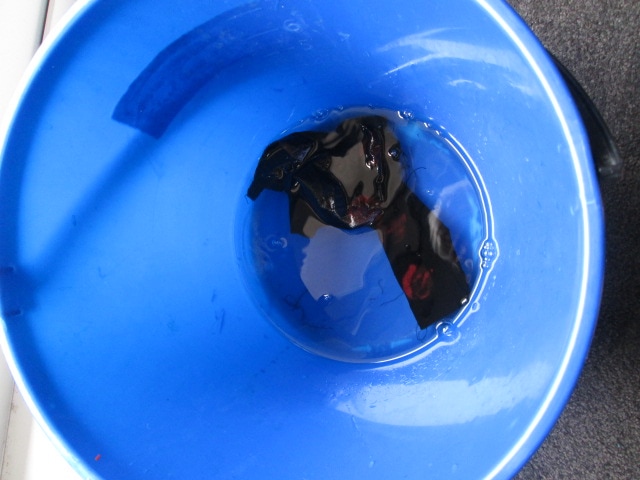
For a cheap and practical solution to my needs the cornflour paste was perfect!

Note: Interestingly, the left over bleachy paste did break down overnight and became thin and runny - so I recommend mixing the the bleach and paste as you need it rather than making a big batch. 

There is some debate as to how much damage bleach does to fabric when used to remove colour (discharge) in this way. To be honest, I have used bleach to remove colour several times in the past, and never had any problems. The fabrics still seem to be in good condition and I see no problems on the horizon. Maybe in 20 or more years there will be - but so far so good. However, in the interest of being thorough I researched how to neutralise the bleach and stop any potential damage.

There are a number of methods various people recommend. The one NOT to do is to dip the discharged fabric into a mixture of vinegar and water. The (faulty) logic goes like this: bleach is alkaline, so neutralise it with an acid. Apparently it is not quite as straightforward as it seems (is anything???) Paula Birch has a very good  explanation of the different methods on her website, which you can find here: www.pburch.net/dyeing/FAQ/neutralizingdischarge.shtml

I opted for the hydrogen peroxide as it was the cheapest and easiest to obtain, not to mention that it seems less noxious. Paula Birch recommends 3% peroxide, which translates to 10 vol if you are more used to that measurement. 

Picture
3% or 10 vol Hydrogen peroxide
Picture
Discharged fabric soaking in the peroxide

(As a long term experiment I have kept 3 pieces of the discharged black fabric. One has not been neutralised at all, just rinsed in water, the second has been neutralised in the dreaded diluted vinegar and the third in peroxide. Time will tell if there is any difference!)

Picture
several of the discharged pieces stitched together
Picture
Further discharging was done by dribbling thickened bleach onto the vertical fabric
​
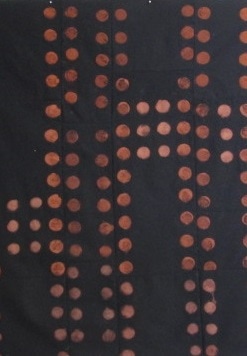
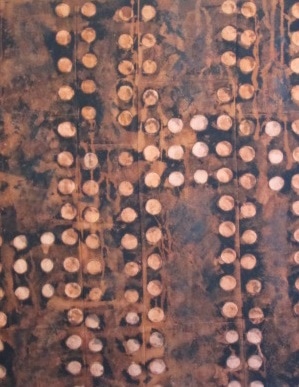
By this stage I was pretty happy with the effect. To me it is beginning to resemble a section of painted iron. I have since added some further fabric and begun the process of hand stitching various knots over the surface to give it even more texture.
Picture
Close up of the discharged fabric

The closing date for entries to the 'Made in Europe II' SAQA exhibition is 31st May - so I had better get on with it!

http://saqacallforentrymadeineurope2.com/

​
Thanks for reading.
​
Please feel free to share my website or blog with your friends by using the buttons to the right. If you would like to receive an e mail each time I post a new blog, please click here. I promise to never send you junk or give your address to anybody else.

Using 'what if ?'questions to help with quilt design

17/5/2016

 
I met a lovely group of very accomplished traditional quilters this week. We spent a great morning together eating cake, swapping stories and sharing our work. It was a pleasure to see such beautifully made quilts. It always makes me smile, but the world over, quilters always seem to ask the same questions...

'How long did it take to make?'; 'Where do you get you ideas?' and 'How do you turn the ideas into quilts' being the top three that seem to get asked most often.  


Question 1: I honestly can't give a good answer - ages seems to be my best guess!

Question 2 is easier: I keep my eyes and ears open, take lots photos and collect nice images from brochures, magazines and the like, then put them into sketchbooks / workbooks to work on later.
​
Question 3: well, this is the big one, isn't it?
​
Picture
Sample sketchbook page for the roses quilts
​A quick Google search  brings up lots of videos, online courses, tutorials, books, and tips for those who would like to make the transition to designing and making their own work. If you want to get technical you can get into the detail of good design and like many other quilters I have written a book about it. One of the main things to do is to stop wondering about it and take the plunge. Try something small and don't worry if it doesn't work out. But that still doesn't answer the question, does it? 

So, here is one quick and easy technique to at least get started, and once you have started it will all seem a lot easier!

Find something that you like. It might be a picture, a cushion,  your auntie's old tea towel,  or maybe a quilt that has particularly caught your eye. It can be anything. You aren't going to make a copy of it - so no need to fret about copyright. (However it might be polite to ask the permission of the original maker if you think it appropriate.) This is going to be your inspiration and you are going to look at it carefully and ask......... 'what if ?'


​To demonstrate what I mean, here are several quilts made using the quilt 'City of Roses' (a quilt I made several years ago) as the starting point and the 'What if ?' questions that I asked.
​
'City of Roses' ©2012 Claire Passmore

What if................ I changed the colours?
This is a pretty straightforward and not terribly original, but it is a good place to start this explanation.
(note: if you are only changing the colours of a quilt then you really do need to ask the permission of the original maker, as it is a copy). So, instead of green and pink I chose blue & purple and peach & pink. Already it is starting to look different. (I will be teaching this quilt and many options for altering it at Midsomer Quilting on 3rd July)
'City of Roses II' ©2016 Claire Passmore

What if.............................. I modified the shape of the flower motifs?
In my sketchbook I tried several different ideas for the rose shapes. There are lots of different variations that could be made. ​I stuck with roses, but I could have easily changed the type of flower to something like a daisy for a really different look.

Picture
Picture
Picture
Picture
Picture

​I decided to change the way I cut the spiral. Instead of a simple straight edged spiral I made the edge bumpy.

Picture
Simple spirals
Picture
Bumpy spirals

What if ....... I changed the way I put the flowers onto the quilt top?
Instead of using raw edge applique I thought about how else could I put flowers onto the fabric. I made a lino cut stamp and also experimented with Derwent Inktense pencils and mono printing

Picture
Derwent Inktense Pencils
Picture
Lino cut rose shape stamp
Picture
mono printing

​What if............. I add some leaves?

Just a few little green leaves add enough contrast to help define the rose shapes on the busy background. They act as visual cues to say 'we are flowers' and stop the rose spirals from appearing as a big scramble.
​
Picture


What if....................... I changed the background?
As you can see from the quilt below I made quite a few changes to the background. You can read more detail about how I made this quilt in an earlier blog post by clicking here, but basically I cut the quilt into 3 and inserted panels of white fabric in between. On the white fabric I wrote a message with dye to tell the story I wanted to convey.
​
'Before They Fade Away' © Claire Passmore 2016
At a glance this quilt looks quite different from the original, but if you look more closely you will see it shares many similarities with 'City of Roses'. There are changes to the size, colour, overall shape of the quilt, as well as a slight change to the flower motifs and the method of adding the flowers. All this has contributed to making this a new and unique design.
​
What if...................... I simplify the quilt?
Instead of having 3 central panels - how about making it smaller and just having just one? Alternatively how about making it larger and having 5?

'Before They Fade Away II' © Claire Passmore 2016

What if ................. I change the colour of the text?
Rather than have black and grey, what would it look like if I had black and rose coloured text?

The answer turned out to be YUK!! Oh well, sometimes these things happen and when they do you get to try another 'what if ?' to solve the problem.....

What if ................. I change the colour of the white outer fabric?
To quieten down that bright pink writing that was now shouting out I tried painting some weak blue and green dyes onto the fabric. It calmed it down a lot and I like the new look.


What if .................. I change the position of the band of appliqued roses?

To be honest, this happened by accident, but is nevertheless another good example of a 'what if !' When I fused  on the flowers I did not notice I had the quilt upside down, but rather than pull them all off I stood back and looked at the quilt to see whether I liked it or not. I liked the new position - so they stayed and were stitched down.
​
'Before They Fade Away III' © Claire Passmore 2016

Do you notice that the central panel isn't completely square in this one? That would be another good avenue to explore -perhaps trying a parallellogram or trapezium shape instead of the square.


What if............... I added a big extra border?
The blue outer border made me wonder whether another border might look good - giving a much more traditional look to the quilt. 
​
'Before They Fade Away IV' © Claire Passmore 2016
Looking at it now I am thinking what if I extend the flowers across the blue border? I might lay a few on to see how it looks.

​
What if.............. I took the text away and replaced it with some quilting lines instead?
For this one I free motion quilted thorny rose stems and leaves and then added a little colour with Derwent Inktense pencils. It has given a light and delicate  look which I like very much.


What if................ I change the quilting pattern?
Instead of the straight line quilting I used a micro stipple to fill the gaps between the leaves. I think this one might be my favourite!

'Before They Fade Away V' © Claire Passmore 2016

That pretty much explains how I approach the whole 'What if' idea, and it has yielded some interesting results. 

Thanks for reading.

​
​Please feel free to share my website or blog with your friends by using the buttons to the right. If you would like to receive an e mail each time I post a new blog, please click here. I promise to never send you junk or give your address to anybody else.
 

On the edge (in more ways than one!!)

9/2/2016

 
It is that time of year again - when I am thinking about making a quilt for the annual challenge set by the Contemporary Quilt Group of the Quilters Guild of the British Isles. This year's theme is 'on the edge'.

​I have participated in this challenge for the past two years and am very pleased to have had my quilt selected for display both times. Lets hope it is third time lucky!

'Forced Removal' an art quilt by Claire Passmore which examines the displacement of people in South Africa under apartheid
Forced Removal
Left: 'Forced Removal' made for the 2014 challenge entitled 'Dislocation'.
​I wrote about this quilt some time ago, and you can read more about it here.

The quilt has also just been accepted to hang in the SAQA exhibition 'My Corner of the World' in the Stratford Perth Museum, Ontario,Canada from May 21st. More information about the exhibition can be found by clicking here.

Right: 'Chrysopoeia' made for the 2015 challenge entitled 'elements'.
You can read more about this quilt here.
Art quilt by Claire Passmore using gold leaf and hand dyed and embelished fabric
Chrysopoeia

​This year  the challenge is going to be a little different, in that the selected quilts wont hang at the Festival of Quilts, but instead will tour various venues across the UK (and possibly further afield). You can find out more about the challenge here. There is still plenty of time if you want to make a quilt to enter into the challenge too. All you need is to be a member of the Contemporary Quilt Group. Go on - what do you have to lose?

If you are thinking of making a quilt, but are not quite sure what you might make, Margaret Cooter recently shared some very helpful ideas with members of the Contemporary Quilt Yahoo Group. I have copied what she wrote below.....

Some further "edge ideas", which leapt off the page at me in the library book I've been reading in fits and starts. They come from pages 125-6 of Ali Smith's "Artful" -

Edges involve extremes. Edges are borders. Edges are very much about identity, about who you are. ...
 
Edge is the difference between one thing and another. It’s the brink. It suggests keenness and it suggests sharpness. It can wound. It can cut. It’s the blade – but it’s the blunt part of the knife too.
 
It’s the place where two sides of a solid thing come together. It means bitterness and it means irritability, edginess, and it means having the edge, having the advantage. It’s something we can go right over. It’s something we have on someone or something when we’re doing better than him or her or it. It’s something we can set teeth on. And if we take the edge off something, we’re making something more pleasant – but we’re also diminishing it.
 
There’s always an edge, in any dialogue, in any exchange. There’s even an edge in monologue, between the speaker and the silent listener. In fact there’s an edge in every meeting, between every thing about to come together with something beyond it.
 
Edges are magic, too; there’s a kind of forbidden magic on the borders of things, always a ceremony of crossing over, even if we ignore it or are unaware of it. In medieval times weddings didn’t take place inside churches but at the door – thresholds as markers of the edge of things and places are loaded, framed spaces through which we pass from one state to another.


Picture
So, with all that in mind, I decided to make a quilt that involved the extremes  of curves and points, hot and cold, and with more edges and corners than a quilt really ought to have. I woke up at 4am on Monday morning and decided that I should start the quilt right there and then!

Picture
This is what I started with

I had a lot of scraps of fabric that had been pre-fused with bondaweb from another project, so I went through them and pulled out some vibrant colours - then sorted them into 'hot' and 'cold'.  To be sure I liked the idea I had in mind  I made a small sample piece to experiment with. This will probably be the piece I submit with my entry, which I hope will help my quilt get selected! 

(I really like the idea of sending a sample piece to the challenge judges. I think it gives them a far better idea of what my quilt looks like and how carefully I have made it. This particular challenge always requires a small 20cm square sample to be submitted so that way the judge(s)  have 3 things to help them make up their minds: the photos of the quilt, the statement I submit explaining what the quilt is all about and the sample to hold. The other thing I like about this challenge is that the quilts are all judged anonymously.)
​
Picture
This is how the sample started
As you can see, I went for sharp points and curvy waves on either side of the quilt, leaving the middle empty - something we don't usually do on a quilt! I cut the pieces free hand, so it came together very quickly.
You can probably also see that I have cut a square from the bottom corner of the sample - that is deliberate - not just the scrap of fabric I chose! I wanted to experiment with making the quilt an irregular shape, and because it has that inside corner I wanted to see how neatly I would be able to finish the edges of the quilt. 
After a bit of thought I decided to try the pillowcase method of stitching the backing fabric to the front of the quilt, then turning the whole thing inside out - just like a pillowcase. I made my 'Cape Dutch' quilt in the same way. (Click here to see it.)
Using this method meant that I needed to put the wadding on the back of the quilt before stitching on the backing - so I decided to stitch the wadding to the front of the quilt with soluble thread first, to make sure it didn't move and wrinkle whilst I turned the quilt right sides out. 
Picture
Wadding temporarily stitched to the back of the quilt with soluble thread

Finally I stitched the backing to the front of the quilt (with right sides together), making sure to leave an opening through which I could turn the quilt.
​
Picture
'On the edge' sample; half done

And here it is. The edges are very neatly turned (no binding now required), the corners have remained nice and pointy, and the whole tiny quilt is nice and flat. I have started some free motion quilting to try out a design and to make sure I know the thread / needle / tension combination for when I come to make the real thing. 

I will keep you posted on how it turns out!


And now for the other thing that has me 'on the edge'...................

It is my own fault, and I should know better, but I opened up my computer this morning to find all the images of my work on the 'Go Easy on the Makeup' quilt have vanished!! Who knows where they have gone? I have spent hours searching for them, trawling the internet to see how I could locate and retrieve them, finding out interesting stuff that I had no idea about with regard to hidden files, overwriting files, retrieving files you deleted years ago, but all to no avail. So, PLEASE PLEASE - if you have anything on your computers which you really would hate to lose forever

​BACK UP YOUR COMPUTER NOW!


I think I might make a quilt about that!!

Thanks for reading.
​
​Please feel free to share my website or blog with your friends by using the buttons to the right. If you would like to receive an e mail each time I post a new blog, please click here. I promise to never send you junk or give your address to anybody else.

Making progress by playing about with different materials

1/2/2016

 
Following on from my last blog post this one continues the story of the 'Going easy on the makeup' quilt. Last time  I mentioned that I would move on to playing with some ideas.  I like this way of developing a quilt,  I find that it is a good way to find out what works and what doesn't.
So, this post is more of a  rambling running commentary of what  I was thinking and what I tried out next.

Picture
The black-line face - now quilted
Picture
A bit weird I know! This is a trial overlay for the makeup quilt I am working on
I have already talked about the black and white face which forms the main structure of the quilt, so I wont go into detail here. However just glancing back at the notes I recorded when using the toolkit  I knew that I wanted to keep the face simple - just black and white with no major detail. 
Picture
Ideas for the use of line

Once that was completed I then needed to think about how I was going to add the 'overdone' makeup to the quilt top. I was reluctant to add it on top of the black and white, as  I wanted to somehow preserve the beauty of the naked face, as well as show the 'mask' of makeup that can cover it. My first idea was to have a floating voile layer over the face, with the makeup shapes on that.
Picture
Ideas for the use of shapes

I had already begun to think of the shapes I would use which were recorded in my sketchbook, so I needed to work out how to create these on fabric. My first ideas were either to use paint, dye, more layers of organza and/or thread.
Picture

For the lips I decided to cut a paper stencil and try it with Markal oil stick and acrylic paint. I also wanted to try fusing a piece of red organza onto the voile and the machine stitching over to add a little detail. The results were varied, but each gave a different effect. The Markal did not show particularly well, so I discounted that idea immediately. 
Picture
Freezer paper stencil and acrylic paint applied with a sponge
Picture
Markal oil stick on the left, acrylic paint on the right
Picture
Red organza and machine stitch
Next for consideration were the eyes. I have fond memories from my childhood of my grandmother wearing a generous application of emerald green eyeshadow - a little like the model to the right! (I found this image on Wikimedia commons, and so I am able to use it here without fear of infringing anyone's copyright. However, I do need to acknowledge the following information: Maquillaje by Eneas De Troya from Mexico City, México - Maquillaje Uploaded by russavia. Licensed under CC BY 2.0 via Wikimedia Commons - https://goo.gl/SvrgpQ

It seems that bold, colourful eyeshadow has made something of a comeback at the moment - and peacock blue, vibrant yellow and sparkling emerald are once again being caked onto the eyelids of many people. Added to that an outrageously long set of lashes seems to finish off the 'look'. 
This is what I wanted to try and add next.
Picture
Picture
Green/blue organza fused to the voile and stitched over with black 30 wt thread - nice and thick!
Picture
Look at those lashes!

I hope you are getting the general idea - lots of trying out different ways to achieve what I have in mind.

The benefit of this is that I can use the samples to choose the best option for the quilt. I also get to explore different ways to use the materials I already have and find out what works and what doesn't. What I discovered here is that acrylic paint takes surprisingly well onto voile - and perhaps unsurprisingly, Markal oil sticks don't. 
I also discovered that even with 2 layers of soluble stabiliser, machine stitching through one or two layers of voile puckers the fabric too much for what I was trying to achieve. I tried hooping the voile - but even with very careful hooping,  hoop burn added to the distortion of the fabric.

After a lot of trials and thinking my solution was to use a combination of fused organza and hand stitch with embroidery thread, rather than use the machine. This is how the eyes turned out. I hope you agree that the effect works and the time I took to experiment with different ideas has paid off. 

Picture
Hand embroidery on voile over the black and white face quilt

Scroll down to see how it turned out.
Picture
'Beauty' by Claire Passmore ©2016


This isn't quite the finished quilt - I am keeping that a secret until the exhibition it is hopefully going to be part of in June. 

UNFOLDING STORIES 2 - An exhibition with Contemporary Quilters West, at Rook Lane Chapel, Frome, Somerset, June 24 - July 5, 2016. I hope to see you there!


Thanks for reading. I hope you have enjoyed sharing in the progress of this quilt.
​
Please feel free to share my website or blog with your friends by using the buttons to the right. If you would like to receive an e mail each time I post a new blog, please click here. I promise to never send you junk or give your address to anybody else.

A bit of free motion fun for Christmas

30/11/2015

 
Picture
Having messed about with raw edged leaves last week I had some ideas to make a few pretty things for Christmas. The holly leaves looked particularly nice, so I soaked a few more oddments of fabric in the Terial Magic stiffener and cut out a few more leaves; small, medium and large.
​
Picture
Stiffened fabric scraps (starch or Terial Magic) cut into holly leaf shapes.
Picture
Put the leaves into a little stack
Picture
Add another piece of fabric cut into the shape of mistletoe....

​I placed the holly leaf shapes on top of each other and finally put the little pile onto a piece of green felt. I then free motion stitched the leaves down and did a bit more stitching around the edge to look like berries. Then I cut it out. Looks ok, don't you think?
​

Picture
All looking good.... a little bit of fraying on the light green fabric - that was the piece I stiffened with starch. Maybe the Terial Magic would have been better for this particular fabric.
Next I cut a piece of white felt into a rectangular 'tag' shape and laid the mistletoe and felt leaf onto it and then stitched that down too.
Picture
White felt rectangle (with the corners cut off)
Picture
Free motion stitch the pieces onto the felt. No need to be precise!
Picture
Add a few beads and a little acrylic paint.
Ta da!!!
Picture
I added a dark green layer of felt for a backing and then free motion quilted a simple squiggle with silver thread all over the white felt.

And then I got carried away..........................

​​

Why not try out something similar? It was lots of fun and all I used was a few cotton fabric scraps and some oddments of felt.

​Thanks for looking.
​
​Please feel free to share my website or blog with your friends by using the buttons to the right. If you would like to receive an e mail each time I post a new blog, please click here. I promise to never send you junk or give your address to anybody else.

Trying out a new stabilising product: Terial Magic

23/11/2015

 
I was at Midsomer Quilting last week, teaching my 'Doodle Birds' workshop (more on that later) and was given a present by De - a new product to try out. It is called 'Terial Magic', and I must admit, I had never heard of it until now.

Terial Magic is a slightly sticky liquid that comes in an easy to use spray bottle. According to the instructions it needs to be sprayed onto fabric and allowed to dry naturally for 15 or so minutes, and then ironed.

Once dry it is supposed to make the fabric stiff (like when you use starch) and non fraying. Stiff enough, it is claimed, that no further stabiliser is required for things like machine embroidery or 3D work.

Picture
Trying out Terial Magic

To see how it worked I took a few pieces of cotton quilting fabric from my scraps bag and sprayed them until they were moist. Following the demonstration on the Terial Magic website (click here) I put my fabric into a small tub and sprayed it. Once it was quite moist I squished it about a bit to make sure the liquid had penetrated throughout the whole piece, and then squeezed out the excess liquid (I put this back into my bottle).

Picture
Spray the dry fabric with Terial Magic in a small bowl until saturated
Picture
Squeeze out the excess slightly sticky liquid. I put this back into my bottle

After smoothing it out I left it to air dry on a flat surface for the 15 minutes stated. After this time it was still very wet - it was a winter's day in the UK, so not very warm - so I left it for around another 20 minutes of so, by which time it was only just damp. Obviously the temperature plays an important part in this, so use your judgment.
NOTE:At this stage the fabric was slightly stiff, but not noticeably different to when I had started.

I then took the fabric pieces and ironed them, as per the instructions. I used a hot  iron directly on the fabric (no ironing sheet) and the heat obviously had an effect, as the fabrics became smooth, very crisp and stiff. There was no residue on the iron and no flakes or 'gunge' on the fabric. 
Picture
Pressing the damp fabric with a hot iron. It became very crisp - like a piece of thin card

Comparison with starch

Up to this point I was starting to wonder why I would use this product instead of starch. I do not often use starch on my fabric, but when I do I usually mix my own and apply it in the same way.

I applied the homemade spray starch to the fabric in the same way as I did the Terial Magic and left it to dry until just damp and  then ironed the fabric. It was slightly stiff, but nowhere near as stiff as with the Terial Magic.
To try and get a stiffer result I sprayed the fabric once again with the starch mixture, but this time I ironed it dry straight away. This made a big difference and the fabric now had very similar crispness and stiffness to the Terial Magic soaked fabric. 

There were, however, two things I noticed which were slightly different when using the starch.
1. Small flakey particles of starch came to the surface of the fabric, which easily scorched
2. The sole plate on my iron got covered in a thin film of starch, which also scorched. Not the end of the world, but it meant I had to clean the sole plate of my iron which is always a pain.


My spray starch recipe:

50ml tap water
200ml  hot water

1 to 3 teaspoons of cornflour

Mix the cornflour and the
cold water to a smooth paste.
Add the hot water and whisk / shake until well mixed.
Pour into a spray bottle.

​According to the blurb that comes with Terial Magic these are two of the drawbacks of using starch. Another thing they mention is that insects like to eat the starch and therefore your fabric. I must say that I have never noticed this, but I am not a regular 'starch user'(!) so I am not able to say whether this is an issue or not. They also say the stiffener in Terial Magic is not edible by insects - so if this is important to you it may influence your choice.

What to do with this stiffened fabric

​The stiffened fabric was interesting.
It folds crisply - just like thin card, so if you have a project that needs firm creases or needs to stand without support this may be a good product to use. 

I tried a few origami ideas...​
Picture
This is a single layer of fabric folded to make a star
Picture
A single layer of fabric folded to make a dress. Next to it is a banknote I was once given, also folded into a dress shape
Picture
Folded hexie yoyo - easy once you have got the hang of it! (trouble is it took me an hour to get the hang if it)
The crispness of the fabric made it perfect for folding techniques. I can imagine it would also be particularly good when piecing small, fiddly shapes or pieces cut on a bias.

Origami links for the above 
For the folded dress, click here
For the yo-yo hexie, click here


​Next I tried some needle turn applique
Picture
1. The stiff fabric was easy to cut. I chose this fabric as it was particularly bad at fraying prior to treatment
Picture
4. The needle and thread slipped through the fabric easily - it was a pleasure to stitch
Picture
6. Fabric soaked in starch - cut well and no noticeable fraying
Picture
2. After cutting I finger pressed the seam allowance over. The crease stayed perfectly


The green fabric stiffened with the Terrial Magic did not fray at all and was very easy to stitch. I was pleased to note that there was no resistance to the needle from the product in the fabric


To make a fair comparison I repeated the process with a piece of yellow fabric soaked in starch. It cut well and creased well, just the same as the Terial Magic soaked fabric. The only difference I noticed was that when I came to stitch the needle and thread were not at all easy to pass through the fabric. It was much more difficult and made hard work of a simple job.
Picture
3. I pinned the leaf shape in place ready to stitch down
Picture
5. The finished leaf shape stitched down
Picture
7. The two leaf shapes; the green fabric was easy to stitch, the yellow much more difficult.

And then I tried stitching some raw edged leave to a piece of fabric
​​
Picture
Holly leaf shapes cut from Terial Magic soaked fabric
Picture
Place 12 in a circle, and stitch down the centre of each leaf. It looks better in real life than this photo!
The stiffness of the leaves made it easy to position them on the fabric and the raw edges, once again, did not fray.

The blurb also says you can use the stiffened fabric for machine embroidery without and further stabiliser. As I don't have an embroidery unit I can't let you know about that - but if anyone does and has experience of this product it would be good to find out if the claims are true. 

So - do I like Terial Magic? Yes, I think I do. It is similar to starch, but has a nicer feel, doesn't gunk up my iron and the treated fabric is nicer to stitch. I don't often need fabric that is stiff or crisp, but when I do I think this product would be a useful addition to the tools I already use. Thanks De - when I run out I will be buying another bottle from you!


Now for those Doodle birds!
These are a few pictures I took during the workshop at Midsomer quilting last weekend. Brilliant aren't they?

And how about these two amazing Doodle Poodles?  My thanks to Chris D who was so inspired when she got home that she made these two fantastic pieces. I just love them! Thanks for sharing them, Chris, I think you have cracked free motion quilting!
Picture
Picture
I hope you have enjoyed seeing all this brilliant free motion work. Thanks for looking.
​
Please feel free to share my website or blog with your friends by using the buttons to the right. If you would like to receive an e mail each time I post a new blog, please click here. I promise to never send you junk or give your address to anybody else.

Free motion quilting samples - practice makes perfect, but what to do with all those samples?

28/9/2015

 
In a few weeks time I will be teaching my free motion quilting workshop at Midsomer Quilting not far away in Somerset. 
I haven't taught this workshop in the UK before, so to celebrate I have made some new samples of my favourite birds and created some nice things with them.

As you may know, I always like to make samples of things before I start a bigger project. I like to see how new fabrics or paints behave before I launch into a big piece and become familiar with how they behave. It may seem like an extra step in an already long process, but time and again I have been glad I did spend the time exploring and experimenting. I personally find it saves a lot of time and frustration in the long run!


Picture
The (old) view from my window
As you may also know, I just love flamingos. Those feathery, powder-pink balls on such skinny legs always make me smile.  I have fond memories of watching them from my window when I lived in CapeTown. This is a close up of the quilt I made several years ago. 
Picture
Close up of my Flamingo quilt
Using some of the sketches I made of the flamingos as a starting point, I drew a new, quirky flamingo and filled it with some doodled patterns. I then transferred it onto a piece of plain white poplin  fabric and free motion stitched the whole thing. Once it was finished I had fun using my newly mixed fabric paints (using acrylic paint and fabric medium, as I explained last week) to finish the quirky doodled flamingo.
​
Picture
Start with a little purple acrylic paint
Picture
Add some pink close to the head
Picture
Shade by adding fabric medium and spreading the paint more thinly
Picture
Start in the centre with a tiny amount of paint mixed with lots of fabric medium
Picture
Then gradually add more pink paint to achieve a darker value
The paint and fabric medium mix worked very well. As well as making the paint soft, buttery and easy to work with, it also extends the drying time of the paint too, meaning I have more time to blend colours together to get that nice graduated look. This is how the new flamingo turned out. 
​
Picture
The finished flamingo Doodle Bird


Which brings me on to the next point..... what do I with all these samples? 
It is an important thing to consider.  I live in a fairly small house, and space to store things is at a premium. I would love to have the equivalent of a walk in wardrobe of fabrics, equipment, sketchbooks and samples - but until I win the lottery and buy the old textile mill that is in my town, and convert it into a home and studio (pipe dream!!) I need a better plan. So, what I try and do is convert them into something both pretty and useful. Cushions, sketchbook covers, bags, storage pouches and so on. You get the idea.

And this is what the little flamingo has been converted into. I am planning on storing my samples for the doodle bird workshop in it - so everything will be neat and tidy and all in one place. How about that for organised?!
​
Picture
Doodle Bag!
Picture
Picture


My thanks go to Kati Spencer, whose excellent instructions I followed to make the bag. You can find Kati's excellent tutorial here on her blog 'from the blue chair'.

Here is the link, should you wish to make a similar bag.  ​http://www.fromthebluechair.com/2013/03/messenger-bag-supply-list.html


I must say, I am really looking forward to running the Doodle Bird workshop in November. I have 16 new full sized Doodle Birds to choose from, and several smaller bird projects for those who are new to free motion quilting. As well as developing or improving your free motion quilting skills, you will create beautiful quilted squares which you can transform into other projects, like the bag above, or perhaps a cushion or book cover. If you get completely hooked you could even make all 16 and turn them into a bed quilt - something a bit like this.

Picture
The original Doodle Birds quilt I made in 2012
​The workshop is on the 14th November at Midsomer Quilting. To find out more either contact De de@midsomerq.com or myself, or see the brochure on the workshop by clicking here. 

Thanks for reading. Happy doodling!

Please feel free to share my website or blog with your friends by using the buttons to the right. If you would like to receive an e mail each time I post a new blog, please click here. I promise to never send you junk or give your address to anybody else

Making your own fabric paints with fabric medium and acrylic paint

20/9/2015


Fabric paints two ways: ready made fabric paints or mix your own....

One of the ways I like to add colour to fabric is with fabric paint. There are lots of brands on the market, all at varying prices. 

'Pebeo', 'Jacquard', 'Dala' and 'Golden' are brands that are readily available. They each give bright, long-lasting colour, leave the fabric with a soft hand (that is, not a stiff or plastic-like feeling on the surface of the fabric), can be heat set easily with an iron and are washable. I have lots of all of these brands and find them equally good. 

So far, so good. The main problem I find with all of these is that they are mostly sold in little pots and can work out to be rather expensive.


Picture
Picture
Picture
Picture

Happily, however, there is an alternative. You can purchase something called FABRIC MEDIUM to mix with ordinary artists acrylic paints which transforms them into fabric paints. Again, there are lots of fabric mediums on the market. In the past I have used 'Golden GAC 900', 'Dala Waterproofing Medium' and 'Liquitex Fabric Medium' very successfully. 
Picture
Picture
Picture

One of the major benefits of using fabric medium is that you can mix it with acrylic paints - and these come in a huge variety of colours, qualities and sizes and are readily available online and on the high street and even in many large supermarkets. For me, this means I have so much more choice.

Another benefit is simply down to cost. Generally speaking, artists acrylic paints are not very expensive and come in a range of sizes from small tube to bucket-sized. Prices vary according to whether you buy student quality, which I find is usually fine, or artists quality which has more pigment and often goes further but is more expensive. 


Picture
Picture
Picture
Picture
Which brings me on to why I am talking about this today. 


I ran out of fabric medium on Friday!


So I took a look online to find some more, and I came across what looked like a bargain - so I bought some to try out. It is a new manufacturer of fabric medium for me. It is made by Berol and comes in a 1 or 5 litre bottle, with 1 litre costing £5 and £6 depending on where you buy it. I purchased mine from Yellow Moon as they were having a promotion and free shipping. It arrived the very next day, which was fabulous. 

I have used it over the weekend on a variety of samples and have found it to be of very good quality. It mixes well with all of the brands of paints I have tried so far and has been great for painting onto fabric with a brush, using with stencils and with hand carved stamp blocks. 
Picture

Here are some of the samples of doodle quilting that I painted 
Picture
Flat F4 brush
Picture
Round R6 brush
Picture
Round R00 brush
Picture

The final thing you need to do when using paint on fabric is to fix it in some way.  If you do not fix the paints you risk them coming off or running when the fabric becomes damp or wet for any reason and after all your work that is probably the last thing you want - so do not forget this last and vital step.

It is usually as simple as ironing the fabric for a certain length of time at a given temperature. There are other ways, however, which I have summarised below. Just be sure to always read and follow the instructions on the particular product you are using.

  • Iron for 3-5 minutes with a medium-hot iron on the reverse side (side opposite of the application). On delicate fabrics where lower heat levels must be used, a longer ironing time will be necessary.
  • Oven: Cure for 1-2 minutes at 300F; 4 minutes at 250F.
  • Clothes / Tumble dryer: Commercial: medium-high temperature for 20-40 minutes. Household: high temperature for 40-50 minutes.

Thanks for reading.

Please feel free to share my website or blog with your friends by using the buttons to the right. If you would like to receive an e mail each time I post a new blog, please click here. I promise to never send you junk or give your address to anybody else.

When you are searching for inspiration, try looking at everyday things

4/9/2015

 
Picture

When you need inspiration....

It happens from time to time - that 'what next' feeling. 

After finishing the flower bowls that have kept me busy recently I had a few days space to fill this week. Not long enough to settle down and get into something big, but too long to just let it slip by. It was one of those 'what next?' moments.

I got out a few of my sketchbooks and looked through them for something to inspire me. I didn't find anything that I wanted to tackle at the moment, but I was reminded of some techniques I haven't used for a while. 


To help me decide on a motif to use I decided to take a walk and look what I found! I have been noticing all kinds of fruit in the hedgerows along the sides of the road these past few weeks - it amazes me that people don't stop and pick a little. So far I have had blackberries (a firm favourite), plums and now apples. There were lots on the floor that were perfect for cooking - so I gathered up my skirt and chose about 20 of the nicest ones to take home. 

As well as making a delicious crumble and some apple sauce for the freezer, I saved a few of the mangiest ones and started a new sketchbook. Problem solved!


So far the sketchbook only has a few pages - and is likely to stay that way for a while - but it is the beginning of something that may (or may not) end up as a series of quilts one day. Nevertheless, it will be enjoyable to create and will hopefully give me the opportunity to try out lots ideas, old and new, that I can use in the future. 

Here is a flip book of some of the pages.

Why not try a few ideas in a sketchbook of your own?


Thanks for reading.

Please feel free to share my website or blog with your friends by using the buttons to the right. If you would like to receive an e mail each time I post a new blog, please click here. I promise to never send you junk or give your address to anybody else.

Sun printing with soy milk

17/8/2015


South African soy and sunshine

Picture


It has been a long time since I started messing about with this new idea, but this weekend I decided to finish what I started several months ago. Before I left South Africa I started an experiment with soy milk , paint and sunshine - and what follows is how it turned out.


Picture

Now I know sun printing is not new - I have tried this fun technique before, when I made the small quilt named 'A Faithful Hand' (above right) using Pebeo Setacolor paints
. When I first tried the technique I was amazed at how simple yet effective it was.  Just by covering fabric with the paint then allowing it to dry in the sun with a solid object placed on the fabric (in this case a stencil I cut from cardboard) I created a beautiful piece of fabric to work with.  However, I discovered one major problem with the paints once the piece was finished. Although I had heat set the fabric (well, I thought I had heat set the fabric), when I came to block the quilt the mist of water I sprayed over the surface sent the blue and orange paint running in all directions. As you can imagine - after completing all that stitching I was not happy!!!!

Lesson learned: Follow the manufacturer's instructions to the letter when you heat set your work, and then check and double check to ensure it is heat set properly before you continue. 

Anyway, after that misadventure, my love affair with the process stopped. Until now.

Thinking back to some of the things I have seen on my travels, I have seen soy milk used as a binder when used with mud (yes, mud!) to colour fabric. Not understanding the process, I began researching the use of mud and soy as a traditional method of adding colour to fabric. As it turns out  the soy milk acts as a very effective 'binder' - in a similar way that a mordant works with other natural dyes. Apparently that is why babies that are fed on soy milk have bibs that never come clean!

The thing with soy milk is that it needs time to do its job - and the longer you leave it, the better the results. So, back in March, before I left the South African sunshine, I decided to try out a new idea.....


sun dyeing with paint and soy milk

Picture
Mixing the paints - soy milk and acrylic paint
Picture
Fabric covered in the soy milk & paint mixture then covered with a windmill shaped mask
Picture
work in progress

The process is pretty simple. All you do it mix the acrylic paint with soy milk until you get a milk-like consistency. You then  brush or sponge the mixture onto damp fabric (I used 100% cotton seed cloth) and cover part of the fabric with a mask. I used a mixture of things - metal letters, foam shapes and wooden die cuts, but you could use anything - natural items like leaves and grasses are very popular. You then leave the whole lot to dry in the sun. 

The way it works is this: the heat from the sun dries the uncovered fabric more quickly than that which is covered by the mask. This dry uncovered fabric then pulls the moisture out from under the mask (you may be familiar with the term 'wicking' it away) and at the same time takes the pigment from the paint with it. Thus, the paint and soy mix is physically drawn out from underneath the mask, leaving a whitish area the same shape as the mask. Clever eh?

This is exactly the same process as you would use if you used the Pebeo paints directly from the pot. The next part, however, is where the properties of the soy milk come in.


Note
It is not the UV from the sun that is important - just the heat. So, if you do not live in a very sunny place, just put your fabric under a heat lamp, taking care to ensure it cannot burn.
Once the fabric is completely dry (and now a little crispy) you remove the mask and you will find a blank patch on the fabric where it was placed. So far so good - the sun print has now been created. With the Pebeo paints you now need to iron the fabric to fix the paint  - that is where it went wrong for me. Because I was trying the soy milk binder the proteins in the soy milk needed time to naturally break down and bind with the fabric, so I needed to pack them away and wait. I believe 3 or so weeks is long enough - but I have not experimented with this to discover. In my case I have waited a little over 4 months (time flies!!) and this is what I discovered.

When I plunged the fabrics into hot soapy water nothing happened! No bleeding of colour, no paint washing out into the water,  NOTHING!! The colour was now completely fixed. Whether that is due 100% to the soy milk I do not know for certain, but what I do know is that it worked really well. Here are some of the results. 

Picture
Picture
Picture
So - some interesting discoveries. I am not sure I will follow through with this much further at the moment - but it is always interesting to explore ideas and experiment with different ways to do things. Who knows what might come of it in the future, and what soy milk could also be mixed with to yield interesting fabric to work with.

Thanks for reading.


Please feel free to share my website or blog with your friends by using the buttons to the right. If you would like to receive an e mail each time I post a new blog, please clickhere. I promise to never send you junk or give your address to anybody else.

<<Previous
    Picture
    Picture
    Picture
    Picture


    Click here if you would like to receive an e mail when I add a new blog post.
                       OR

    Follow my blog with Bloglovin
    Picture

    Categories

    All
    Challenges
    Classes
    Colour
    Cool-ideas
    Courses
    Designing
    Doodling
    Dye
    Exhibitions
    Experimenting
    Festival-of-quilts
    Flower-bowls
    Gelli-plates
    Hanging-sleeves
    How-to
    Inspiration
    Line
    Lino Blocks
    Making
    Marbling
    Mending
    Mono Printing
    Mosaic
    New-products
    Purchasing
    Quilt Gallery
    SAQA
    Sew On The Go
    Sketchbooks
    Software
    Stencils
    Stitch
    Surface Design
    Talks
    Thread
    White Horses
    Workshops
    Yarn Bobming

    Archives

    December 2020
    September 2020
    August 2020
    July 2020
    May 2020
    February 2020
    December 2019
    October 2019
    September 2019
    July 2019
    May 2019
    March 2019
    February 2019
    January 2019
    December 2018
    November 2018
    September 2018
    August 2018
    July 2018
    June 2018
    May 2018
    April 2018
    March 2018
    February 2018
    January 2018
    December 2017
    November 2017
    October 2017
    September 2017
    July 2017
    June 2017
    May 2017
    April 2017
    March 2017
    February 2017
    January 2017
    December 2016
    November 2016
    October 2016
    September 2016
    August 2016
    July 2016
    May 2016
    April 2016
    March 2016
    February 2016
    January 2016
    December 2015
    November 2015
    October 2015
    September 2015
    August 2015
    July 2015
    June 2015
    May 2015
    April 2015
    March 2015
    February 2015
    January 2015
    December 2014
    November 2014
    October 2014
    September 2014
    August 2014
    July 2014
    June 2014
    May 2014
    April 2014
    March 2014

    RSS Feed

    Picture
    Picture
Powered by Create your own unique website with customizable templates.