I can't remember the last time I made a bed quilt; it has to be at least 5 years, probably longer. So, when I decided to make this one I came to it fresh - and enjoyed every minute of it!
It is a single bed size, so not too hard and made using the 'quilt-as-you-go' method, which meant that the intense free motion quilting I used on each of the panels was easy to handle on my small domestic Singer sewing machine.
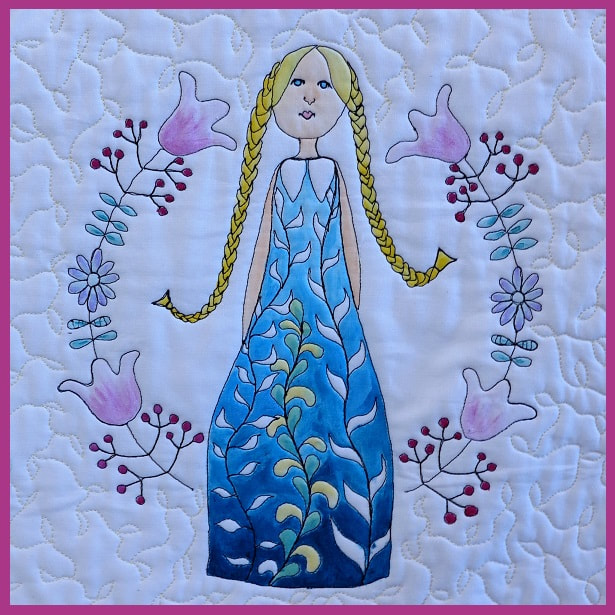
 The quilt is currently hanging at Midsomer Quilting in Somerset, UK, and will be there until May 19th when I will be teaching how to make these pretty free motion quilted blocks. I designed 10 dolls and a very special horse for the workshop. The dolls are based on traditional painted wooden dolls from Russia, Japan and Scandinavia. The idea for the first doll came from the annual Midsomer Quilting 12 x 12 challenge in 2017, entitled 'Where in the World?' After some thought I decided to make a Russian Matryoshka Doll, and if you went to the exhibition you might recognise her.
These Russian dolls are an unmistakable symbol of Russian character, culture and country, an emotional feeling summarised as 'Russian Soul'. As I was researched the history of these elaborately decorated dolls I discovered a lot about similar dolls from other countries, and I was surprised to discover that the tradition of carving these so called 'Matryoshka' dolls (often mistakenly referred to as 'Babushka' - dolls) is not quite as old as I thought.
The first nesting Russian doll set was carved 1890 and has been atributed to a man named Vasily Zvyozdochkinn who made a set using a design by Sergey Malyutin, a folk craft painter. Traditionally the hollow outermost doll in the set is a maternal woman in traditional dress, known as a sarafan. Inside her hollow interior are a succession of smaller and smaller hollow dolls which can be male or female and the smallest, innermost doll is typically a baby turned from a single piece of wood.
Much of the artistry of these beautiful dolls is seen in their painting. Long dark winters are the perfect time for farmers and other artisans to spend time creating beautifully ornate masterpieces. Their decoration often follows a theme; fairy tale characters and regional traditional costume are popular. The name Matryoshka, written in Cyrillic as матрёшка, translates literally as 'little matron', and is a diminutive form of the Russian first name 'Matryona' or 'Matriosha' (Матрёна). This name is very popular in rural parts and is associated with the matriarchs of a big Russian family, having its origins in the the word mother (mama). I was interested to discover that although in the west we frequently call them 'Babushka' or Grandmother dolls, this is actually incorrect - they are not grandmothers at all! For people of Slavic origin Matryoshka is a symbol of motherhood and the fertility of nature, which why the traditional dolls take the form of a curvy, female shape, expressing the ancient symbol of motherhood. Some say that in ancient Russian tradition dolls were made without painted faces and did not represent living persons because it was believed that evil spirits could settle inside it. Others say that Matryoshka dolls were given to newborns to wish them a long and prosperous life - something that echoes with similar dolls in other cultures.
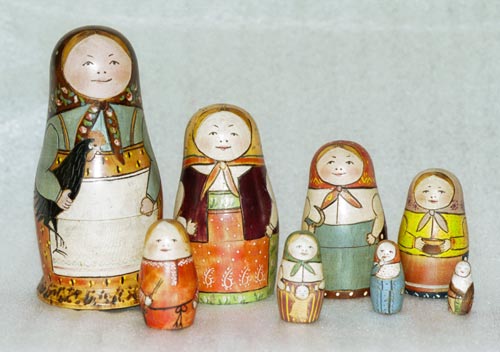
Photo credit: public domain: Doll carved by Zvezdochkin, painted by Malyutin - Sergiev Posad Museum of Toys, Russia, https://commons.wikimedia.org/w/index.php?curid=5051554
Ten years after the first Russian Matryoshka was created, the doll was presented to an international audience at the Exposition Universelle (World’s Fair) in Paris, where it won a bronze medal. The doll was a hit, quickly gaining popularity, and soon began production in multiple regions in Russia. By the 1930s, the dolls were being factory produced and shipped around the world.
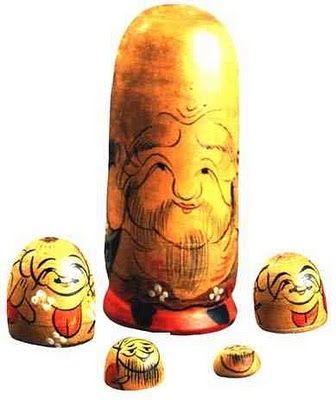
Another more ancient nesting doll set, very likely to have influenced the creation of these Russian dolls, came from Japan. It is believed that the forerunner of the Matryoshka was brought from the Island of Honshu, Japan’s main island. Japanese wooden dolls representing Shichi-fuku-jin, the Seven Gods of Fortune are thought to have inspired Vasily Zvyozdochkinn. This ancient Japanese set of dolls has the largest outer doll taking the form of Fukuoka, a kindly, old, pot bellied Buddhist monk who symbolised happiness and longevity . Inside were 6 further dolls. Each of the dolls took the form of one of the 7 lucky gods from Japanese mythology.
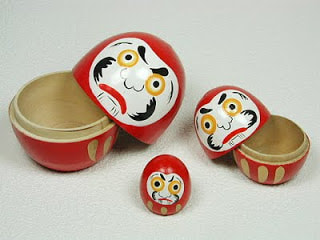
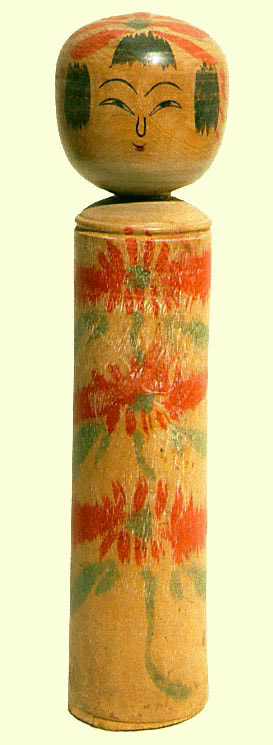
Even older still are traditional Japanese Kokeshi dolls, originaing from north easern Japan. There are 11 traditional styles and are thought to have originated in the 1600's as souveniers for those visiting the spas in this part of Japan. Next are the 'lucky' Daruma dolls modelled after Bodhidharma, the founder of the Zen tradition of Buddhism. These dolls, though typically red and depicting a bearded man (Dharma), vary in color and design depending on region and artist. Though considered a toy by some, Daruma has a design that is rich in symbolism and is regarded more as a talisman of good luck to the Japanese.
A modern twist on these Japanese dolls is the 'Creative Kokeshi Dolll'. are probably more popular in the west. They developed as an art form since the 2nd World War and retain the limbless kokeshi characteristic. However, they are more contemporary in their design with more shapely bodies, added features such as hair, as well as colourful exquisitely patterned kimono. Creative kokeshi are 'created' by artists, and have features and styles unique to their own particular artist or creator. The majority of creative kokeshi are made in Gunma prefecture.
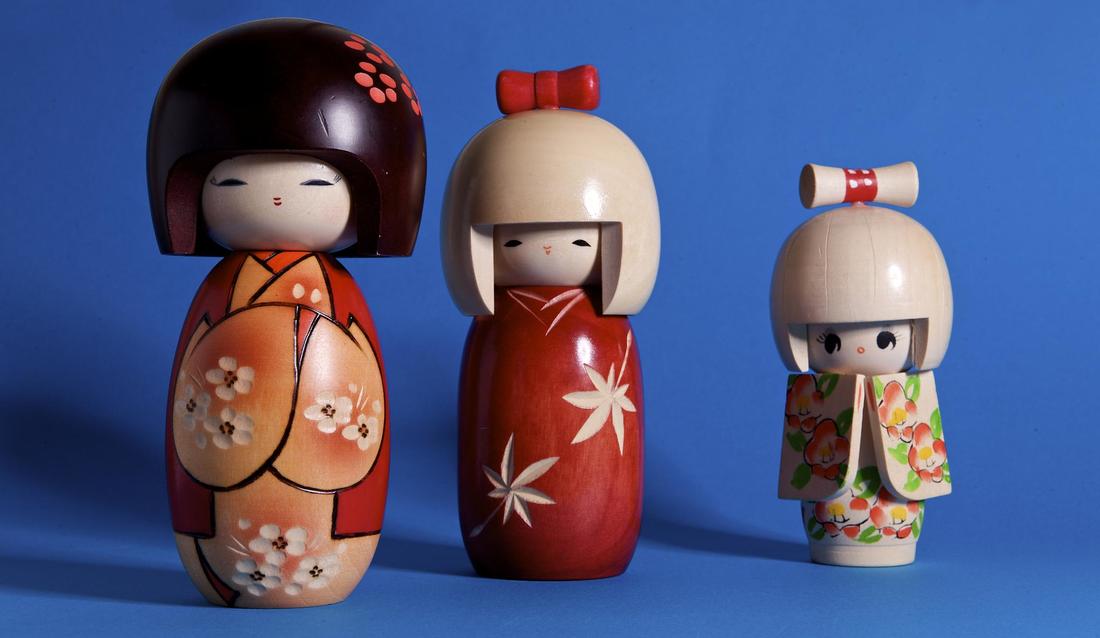
 
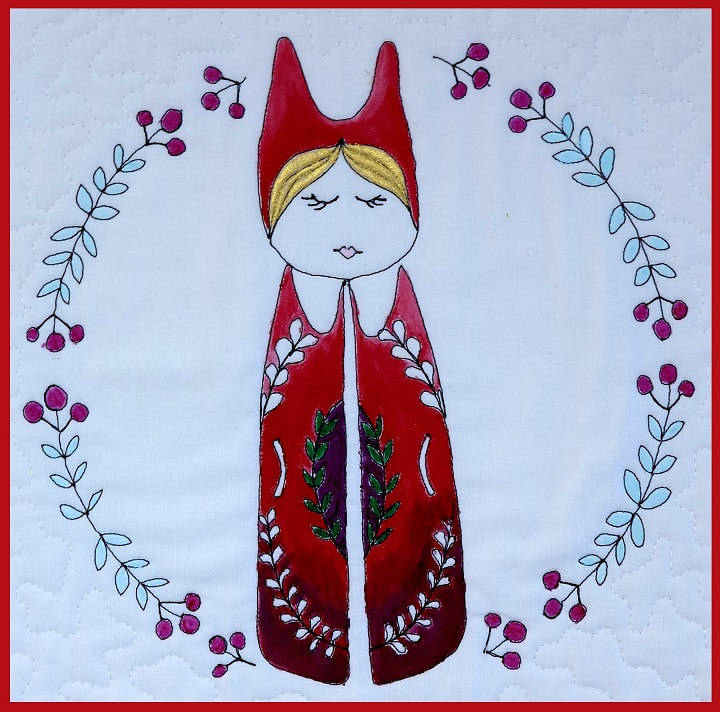
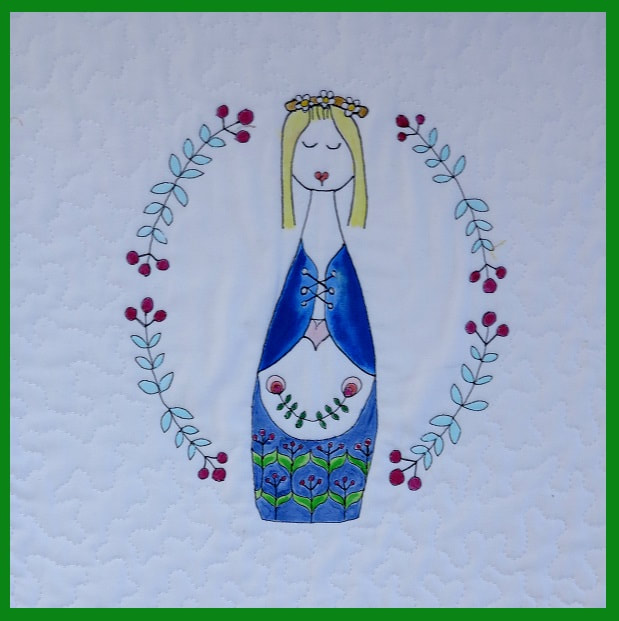
These are the dolls that started my new series of doodles that resulted in the Doodle doll quilt. But of all the dolls in thie mini series, I think the Skandinavian inspired dolls are my favourite. Here are 3 of them. At the workshop we will be making square panels similar to those above, created by 'drawing' the design onto plain white fabric just using black thread. Once the design is stitched we then fill it with free motion quilting stitch and finally use fabric paints to colour them. Depending on how fast you work it is possible to complete 3 of these panels during the day. The panels can be used in lots of ways - to create a bed runner or a larger quilt, as a panel on a bag, as a wall hanging - or even stitched onto clothing.
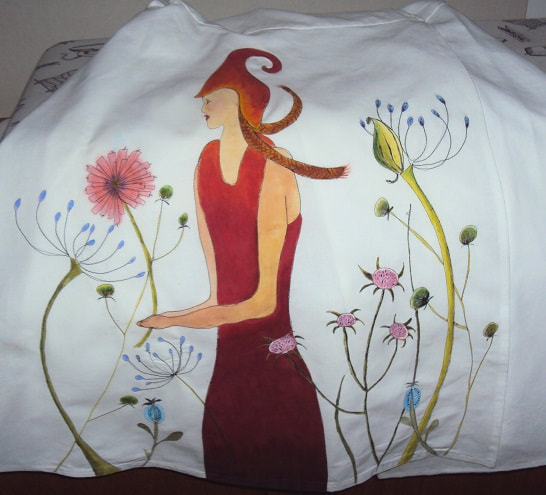
Of course, you don't need to go to a workshop to create you own doodles. On paper or just draw an outline and start to fill it with repeated shapes. Once you have your design, set your sewing machine for free motion quilting and 'draw' your design with stitched thread. I paint my finished designs with fabric paint, but they also look very striking just left in black and white.
Why not have a go? If you are interested in coming to the workshop you can contact De at Midsomer Quilting https:midsomerq.com/. You can also see more on my website by clicking the button below Thanks for reading.
If you haven't ever said it, I'm sure you have heard someone else say it....
"I can't do free motion quilting. It is so difficult."
Well, I can honestly say that is a load of rubbish! And here is the proof. Last Saturday I was with a group of ladies at Midsomer Quilting who are the proof that free motion quilting is not only easy to master, but lots of fun too. Some were complete newbies to FMQ - and others had dabbled a little and a few were already confident. Just look at what they made - I bet you can't tell who had never done this before!
Gill's brilliant and totally original golf playing bird has just scored a birdie. Get it?!?!?!?! I think he is wonderful.
We had quite a lot of Dodos (incidentally, my favourite Doodle bird
Robby Robin and his Christmas tree
So as you can see, a lot of very successful free motion quilting was stitched and a lot of concentration and fun was had. The great thing about making these lovely birds is not only do they look wonderful, but they are great at boosting confidence with free motion quilting. By working on a square of fabric of around 12" it is easy to keep control as you do not have to manage the bulk of a whole quilt in the throat of the machine. You are also free to experiment and try out lots of different patterns.
Still don't think you can free motion quilt? Why not just have a go? If you would like some tips on how to be successful with free motion quilting take a look at my blog post from back in December 2014. You can read it here. I hope it helps! (Just one thing has changed since I wrote it - I no longer drop the feed dogs when I free motion quilt, - you could give it a try to see if you find it any easier). If you give it a try, I'd love to see what you do. Thanks for reading
Trying out Terial Magic
To see how it worked I took a few pieces of cotton quilting fabric from my scraps bag and sprayed them until they were moist. Following the demonstration on the Terial Magic website (click here) I put my fabric into a small tub and sprayed it. Once it was quite moist I squished it about a bit to make sure the liquid had penetrated throughout the whole piece, and then squeezed out the excess liquid (I put this back into my bottle). After smoothing it out I left it to air dry on a flat surface for the 15 minutes stated. After this time it was still very wet - it was a winter's day in the UK, so not very warm - so I left it for around another 20 minutes of so, by which time it was only just damp. Obviously the temperature plays an important part in this, so use your judgment. NOTE:At this stage the fabric was slightly stiff, but not noticeably different to when I had started. I then took the fabric pieces and ironed them, as per the instructions. I used a hot iron directly on the fabric (no ironing sheet) and the heat obviously had an effect, as the fabrics became smooth, very crisp and stiff. There was no residue on the iron and no flakes or 'gunge' on the fabric.
According to the blurb that comes with Terial Magic these are two of the drawbacks of using starch. Another thing they mention is that insects like to eat the starch and therefore your fabric. I must say that I have never noticed this, but I am not a regular 'starch user'(!) so I am not able to say whether this is an issue or not. They also say the stiffener in Terial Magic is not edible by insects - so if this is important to you it may influence your choice. What to do with this stiffened fabric The stiffened fabric was interesting. It folds crisply - just like thin card, so if you have a project that needs firm creases or needs to stand without support this may be a good product to use. I tried a few origami ideas...
The crispness of the fabric made it perfect for folding techniques. I can imagine it would also be particularly good when piecing small, fiddly shapes or pieces cut on a bias.
Origami links for the above For the folded dress, click here For the yo-yo hexie, click here Next I tried some needle turn applique
And then I tried stitching some raw edged leave to a piece of fabric
The stiffness of the leaves made it easy to position them on the fabric and the raw edges, once again, did not fray.
The blurb also says you can use the stiffened fabric for machine embroidery without and further stabiliser. As I don't have an embroidery unit I can't let you know about that - but if anyone does and has experience of this product it would be good to find out if the claims are true.
So - do I like Terial Magic? Yes, I think I do. It is similar to starch, but has a nicer feel, doesn't gunk up my iron and the treated fabric is nicer to stitch. I don't often need fabric that is stiff or crisp, but when I do I think this product would be a useful addition to the tools I already use. Thanks De - when I run out I will be buying another bottle from you!
Now for those Doodle birds! These are a few pictures I took during the workshop at Midsomer quilting last weekend. Brilliant aren't they?
And how about these two amazing Doodle Poodles? My thanks to Chris D who was so inspired when she got home that she made these two fantastic pieces. I just love them! Thanks for sharing them, Chris, I think you have cracked free motion quilting!
I hope you have enjoyed seeing all this brilliant free motion work. Thanks for looking.
Free motion quilting samples - practice makes perfect, but what to do with all those samples?28/9/2015
In a few weeks time I will be teaching my free motion quilting workshop at Midsomer Quilting not far away in Somerset.
I haven't taught this workshop in the UK before, so to celebrate I have made some new samples of my favourite birds and created some nice things with them. As you may know, I always like to make samples of things before I start a bigger project. I like to see how new fabrics or paints behave before I launch into a big piece and become familiar with how they behave. It may seem like an extra step in an already long process, but time and again I have been glad I did spend the time exploring and experimenting. I personally find it saves a lot of time and frustration in the long run!
Using some of the sketches I made of the flamingos as a starting point, I drew a new, quirky flamingo and filled it with some doodled patterns. I then transferred it onto a piece of plain white poplin fabric and free motion stitched the whole thing. Once it was finished I had fun using my newly mixed fabric paints (using acrylic paint and fabric medium, as I explained last week) to finish the quirky doodled flamingo.
The paint and fabric medium mix worked very well. As well as making the paint soft, buttery and easy to work with, it also extends the drying time of the paint too, meaning I have more time to blend colours together to get that nice graduated look. This is how the new flamingo turned out.
Which brings me on to the next point..... what do I with all these samples? It is an important thing to consider. I live in a fairly small house, and space to store things is at a premium. I would love to have the equivalent of a walk in wardrobe of fabrics, equipment, sketchbooks and samples - but until I win the lottery and buy the old textile mill that is in my town, and convert it into a home and studio (pipe dream!!) I need a better plan. So, what I try and do is convert them into something both pretty and useful. Cushions, sketchbook covers, bags, storage pouches and so on. You get the idea. And this is what the little flamingo has been converted into. I am planning on storing my samples for the doodle bird workshop in it - so everything will be neat and tidy and all in one place. How about that for organised?! My thanks go to Kati Spencer, whose excellent instructions I followed to make the bag. You can find Kati's excellent tutorial here on her blog 'from the blue chair'. Here is the link, should you wish to make a similar bag. http://www.fromthebluechair.com/2013/03/messenger-bag-supply-list.html
I must say, I am really looking forward to running the Doodle Bird workshop in November. I have 16 new full sized Doodle Birds to choose from, and several smaller bird projects for those who are new to free motion quilting. As well as developing or improving your free motion quilting skills, you will create beautiful quilted squares which you can transform into other projects, like the bag above, or perhaps a cushion or book cover. If you get completely hooked you could even make all 16 and turn them into a bed quilt - something a bit like this.
The workshop is on the 14th November at Midsomer Quilting. To find out more either contact De de@midsomerq.com or myself, or see the brochure on the workshop by clicking here.
Thanks for reading. Happy doodling!
Fabric paints two ways: ready made fabric paints or mix your own....
One of the ways I like to add colour to fabric is with fabric paint. There are lots of brands on the market, all at varying prices.
'Pebeo', 'Jacquard', 'Dala' and 'Golden' are brands that are readily available. They each give bright, long-lasting colour, leave the fabric with a soft hand (that is, not a stiff or plastic-like feeling on the surface of the fabric), can be heat set easily with an iron and are washable. I have lots of all of these brands and find them equally good. So far, so good. The main problem I find with all of these is that they are mostly sold in little pots and can work out to be rather expensive. Happily, however, there is an alternative. You can purchase something called FABRIC MEDIUM to mix with ordinary artists acrylic paints which transforms them into fabric paints. Again, there are lots of fabric mediums on the market. In the past I have used 'Golden GAC 900', 'Dala Waterproofing Medium' and 'Liquitex Fabric Medium' very successfully. One of the major benefits of using fabric medium is that you can mix it with acrylic paints - and these come in a huge variety of colours, qualities and sizes and are readily available online and on the high street and even in many large supermarkets. For me, this means I have so much more choice. Another benefit is simply down to cost. Generally speaking, artists acrylic paints are not very expensive and come in a range of sizes from small tube to bucket-sized. Prices vary according to whether you buy student quality, which I find is usually fine, or artists quality which has more pigment and often goes further but is more expensive.
Which brings me on to why I am talking about this today.
I ran out of fabric medium on Friday!
Here are some of the samples of doodle quilting that I painted The final thing you need to do when using paint on fabric is to fix it in some way. If you do not fix the paints you risk them coming off or running when the fabric becomes damp or wet for any reason and after all your work that is probably the last thing you want - so do not forget this last and vital step. It is usually as simple as ironing the fabric for a certain length of time at a given temperature. There are other ways, however, which I have summarised below. Just be sure to always read and follow the instructions on the particular product you are using.
Thanks for reading.
Doodling v Drawing Let's just clear one thing up. Doodling is not the same thing as formally drawing. A doodle is a drawing made while a person's attention is otherwise occupied. So, if I sit down and focus on just drawing, then that is a drawing. To be a doodle I am drawing, but not really thinking about it. Doodling has a bad reputation Now - when I was in school, doodling was severely frowned upon as being a waste of time , or even worse, proof that you were not concentrating. How wrong they were!!! Recent studies by Professor Jackie Andrade, of the School of Psychology at the University of Plymouth have come to my rescue and give scientific proof (obviously the best kind) that doodling is NOT the product of a wandering mind, but, in fact, the complete opposite! Doodling is not my mind 'daydreaming' but rather a way to force it to stay focussed on the present. In fact, much like chocolate and red wine, doodling has benefits. Who knew?
So what, exactly, are these benefits?
Doodles and Quilting
Doodle Birds Which brings me on to my latest project: Doodle Birds. I am actually revisiting a technique which I tried out about 5 years ago, early on in my ventures into Free Motion Quilting. I decided I wanted to get better at FMQ - and there is nothing like a bit of practice to see improvements. It all began with a doodled bird.................... and this is where I have ended up. It takes time and patience to create a Doodle Bird, but it has improved my FMQ enormously. If you think you would like improve your FMQ then why not give one a try? I will be teaching a workshop at Midsomer Quilting in Somerset on 14th November, but why wait? Get out a pen and some scrap paper, phone a friend and go for it! What have you got to lose?
|
|