CLAIRE PASSMORE blog archive

Agar and gelatine based Gel plates for fantastic mono printng fun

21/12/2015

 
I recently ran two workshops at Midsomer quilting covering a range of exciting techniques to add surface design to fabrics. Both days were great fun - if a little hectic - and lots of beautiful fabric samples were made.

One of the techniques we covered was monoprinting using gelatine plates. I wrote a blog quite a long time ago covering how to make your own reusable 'long-life' gelatine plate (I will put my recipe for a gelatine plate further on in this post), but as I had two ladies at one of the workshops who preferred not to use a product created derived from pork / beef I have been busy trying to perfect a non gelatine based plate. Messing about like this appeals to the chemist side of me, and along the way I have discovered some very interesting things - a few of which I will share for those who are interested!


Picture
Using gelli plates to make mono prints on paper and fabric at Midsomer Quilting
I also received a lovely message from Sue who also attended one of the workshops. She had a problem buying regular gelatine in her local supermarket - they only had Vege-gel in stock.  This is a carrageenan based product - something I can't find here in New Zealand (at the moment!) so for the time being this is my agar agar based recipe. (Note: agar agar is known by many names; China grass, Faluda, Japanese Moss, Ceylon Moss and Bengal Isinglass to name a few) I have done some research into Vege-gel and have some ideas which I list further down that you could try if you want to make a vege gelli plate. I would suggest trying out a just a small quantity  and see how your plate turns out.
​
Picture
Agar-agar powder - I bought mine in my local Korean food shop - but I have seen it in Waitrose, Lakeland, Holland and Barrett and in many small food shops which sell spices etc.
Picture
Carrageenan based gel. This brand (there are others) is more widely available in the big supermarkets - but I have not had experience of using it


My agar agar based gelli  plate recipe

Ingredients:
50g agar agar powder
600ml water (approx 2.5 cups)
2 teaspoons of salt
225ml glycerine (approx 1 cup)

(with these quantities I made one 18cm x 18cm gelli plate and two 18cm x 10cm gelli plates)


 INTERESTING STUFF

Both agar agar and carageenan are derived from red seaweed. On food labels is also known as E406

My 'Telephone Brand' agar is pure agar. No added anything. A little goes a L-O-N-G way!

Vege-gel is a commercially created product made for cullinary use. It is a mixture of carageenan, locust bean gum and other substances. The gum helps to stop the gel being so brittle, and stops the prepared gel from 'weeping' - an important difference from the pure agar agar powder.

A special property of agar is the large difference between the gelling temperature and the melting temperature. (known as hysteresis).
Although it melts at 85 °C (185 °F) it solidifies from 32–40 °C ( 90–104 °F) so – it won’t melt on you on a hot day like gelatine can. A useful property in warm climates.


So - this is what you do...........................
​
Picture
Gather together the ingredients and a few utensils.

Agar agar, glycerine, salt, water
Saucepan, tray to mold your gelli plate, whisk, teaspoon, spatula.


I have added salt to my recipe as I wanted to increase the pH. I read that pH noticeably affects the strength of the agar gel; as the pH decreases, the gel strength weakens.  Having tested this out I have noticed the addition of salt really makes a much less brittle plate.
Picture
Mix the salt into the water and then add the agar agar, whisking with a balloon whisk to make sure all of the powder is wet and incorporated. You don't want any dry lumps on the bottom or around the edges.
I left mine to sit for about 5 minutes to make sure it was nicely mixed and the water absorbed.
Next, put it on a medium heat and stir gently. You will feel the mixture begin to thicken and also turn a little more transparent. (This is difficult to see from the pictures.)
 

A major difference between agar agar and gelatine is that you must heat agar agar to around 90
 °C and boil for 2 minutes before it creates a decent gel. 
Picture

For our purposes we want to plasticise it - and for that we need to stir in glycerine. 

Not only does the glycerine act as a plasticiser, it also acts as a humectant, stopping the agar agar drying out. 
You could now leave the mixture to set. However, I would not recommend it. At this stage the agar agar will be very brittle. Put a little blob on the work surface or a plate and allow to cool - you will see what I mean. It is the weirdest thing - a 'crunchy' gel! If you sweeten it now you can use it for a jelly based desert. ​
Picture
Picture
​Once the glycerine is thoroughly mixed in, pour the hot mixture into your mold. Something with a very smooth, flat base (such as a baking tin or flat bottomed pyrex bowl) is ideal. This tray has a tiny plastic circle in the base, left from when it was molded, so isn't perfect, but I don't mind that much.


​
After about ten minutes gently ease the set gel away from the edges of the container. It will not feel elastic the way gelatine does - but it does have a soft and slightly giving feel.
Then simply turn the container over and allow the gelli plate to fall out onto your hand.


Agar agar sets at room temperature within a few minutes and doesn't need to be put in the fridge at all.

Gelatine needs at least an hour or two to set in a cool place.
​
Agar agar plates do seem to 'weep'. This is known as syneresis. If you can get hold of some Locust Bean Gum (also known as carob gum or E410) a small amount of this is said to stop the problem. I haven't been able to get any - so I am unable to comment. 

​
So - what if you have the sachets of Vege-gel, the Carrageenan based gel?

As I can't get the Vege-gel I can only make some educated guesses, but it sounds promising doesn't it, as the locust bean gum is already in there - so hopefully no syneresis!  

So, this is what I would do.................

Make a small batch with just one packet of the gel using the following recipe as a starting point, and see how it turns out.

1 sachet of Vege-gel powder
200 ml water (approx 3/4 of a cup)
80 ml glycerine (1/3 of a cup)

Make it in the same way as the agar agar plate - making sure you do not add the salt. I can't find any evidence that salt will help - so start by leaving it out. Leave it to set and see what you get.

Use this as your starting point, and then tweak the recipe according to what you see. If the plate is too brittle, try remelting it and adding 50 to 100ml more water and see what happens. By remelting and making small changes you can tweak the recipe to see what works best, then make a bigger plate with your preferred combination of ingredients.

I would love to hear if anyone does try this - as you know, I am a big believer in sharing information - it can only benefit all of us!


​Carrageenan has an unusual reaction when mixed with locust bean gum - 
Kappa carrageenan ( a particular type of carrageenan) shows an unusual synergism with locust bean gum in aqueous gel mixtures. The interaction is marked by a considerable increase in the gel strength, an improvement in water binding capacity, a change in gel texture from brittle to elastic, and a reduction in the degree of syneresis (that is the expulsion of liquid that I am seeing with the agar agar gelli plate). I guess that is why Dr Oetker puts it in his little packets!


             And now for my new and improved gelatine based gel plate recipe..............

​
Ingredients:
40 g gelatine powder (250 bloom)
100 ml warm water 

175 ml glycerine
160 ml Surgical spirit *
(also known as rubbing alcohol or isopropyl alcohol)

If you are unable to purchase isopropyl alcohol, you can substitute plain water. There is very little difference in my experience, but if I can get it I add the alcohol - maybe I am wasting my money!!
Picture

To make the gelatine plate, dissolve the gelatine powder in the water and stir well. Allow to sit for around ten minutes to make sure the gelatine absorbs the water fully. Next, put it into the microwave and zap for 30 seconds of so. BE CAREFUL - this mixture will be hot and WILL BURN YOU. Take it from the microwave and stir in the glycerine and surgical spirit (if using). Stir very well, then return to the microwave for a further minute of so. Keep your eye very carefully on the gelatine mixture. You do not want it to boil. If you do it will not gel properly. 

You are aiming for a clear, golden liquid which has the same consistency as runny honey.

Once it has reached this stage take it carefully from the microwave and pour it into your mold. Place on a flat surface and allow to cool before putting it into the fridge. It is likely to take at least an hour to set - maybe more. 

Once set, remove from the fridge and gently ease the edges of the gelli away from the container. It should feel bouncy and rubbery, and should not want to tear or rip. Turn the container upside down and ease the plate out onto your hand.
​


​MORE INTERESTING STUFF


Gelatine is derived from collagen and is extracted from the skin, bones, and connective tissues of animals such as domesticated cattle, pigs and fish. It is an ingredient in many of the foods we regularly eat. By itself it is flavourless and colourless.

Also known as E441 on food ingredient labels.

Gelatine dissolves best in warm to hot water which is why synchronised swimmers use it to hold their hair in place whilst performing. The cold water does not dissolve the gel! 

The strength of gelatine is measured in a unit called BLOOM. The higher the number, the stronger the gel

Dr Oeker brand  has a rating of 250 bloom.
Knoxx has a rating of 225 bloom.

Sugar, milk and alcohol increase the strength of gelatine (which is why I add the alcohol)


Re-forming the plates
​

One of the things I like about these home made gel plates is that once they get a bit grubby, scratched or otherwise not in tip-top shape, you can cut them up, melt them and form them into a new plate. This also means you can make a big one into several smaller ones, or vice versa. 
Picture


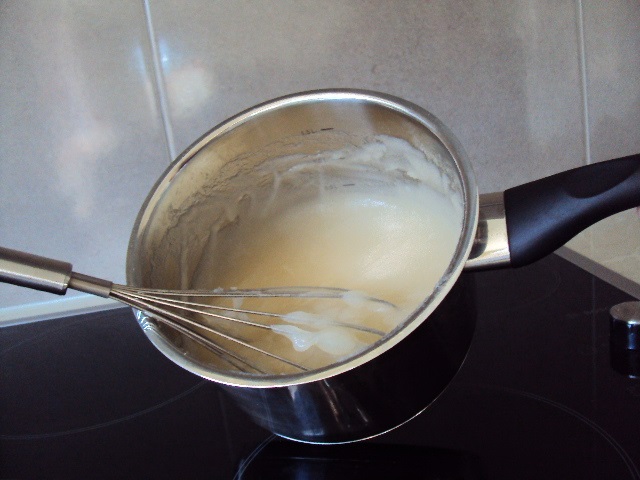
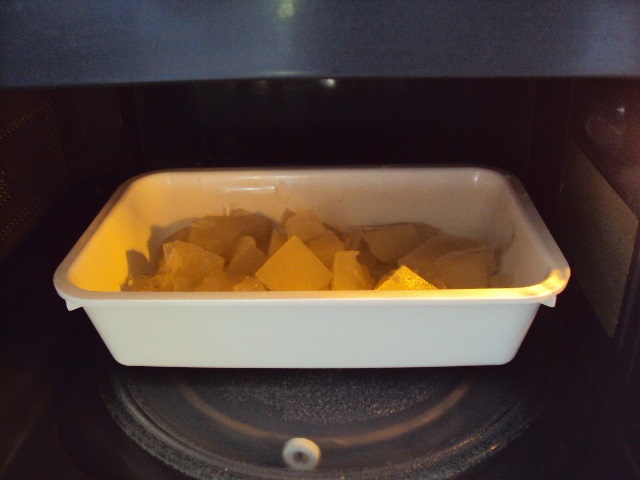
Cut or rip the gel plate you wish to recycle into chunks. This helps speed up the melting process.

Put it into a microwave bowl and heat for around 1 to 2 minutes on full power (I have a 750W microwave). Keep your eye on it and give it a stir after a minute. If you need to add more time do it in short bursts and watch it at all times. You want the mixture to just bubble up but not over the edges.
If it spills over, don't wipe it up - just allow the hot gel to cool then peel it off and stir it back into your molten gel.
Picture


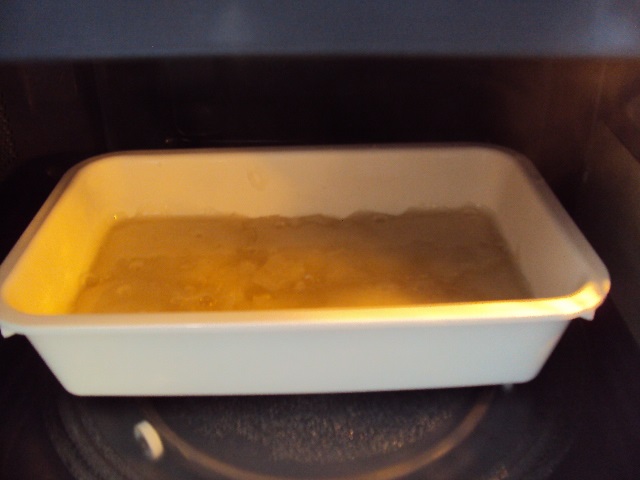
This is almost ready - it is beginning to bubble. Keep your eye on it though - it foams up quite quickly at this stage. 

Also - TAKE CARE - this is hot - at around 90 °C, so it will burn you.

Once ready take it out of the microwave and pour into a new mold. 


​                    Suppliers you may find handy to know about


​


UK


​
​

​​Glycerine and gelatine from MM ingredients

http://mmingredients.co.uk/
​
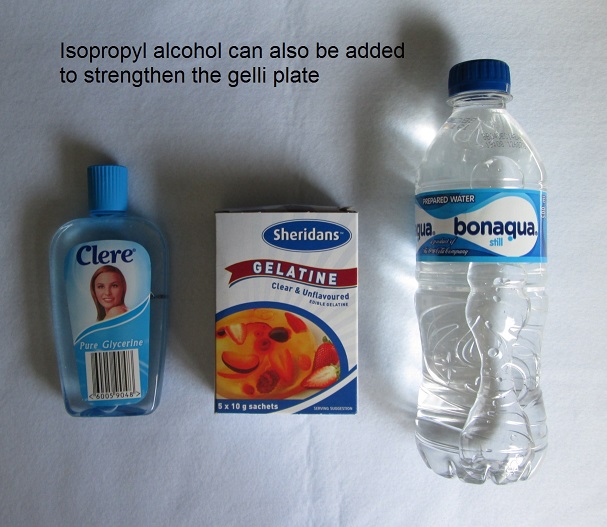
Glycerine BP (that means pharmaceutical grade) can a be bought more cheaply in chemists (such as Boots) than in supermarkets where you find edible grade glycerine. 

Isopropyl alcohol - also commonly known as 'surgical spirit' or rubbing alohol in the UK. Don't bother with Boots for this one - the thought police have been there and they just give you 'the look' when you ask for it. Last time I tried Superdrug still sell it.


​New Zealand


Glycerine and Isopropyl alcohol from Pure Nature
http://www.purenature.co.nz/
​
Gelatine I buy at the supermarket


I hope you will find some of this info useful should you wish to try making a gelli plate for yourself. I would love to hear if you do try any of the recipes - and have any feedback . They really are quite fun to use and you can make some very beautiful papers and fabrics using them. I will let you know how my agar agar plates hold up - I don't intend putting them in the fridge - so I will see if they go mouldy or not.

Thanks for reading.

​
Please feel free to share my website or blog with your friends by using the buttons to the right. If you would like to receive an e mail each time I post a new blog, please click here. I promise to never send you junk or give your address to anybody else.
Dianna Diatz, Lexington Park, Maryland, USA link
20/10/2016 06:25:18 am

Typed in a question on google, and found your blog.

Both the Gelli plates and Gel Press gelatin plates are vegan.

I thought it would be terrific to make a home-made vegan version into more unsual sizes and shapes.

So your blog gives one lots of food for thought!

I have been working with kid's fun foam to create plates and stamps. Experimenting without any gelatin plates so far, to see what I could do without them!

It may just be time to play with gelatin plates!

Would love to see what other fabric art you do, and to get notices when you post new things for your blog.

Have a good end of the week!

Best regards,

Dianna

Claire Passmore
23/10/2016 03:38:22 pm

Hi Dianna
Thanks so much for taking the time to look at my blog and then write me a message. It is great to know that others find it interesting.
It was quite a while ago that I wrote that post, and have since made some really large plates - and also a few round ones too. It makes for lots of interesting work to vary things in this way.

I too have been using fun foam - both to make stamps and to press onto the gel plates to remove paint before printing. It is good and useful stuff. I haven't used it as a plate - but why not? Something for me to explore!

The interesting thing that I have found is that the agar agar plate did go mouldy after 6 months, but I just boiled it a lot and let it set and it is as good as new. After 1 year the gelatine based ones are still as good as new. In some ways I think remelting them makes them better as they seem to firm up and become less fragile, although they are pretty robust.

Have fun with it all. I'd love to see what you do.

I'm not sure if you looked at my website to see my other work - but here is a link http://clairepassmore.weebly.com/galleries.html to some of it.

I also have a link where you can sign up to have an email sent to you when I post a new blog post too:
http://weebly.us8.list-manage.com/subscribe?u=4a5af39540f5138630cc7d13b&id=d2d1a4ccfa

Best wishes

Claire

VIN DERAMO
31/10/2016 11:59:30 am

Hello Claire
I've been trying to make a plate with your agar agar recipe. It looks okay but it appears to seep water as you said it might. I've managed to order some locust bean gum and wondered if this will resolve the situation and if you had any idea how much and when i should add it. Will it be okay throwing it in as soon as the agar mix has remelted. Still haven't used the plate I wanted to get the mix right first. Thank you for informative page. I tried searching before for a tried and tested recipe for a gelatine free plate but your site didn't come up at first. If you want the link for the locust gum it's http://www.realfoods.co.uk/shop?search=locust%20gum but that's only in the Uk.

Claire
1/11/2016 10:35:28 am

Hi Vin,
Thanks for your message - and I'm glad to know that the agar agar based recipe is working for you - even with the syneresis (weeping) of the plate. In my experience this stops being such a problem after a few days - so I make my plate in advance, then just blot the gel plate a few times in the first week then leave it alone. It doesn't seem to cause any problem when it comes to printing.
Well done on sourcing the locust bean gum. I didn't pursue it in the end as I was able to print with the plates just fine.However, I have read up on the addition of the locust bean gum (also known as carob gum) and it indeed seems that it would work very well to reduce the syneresis. If I were to try it out I would mix it in with the agar agar powder at the start. Here is a link which discussed how to use it. http://www.molecularrecipes.com/hydrocolloid-guide/locust-bean-gum-lbg/.

Given that it is very technical and not directly applicable I would say start of with a little bit of locust bean gum - they talk about up to 1% - which means it probably it isn't going to be a lot. The other thing I have discovered is that remelting the plate in the microwave seems to improve its texture - so you have the flexibility to add more at a later date if the small amount doesn't work first off.

Please do let me know how you get along with it - I'd love to know!

Good luck and best wishes

Claire

VIN DERAMO
1/11/2016 02:30:25 pm

Thanks Claire for taking the time to reply. i will leave it for now before adding the gum.Can't wait to have a go with it now.

Denise Gault
29/4/2017 03:56:14 pm

Thanks for your article.
I had bought agar agar for desserts but didn't like the type of jelly.
It was also not very good at setting with the blackcurrant as I had thought it would be.
So having read this and thought about it I went ahead.
Surprisingly used one and a half paints of glycerine..not much left of my original bottle now!
I made a big plate and it is perfect apart from the few scanned bits from the bottom of my saucepan which got mixed through the final set.
But I am really chuffed with it and it is perfect!
Eventually when I reform it I can filter off the scanned bits!!

Carol Lander
30/5/2017 07:13:39 pm

I love the sound of making a veggie plate, thankyou so much!

Ruth
7/4/2018 12:16:37 pm

Hi Claire! Delighted to find your blog as I had some sticks of agar in my cupboard for years and couldn’t buy gelli plates here in Dubai. So having used your excellent instructions I’m experimenting now and will let you know the result. 😀

Claire Passmore link
7/4/2018 04:04:22 pm

Hello Ruth
How great that you found my blog post about using the agar agar to make printing plates. I hope they were a success and you have finally found a use for your cupboard supplies! The good news is that they don't melt in the heat either, although they do eventually go a bit mouldy, unlike the gelatin type which seem to be able to resist mould.
Once you see some signs of mould just boil it up again - I give it a good few minutes to kill off any germs, then let it set. So far mine has lasted 3 years.
I would love to hear how you get along with them. Good luck!
Best wishes
Claire


Comments are closed.
    Picture
    Picture


    Click here if you would like to receive an e mail when I add a new blog post.
                       OR

    Picture
    Picture
    Picture

    Archives

    June 2021
    May 2021
    April 2021
    March 2021
    December 2020
    September 2020
    August 2020
    July 2020
    May 2020
    February 2020
    December 2019
    October 2019
    September 2019
    July 2019
    May 2019
    March 2019
    February 2019
    January 2019
    December 2018
    November 2018
    September 2018
    August 2018
    July 2018
    June 2018
    May 2018
    April 2018
    March 2018
    February 2018
    January 2018
    December 2017
    November 2017
    October 2017
    September 2017
    July 2017
    June 2017
    May 2017
    April 2017
    March 2017
    February 2017
    January 2017
    December 2016
    November 2016
    October 2016
    September 2016
    August 2016
    July 2016
    May 2016
    April 2016
    March 2016
    February 2016
    January 2016
    December 2015
    November 2015
    October 2015
    September 2015
    August 2015
    July 2015
    June 2015
    May 2015
    April 2015
    March 2015
    February 2015
    January 2015
    December 2014
    November 2014
    October 2014
    September 2014
    August 2014
    July 2014
    June 2014
    May 2014
    April 2014
    March 2014

Powered by Create your own unique website with customizable templates.